Notifications on Conditions
This feature is off by default. Contact your administrator to enable it.
This feature should not be relied upon for time-sensitive, critical operational or asset-related notifications.
Notifications allow the user to receive emails when new capsules are detected in a Condition.
For notifications based on a scheduled Organizer Topic see Scheduling Organizer Topic Documents.
For administrator controls see: Managing Notifications.
The default time interval for notifications is 15 minutes. This is a configurable, so please contact your Seeq Administrator if you require a change to this setting.
How to Set up a Notification
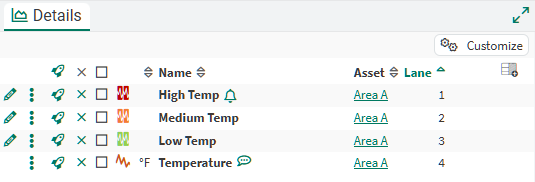
Notifications can be set up on any Seeq condition. After you have made the condition that you would like to be notified on (for help creating conditions see Tools - Identify), in the Details pane, click the i icon to open Item Properties. In the Notifications section, click Add Notification.
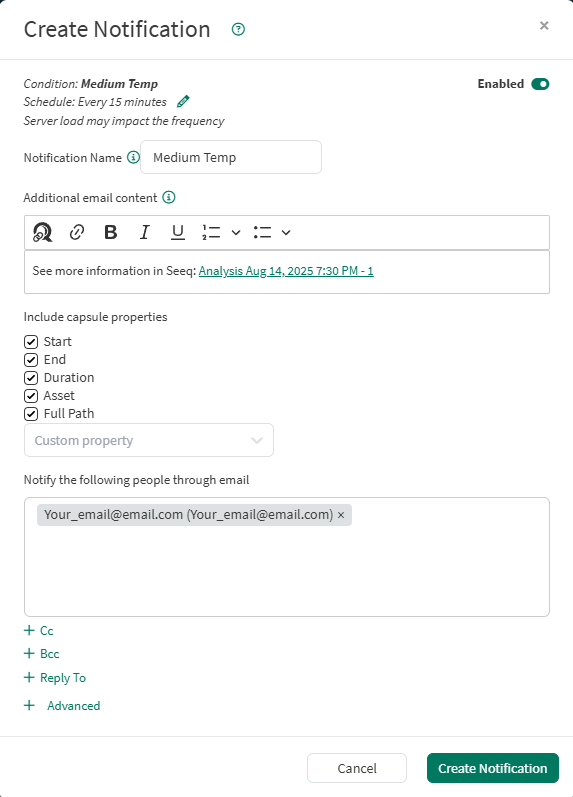
A box will pop up with some configuration options. You can just click Create Notification if you want to use the default settings, or you can edit them.
Enabled: This means Seeq will check for the condition on the frequency specified to the left. If you switch the toggle to Disabled, the notification settings will be saved but Seeq will not check for new capsules and you will not receive emails based on this condition.
Name: This is the name of your notification. It will be used in the subject line of the email.
Include capsule properties: These will be shown in a table in the email. You must include at least one capsule property. The custom property dropdown will populate with any properties that exist on this condition.
Include Link: This link will be included in the email. By default, the View Only link to the current worksheet is included. You can edit this link to instead lead to an Organizer Topic or another web page.
Notify the following people through email: By default, your email address will be included. You can add other Seeq users by typing their name or email address. You can also add non-Seeq users by typing their full email and clicking “New selection” to add them to the list. These emails will be added to the To line. You can expand the Cc, Bcc, and Reply To sections to add people to the respective email lines or customize the reply to behavior of the email.
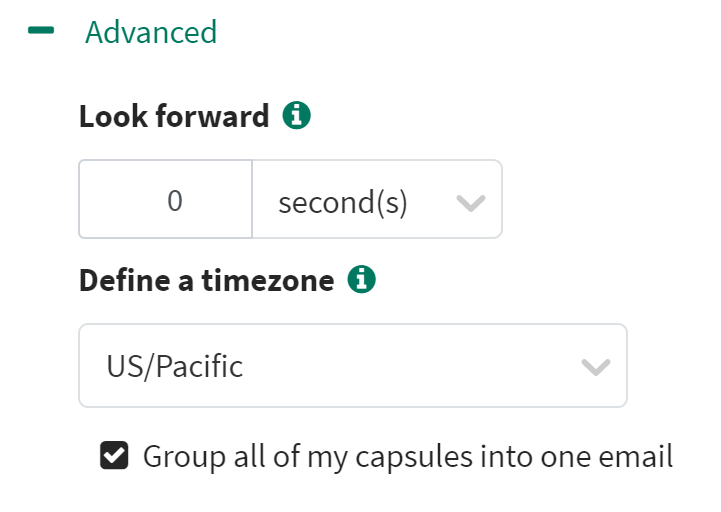
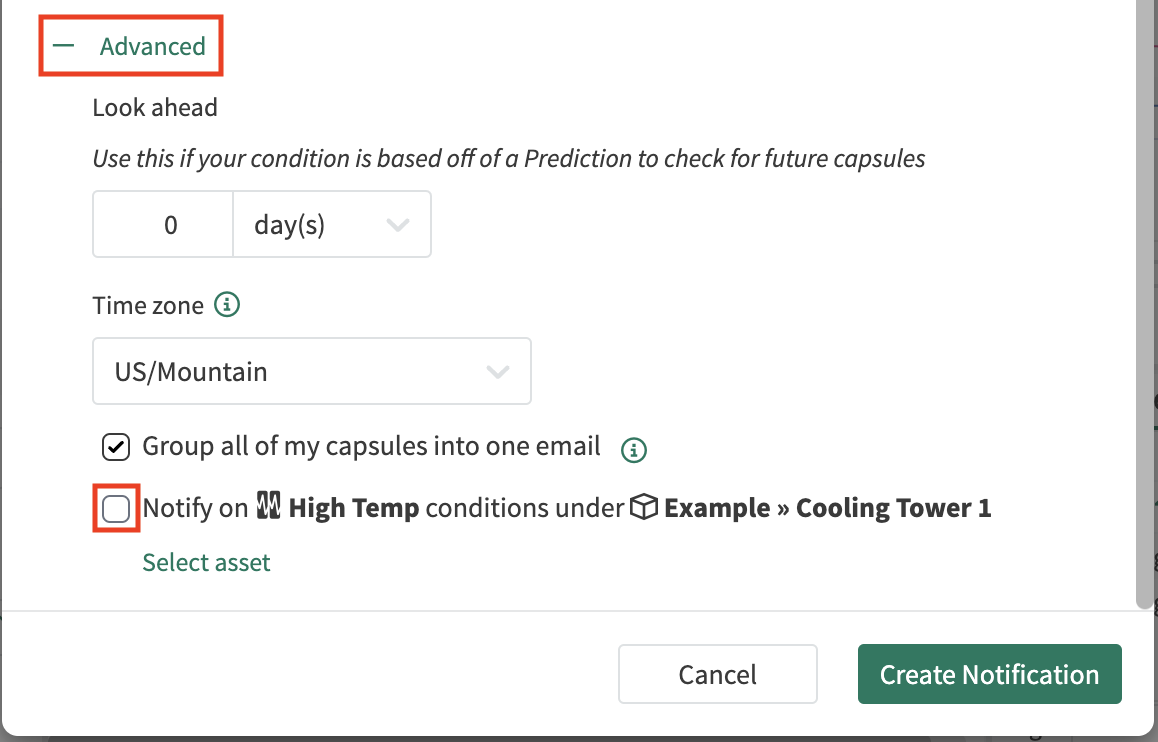
The Advanced section includes a few more settings.
Look forward: This is the amount of time in the future to check for new capsules. This setting can be used if you want to be notified on a Prediction. For more information on how to create a Prediction in Seeq, see Tools - Prediction. The default value is 0 which means we will check up until the current time.
Define a timezone: This is the timezone that will be used for timestamps in the email (i.e. start and end times of capsules).
Group all of my capsules into one email: This setting is used to reduce the number of emails that you receive. This will group all capsules found in one check of a condition into one email so that if there are multiple capsules they will be listed in a table in the same email. Unchecking this box will send a separate email for each capsule found.
Notifications Across Assets
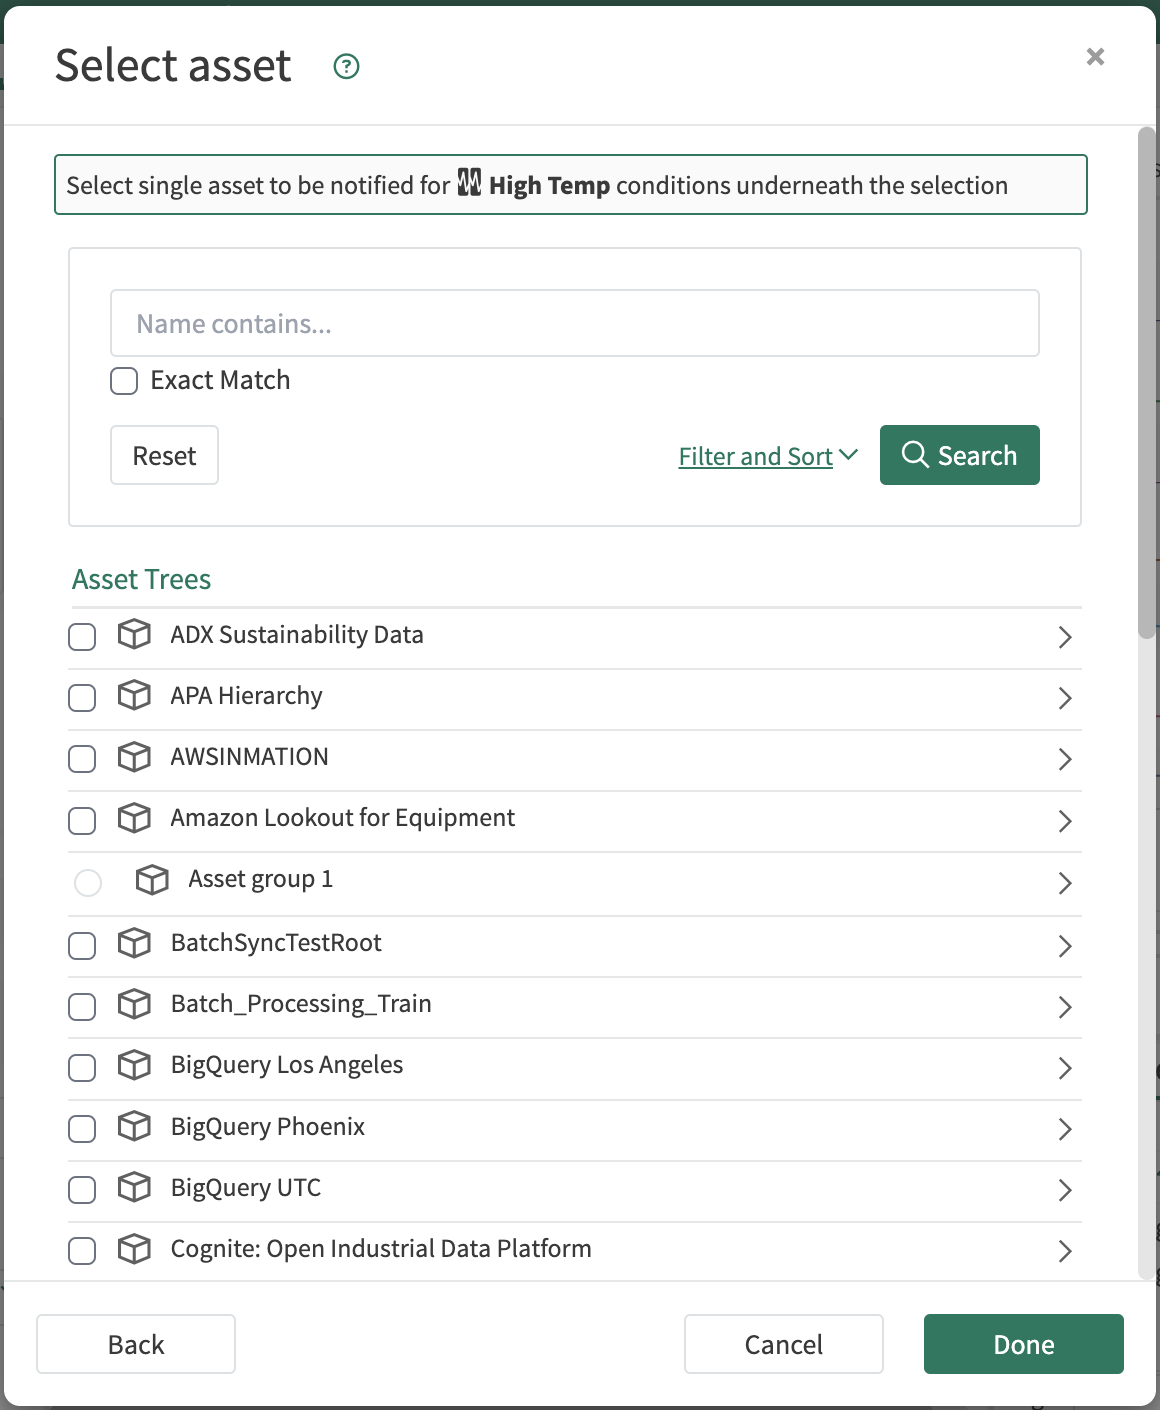
The Advanced section also includes the ability to notify on a condition across an asset tree or group.
Check the box to use the default setting which looks for the condition across all sibling assets.
If you would like to change the asset selection, click “Select asset” to get the full list of assets and choose which level to search under for matching assets that the condition can swap to.

How to edit a Notification
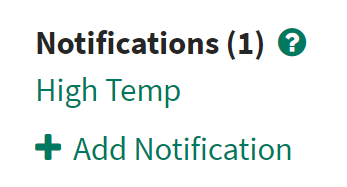
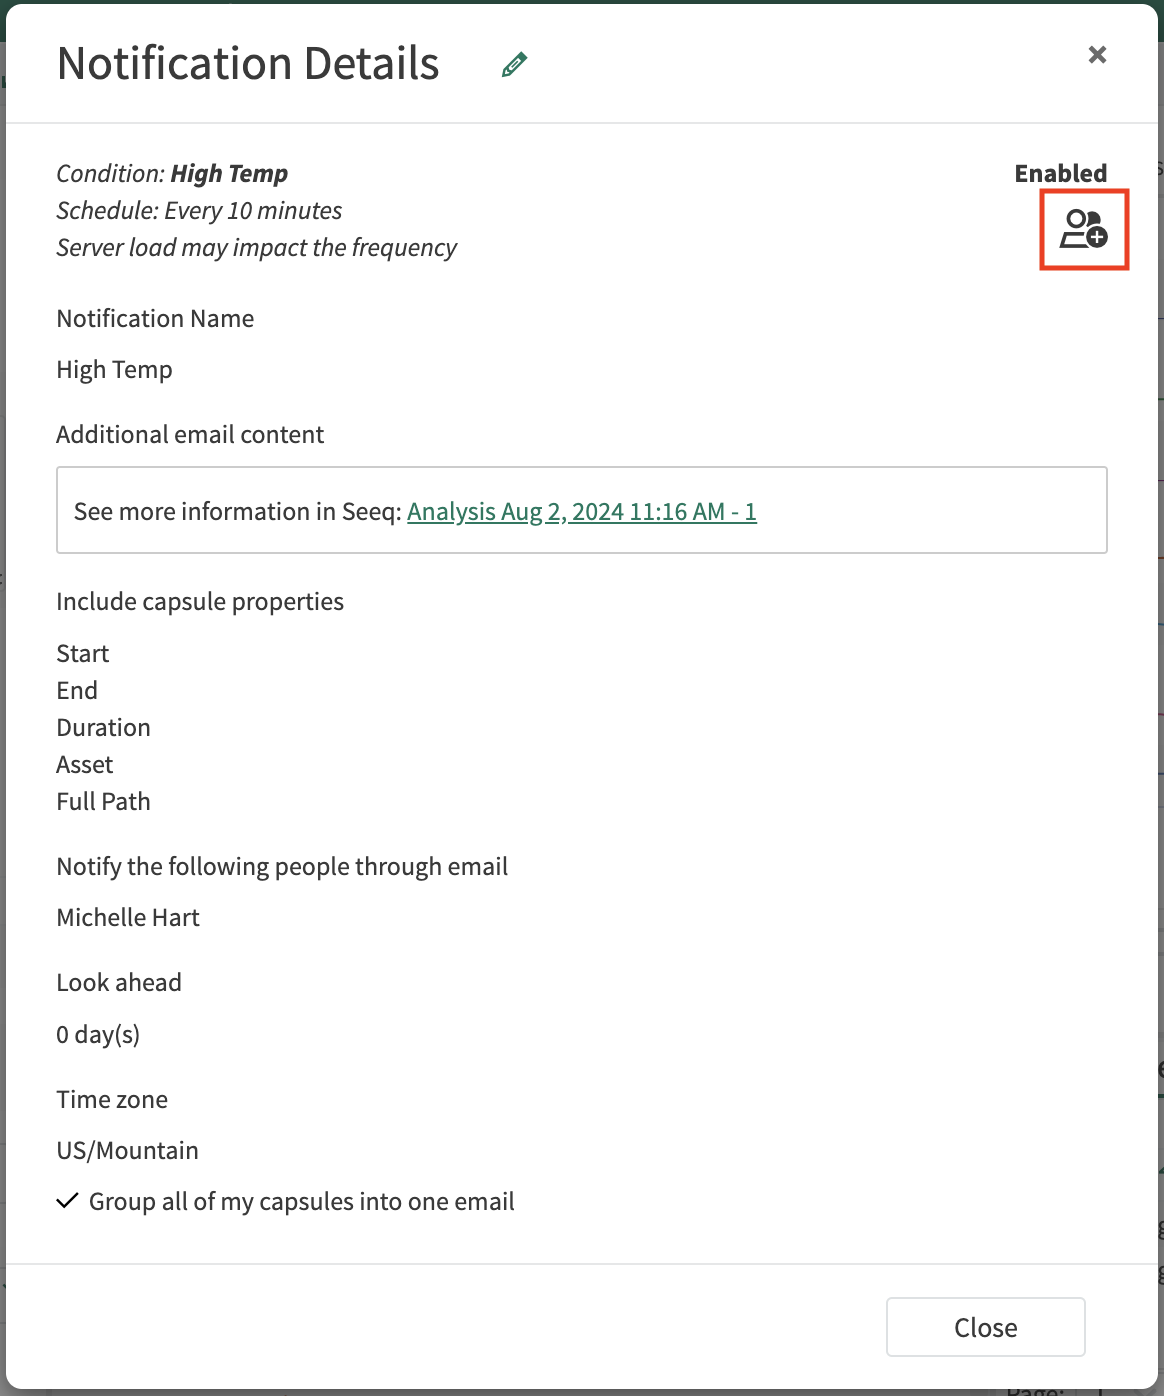
Once you create a notification, you will see a bell icon appear next to the condition name in the Details Pane. You can view the details of the notification by clicking on the bell. Click the edit icon in the header to edit the notification.
You can also access the notifications on a condition through its Item Propeties. You can edit the existing notification by clicking on the name of the notification here.
You can also edit the notification from the Notification Management page (see below).

Notifications Access Control and Sharing
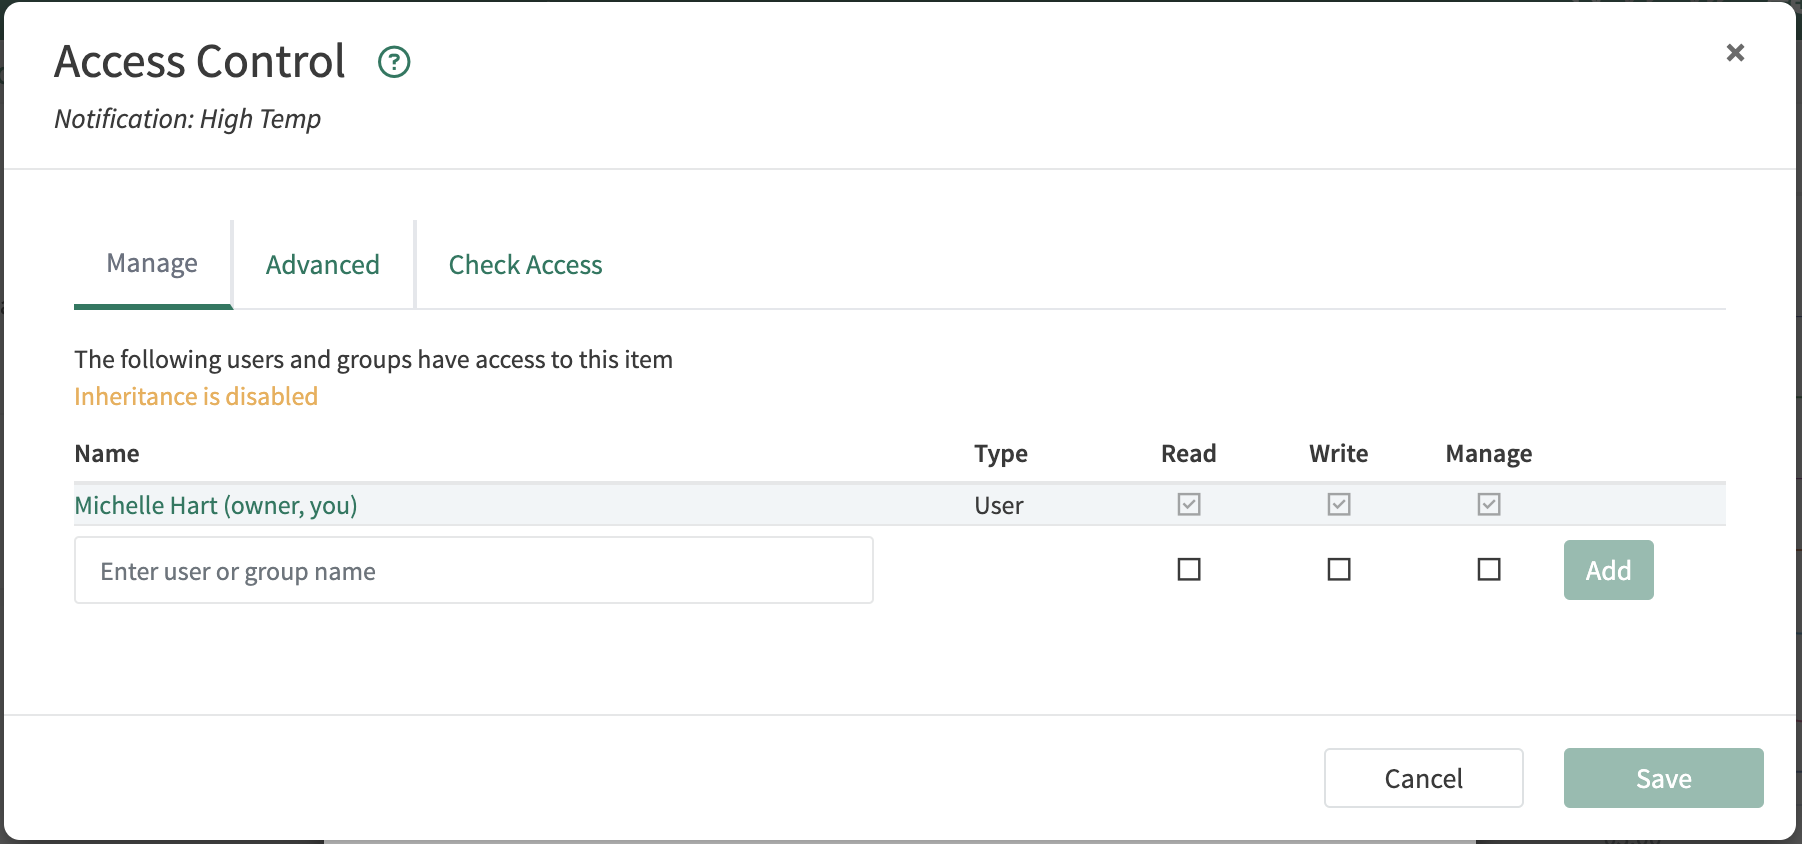
After clicking the bell icon in the Details Pane or the name of the notification from Item Properties, you will see a Share icon which will open up the Access Control for the notification. Here you can control who has access to the notification and what level of access they have.
By default access control inheritance is disabled on notifications and the creator of the notification is the only person that has access to it. You can enable permission inheritance through the Advanced tab if you would like the notification to inherit permissions from the Workbench Analysis.
Notifications with Uncertain Capsules
If a condition emits an uncertain capsule its details will be italicized in the email. The start time, end time, and any property on an uncertain capsule may change. Additionally, if the start time changes, even by a few nanoseconds, the capsule will be included in subsequent notification emails. This is because the start time is the key to identifying the capsule’s identity so if it changes it will be treated as a new capsule. The change of the start time may not be evident in the email because times are rounded to the nearest minute for readability. If only the end time changes then the capsule will not be included in subsequent notification emails.
Often the best solution is to remove or reduce the uncertainty on the condition. This can be easily done by adding the .certainOnly() operator to a condition.
Notification Management
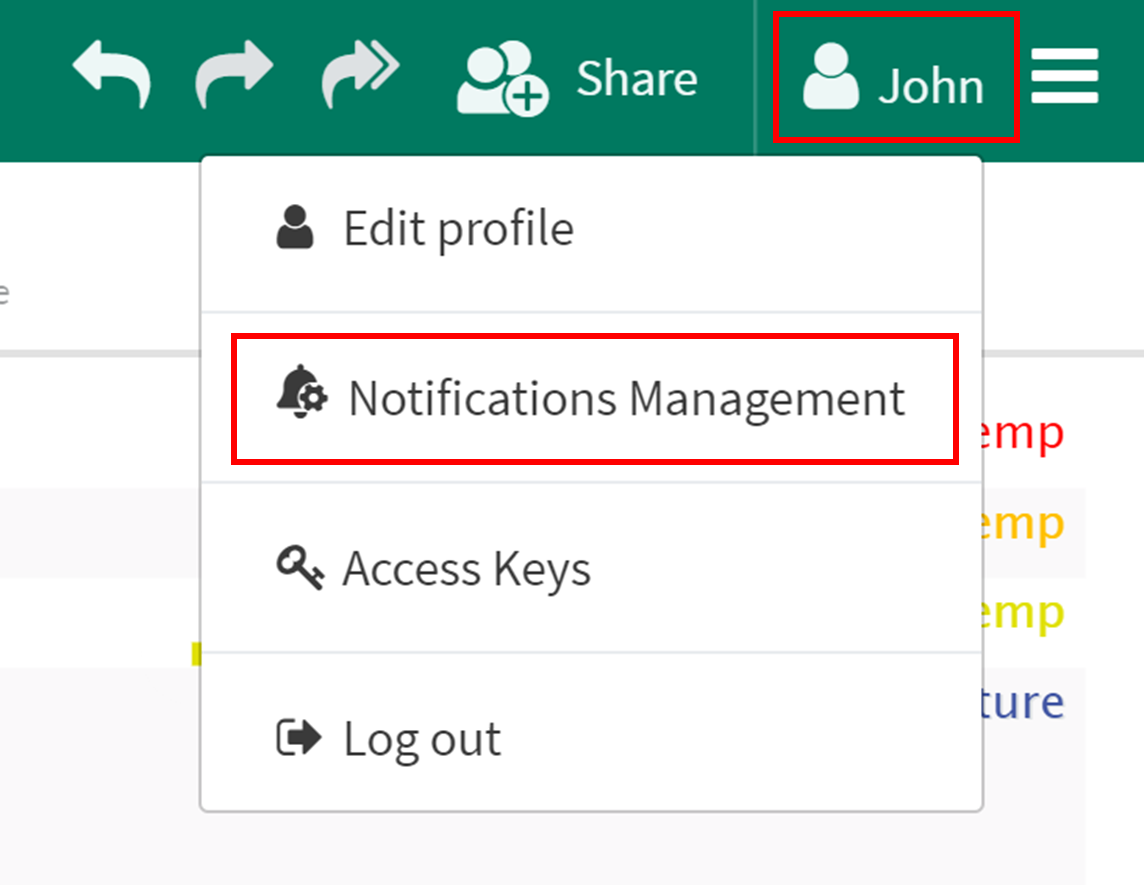
Clicking your name in the upper right corner of any Seeq screen will give you an option to go to the Notifications Management page.
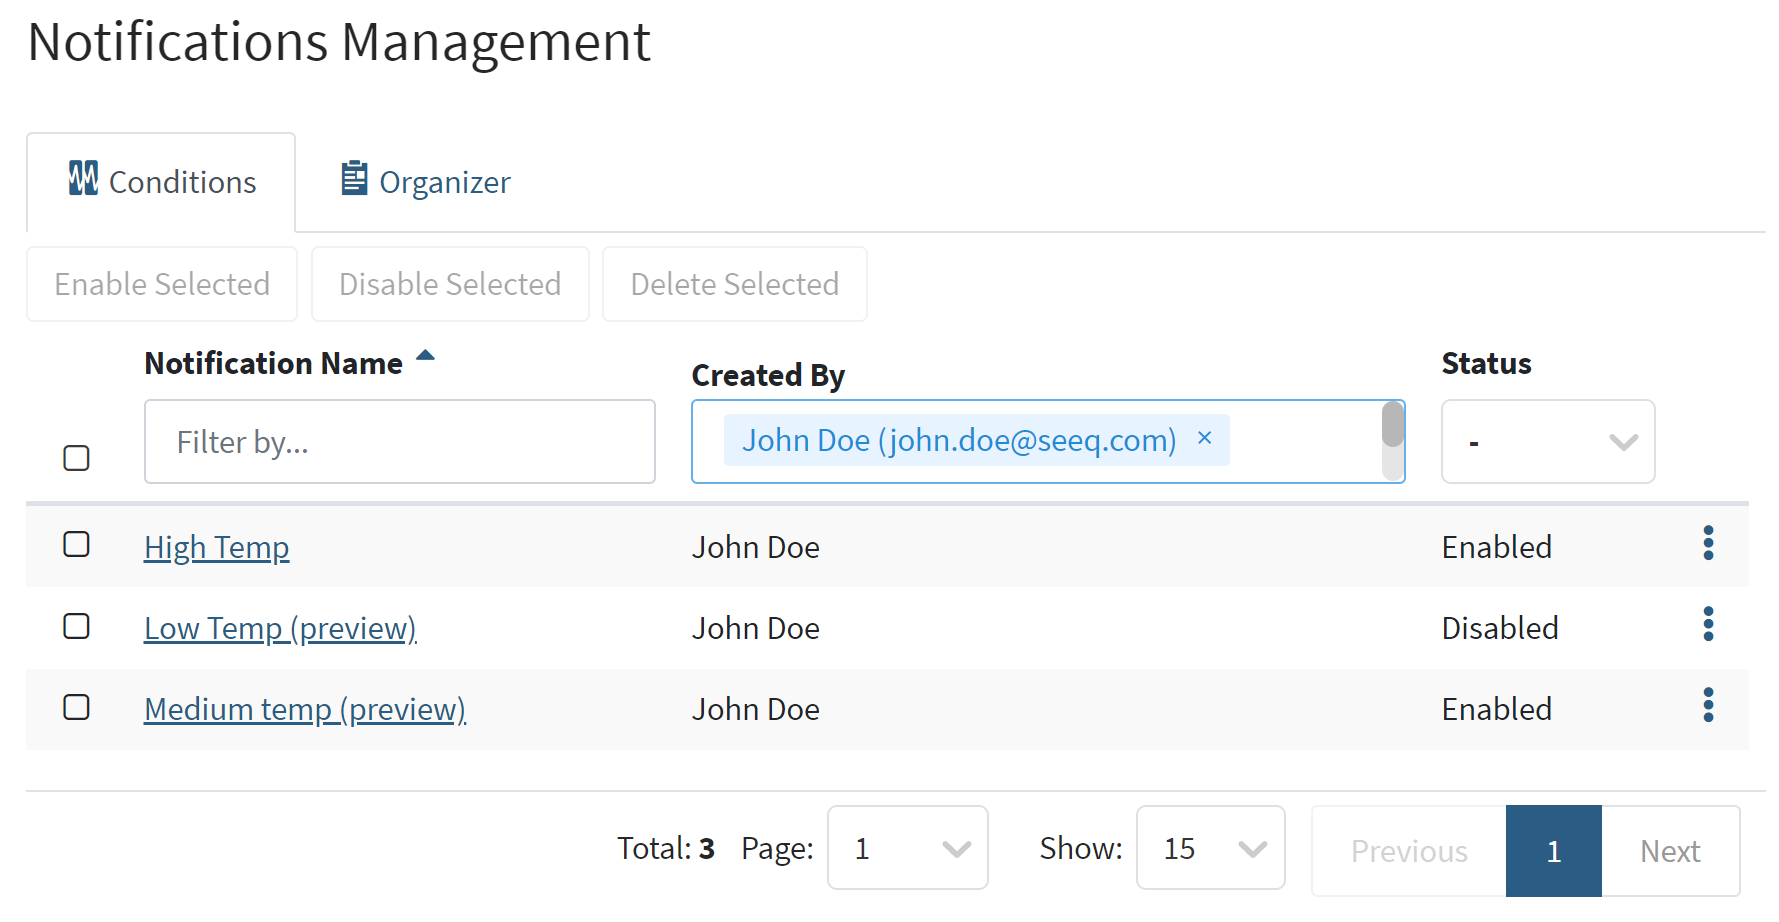
On the Notifications Management page you will see all the notifications that you have created across any Seeq Workbench or Organizer Topic in the respective tabs. If you are an admin you will see all notifications (not just the ones you created). You can enable, disable, and delete notifications in bulk by using the check boxes on the left and the bulk action buttons at the top of the table. You can edit an individual notification by clicking the name of the notification or clicking the menu on the right of the row.
Transferring Notifications to other Users
This is only currently doable through Data Lab and the Seeq API Page and only if the original creator has been deleted.
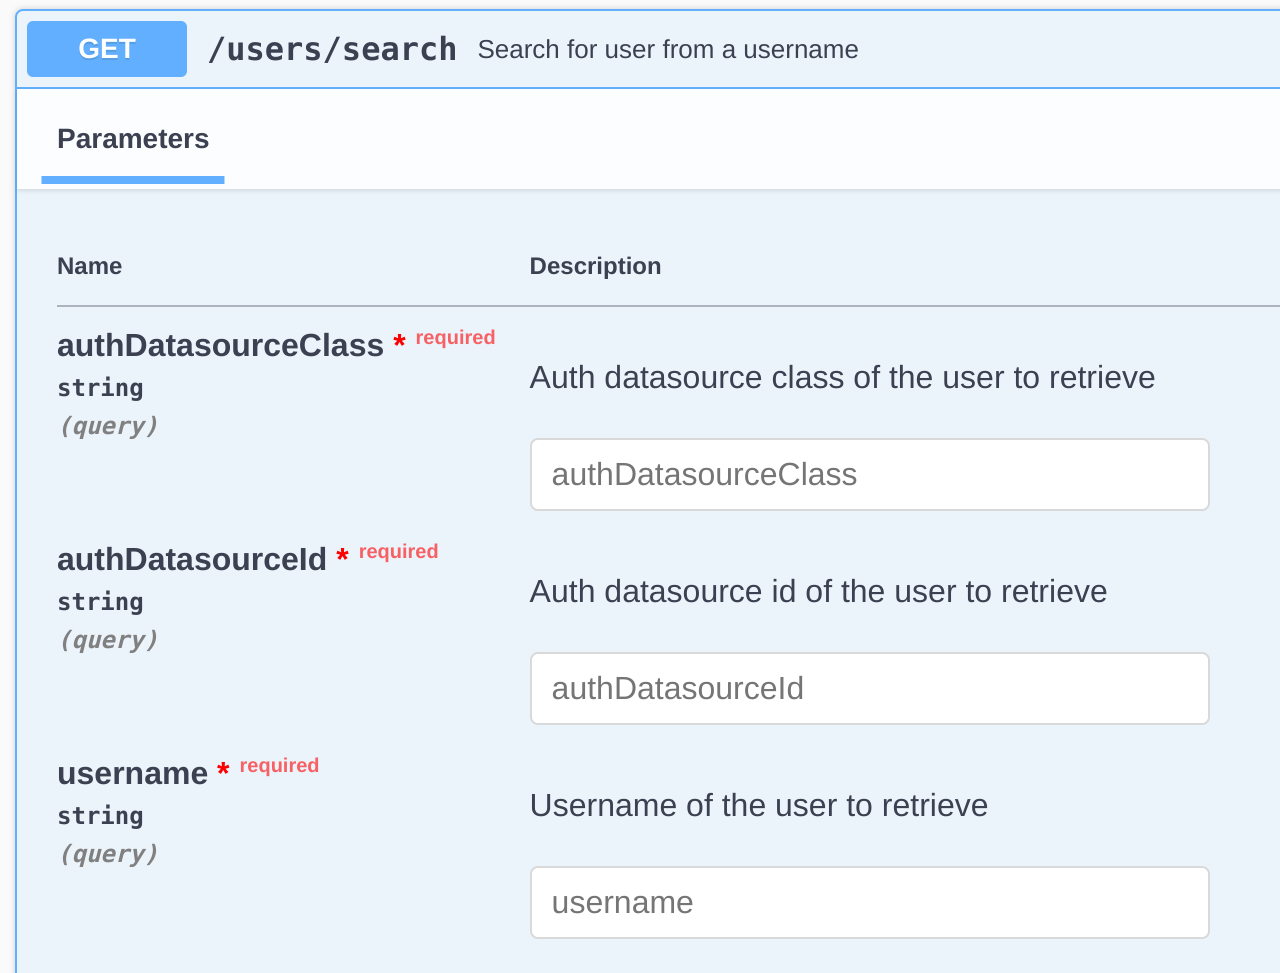
Use the API reference page to find the ID of the user you want to transfer to. You will need to go to the “Users” section, and then use the “/users/search” endpoint. The ID for will be printed in the section below the screenshot on the right.
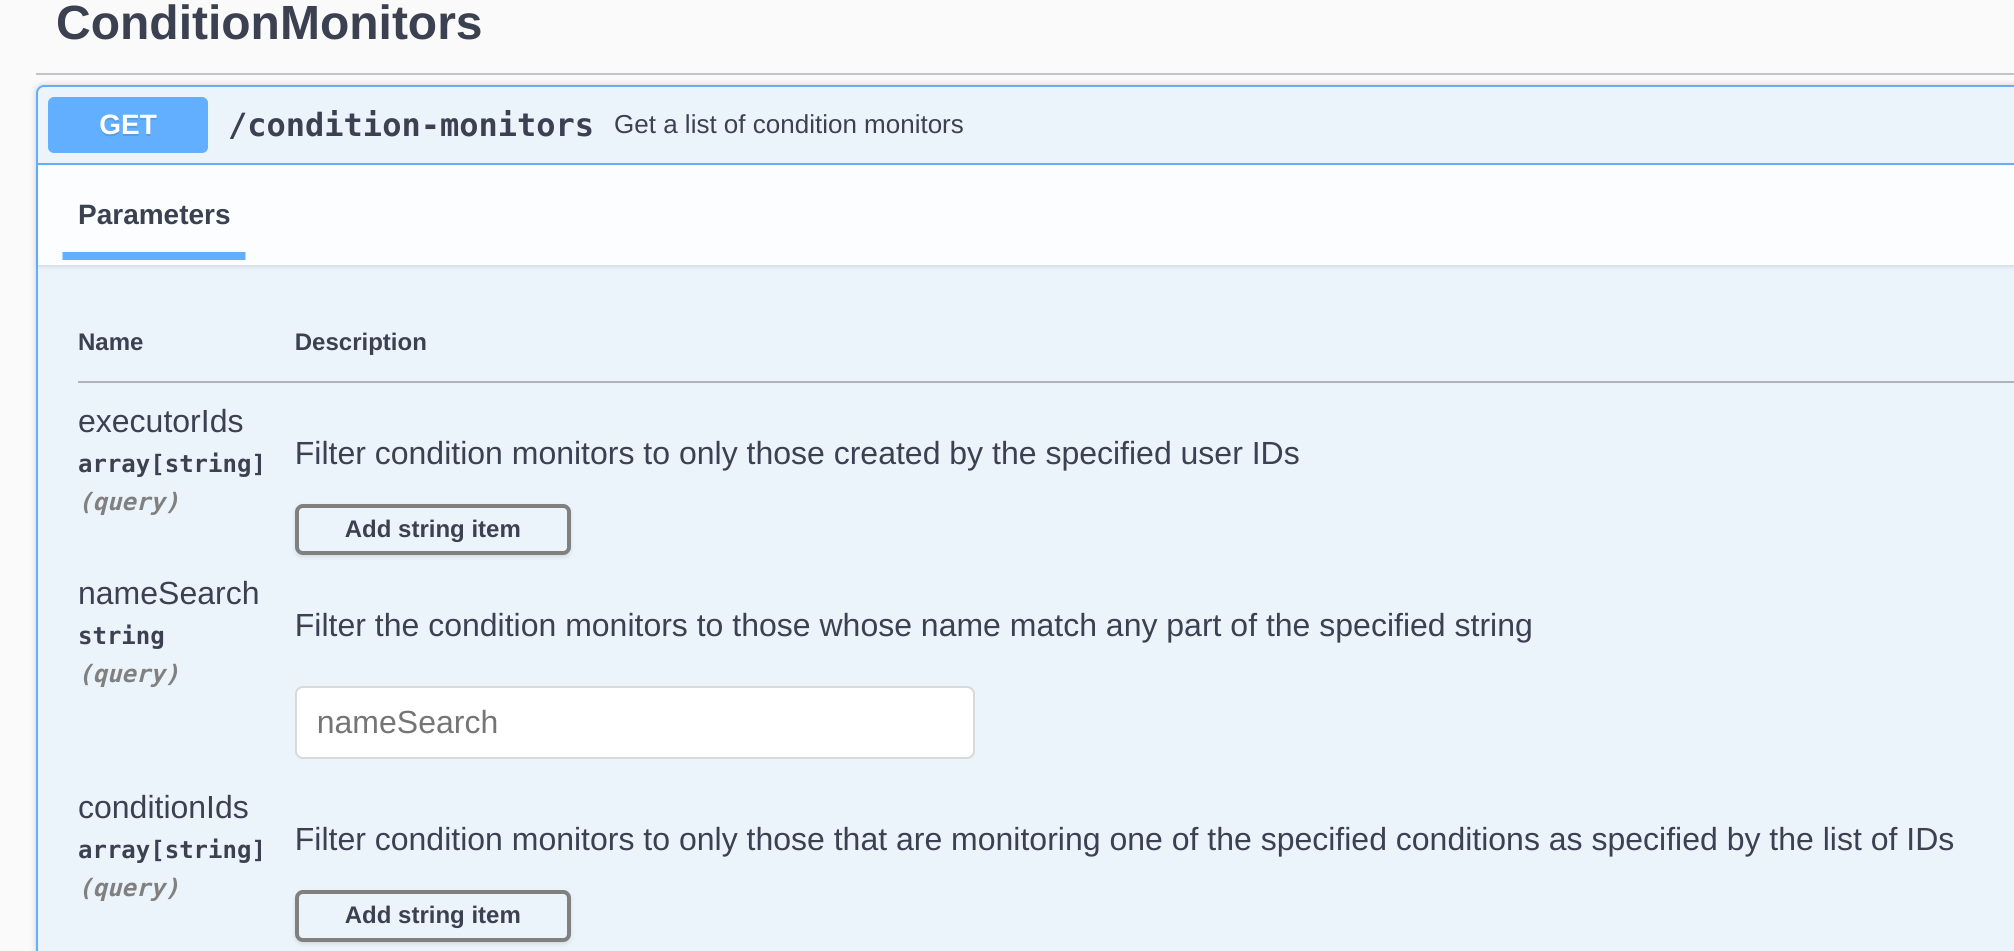
Use the API reference page to find the ID of the Notification you want to transfer. You will need to go to the “ConditionMonitors” section, and use the “/condition-monitors” endpoint. You can search by the name of the Notification or via the IDs of any conditions in the notification. The ID will be printed in the section below the screenshot on the right.
Inside a Data Lab notebook, execute the following code:
 from seeq import spy
from seeq.sdk import ItemsApi

ItemsApi(spy.client).change_owner(item_id='notification_id_here', new_owner_id='new_owner_id_here')
And the notification will have been transfered!