Using the Seeq Command Line Interface (CLI)
Overview
For on-premise installations of Seeq Server, a command line interface (CLI) is available that can perform administrative functions like starting, stopping and backing up the Seeq Server.
Executing Commands Interactively
Windows
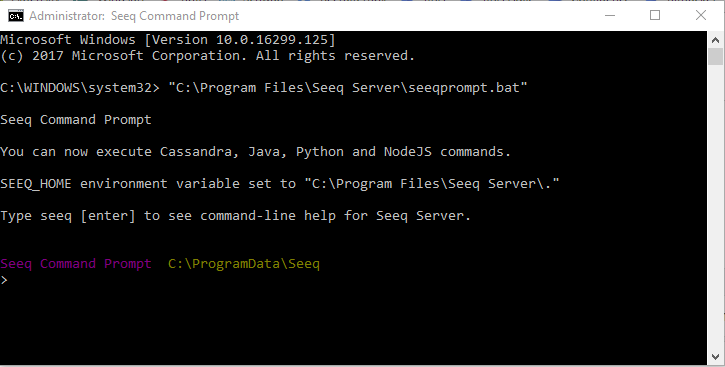
Open the Windows Start menu and navigate to the Seeq Server folder, then click the Seeq Command Prompt shortcut.
If you have chosen to install Seeq Server to a different location than C:\Program Files\Seeq Server, you will need to replace that part of the path appropriately.
This command will set up your command path and other variables so that you can easily execute administrative commands. Your prompt should look like this:
Linux / MacOS
To use the CLI, open a new Bash Terminal. The examples below use Ubuntu, but the instructions are the same for other Linux flavors and Mac OS.
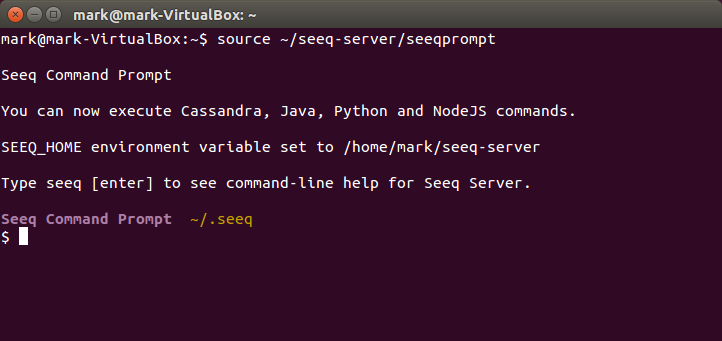
From the terminal prompt, execute:
admin@admin-Ubuntu:~$ source ~/seeq-server/seeqpromptYou will need to provide an appropriate path to the seeq-server directory if it is not in your home folder.
This command will set up your command path and other variables so that you can easily execute administrative commands. Your prompt should look like this if you're using Ubuntu:
Command Help / Documentation
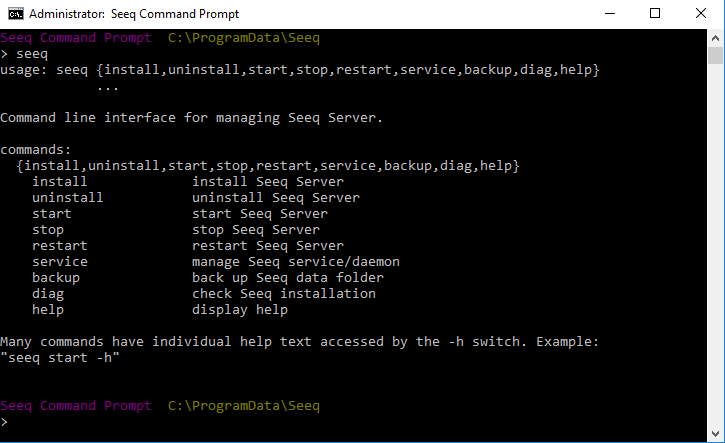
All commands start with seeq and follow UNIX command-line conventions. You can discover the supported commands by just typing seeq <enter> like so:
Executing Commands From a Script
If you are executing a command from another script, you can bypass the seeqprompt step and execute the seeq command directly. For example, on Windows, you can just execute the following command to stop the Seeq Server:
"C:\Program Files\Seeq Server\seeq.bat" stopExecution Logs
All commands are logged to the Seeq data folder under log/pilot/pilot.log. You can suppress this logging by including a -q flag right after seeq. For example:
seeq -q startSSL Override
When the Seeq server is configured for secure HTTPS access, the Seeq CLI may at times be blocked from accessing the API depending on your SSL certificates. You may see an error like this:
[SSL: CERTIFICATE_VERIFY_FAILED] certificate verify failed (_ssl.c:726)When executing CLI commands directly on the Seeq server, you can safely bypass this certificate check by issuing the -i command flag. For example:
seeq -i datasource listCommand Reference
Install / Uninstall
The Windows version of Seeq Server is distributed with a Windows installer package that has a graphical user interface. The installer package uses the seeq install and seeq uninstall to do a variety of tasks, including Windows shortcut creation, .NET Framework installation, Seeq Windows Service installation, and Windows Defender exclusion entries.
If for some reason you need to re-install these aspects without resorting to using the installer package, just execute these commands.
If you want to move Seeq Server's data folder, it is best practice to use the seeq install --data <data_folder>. See Changing the Data Folder Location for more information.
Server Start / Stop / Restart
Seeq Server can be started, stopped and restarted using the respective commands. Note that using start/restart in this manner has the advantage of waiting and confirming that Seeq Server is responsive before returning from the command. Furthermore, stopping the Seeq Server in this manner includes code to forcibly terminate Seeq Server processes and the confirming that no Seeq-related ports are in use.
Service Management
The seeq service command is a lower-level command to manage the Seeq Windows Service directly. It is generally recommended to install use the install, uninstall, start, stop and restart commands instead.
Installation and Data Folder Backup
See Backing up and Archiving the Seeq Database for more information about the seeq backup command.
Server Diagnostics
The seeq diag command includes commands that inspect the Seeq Server installation and the hardware it is installed on, and also provides convenience methods to fix common problems.
The seeq diag info is an important command that checks CPU, RAM, storage speed and size, and Seeq Server responsiveness. See Installing and Upgrading Seeq#DiagnosticInformation more information.
The seeq diag fix command can do things like fix file permissions.
The seeq diag ports command shows information about the ports used by Seeq Server. With -v or --verbose parameter it displays detailed information about the connections of each port.
Identity and Access Management (IAM)
The seeq iam command allows you to list users and directories and perform operations like importing a list of users, migrating users from one directory to another, and creating/deleting API keys.
These commands often require administrator privileges to execute. You can supply a username and password via root arguments. For example: seeq -u [email protected] -p MyPassword123 iam user list
Alternatively, you can define a script admin key that will be used by default for any CLI commands by issuing seeq iam key create script --admin
If all regular users, including administrators, authenticate using a single sign-on scheme like Windows Authentication, you must create an admin key (such as the script mentioned above) to perform any actions that require administrator privileges.
You can redirect output to a CSV file with the --csv flag and if the specified file exists then the contents will be overwritten.
List Users
You can list the users defined in Seeq, along with their associated directory, by executing seeq iam user list. The user list will be displayed in the console window but more information can also be written to a CSV file with the --csv flag. This CSV file can be loaded into Microsoft Excel and you can use sort, filter and search functions to obtain the information you desire. For example, if you want to see the most recent users of Seeq, you can sort by the Last Login At field.
Import Users
You can supply a CSV file with users to be imported to a directory using the seeq iam user import <input_csv> command. Here is an example CSV file:
Username,Directory,First Name,Last Name,Email
jemaine.clement,Seeq,Jemaine,Clement,[email protected]
bret.mckenzie,Seeq,Bret,McKenzie,[email protected]
You can also supply a Password column if you would like to specify the password. Otherwise a password will be generated and will appear in the output of the command.
You may also supply an Admin column that is either True or False if the user is to be an admin.
Note that the import command will update existing users if they already exist. The Result column in the output of the command indicates whether a user was created or updated.
Migrate Users
Sometimes you will have configured a new directory (for example, a Windows Authentication-based directory) and wish to migrate all existing users from an old directory (like the built-in Seeq directory) to the new one. You want the old user to be deleted and content owned by them to be transferred to the new user.
You can accomplish this using the seeq iam user migrate <input_csv> command, which takes a CSV file in the following format:
Old Username,Old Directory,New Directory,New Username
jemaine.clement,Seeq,FOTC,FOTC\jclement
bret.mckenzie,Seeq,FOTC,FOTC\bmckenzie
In this example, the old directory is the built-in Seeq directory, and the new directory is called FOTC. The new usernames follow the DOMAIN\username format in this example, but that format is dependent on the type of directory.
To determine what directories exist, execute seeq iam directory list.
You will often want to execute seeq iam user import first so that all of the users exist. Then you can safely use seeq iam user migrate to remove the old users and transfer the content.
API Keys
API keys are username/password combinations that are used when accessing Seeq Server programmatically. API Keys are defined in the Seeq directory but also have an associated key file that contains the username/password.
By default, there is an Agent API Key defined for use by remote agents, and that key does not have administrator privileges. The key file exists as agent.key in the keys folder within the data folder.
You can define additional keys that can be used by scripts and other custom applications using the seeq iam key create <key_name> command. For example, a common action will be to create a script.key (optionally with admin privileges) by executing seeq iam key create script --admin.
You can revoke a key by issuing seeq iam key delete <key_name>. This command will remove the key from the authentication database and also delete the local copy of the key file.
You can modify the key's credentials by editing the second line of the key file and executing the same seeq iam key create <key_name> after this change has been saved to the key file.
Datasource Management
The seeq datasource command allows you to list all the datasources specified in the system (including archived datasources), browse the items associated with those datasources, turn persistent caching on/off for a datasource or a subset of items, clear or fill the persistent cache, and archive/un-archive a set of items or an entire datasource.
You will generally start by invoking seeq datasource list to learn what datasource you wish to target.
You can then refer to a datasource using any combination of --datasource-id, --datasource-name or --datasource-class that results in the unambiguous identification of one datasource. (--datasource-id is always unambiguous.).
You can then add a --filter or -f argument to narrow the set of items affected by the command. You can use the same syntax as the Seeq Workbench Data tab, which includes simple matching, wildcard matching, or regular expression matching.
It is recommended that you first invoke seeq datasource items (with a filter, optionally) to review what items will be affected by your command. Then you can execute a caching or archiving command with greater confidence.
Items affected by a seeq datasource command are also written to a CSV file in the log/pilot folder under the Seeq data folder. (See the end of the console output for the actual filename.) This file is overwritten for every command – you can redirect to a different CSV file with the --csv flag.
If you execute seeq datasource cache on, seeq datasource cache off, or seeq datasource archive without a filter, the entire datasource will be affected. If caching is turned on or off at this datasource level, then newly indexed items will have caching turned on/off automatically.
These commands were designed to show progress as the command is executed and can also be safely canceled by pressing CTRL+C twice.
If persistent caching is turned on for a datasource or a subset of items within a datasource, you can pre-emptively fill the cache with data so that Seeq Workbench queries for the data are fast even on first access. For example, here's a command that fills the cache for "Area A" tags in the example data back to the start of 2018:
seeq datasource cache on   --datasource-name "Example Data" --filter "Area A_"
seeq datasource cache fill --datasource-name "Example Data" --filter "Area A_" --start 2018-01-01T00:00:00Z
If you are interested in pruning datasource caches, you can control the maximum size of the signal cache by Configuring Seeq.
Workbook Management
Swapping Datasource Items Within Workbooks
It may be necessary to change the data on which an Analysis Workbook or an Organizer Topic is based. For example, there may be a test and production instance of a historian, and a workbook has been created using data from the test instance. Now it's ready to be used on production data, and it's too cumbersome to manually change all the worksheets and calculated items to the other datasource.
Changing the datasource for a set of workbooks is called workbook swapping. It requires distinct steps as the following sections describe, all using the Seeq Command Line Interface.
It is strongly recommended that you back up your Seeq Database before trying to swap datasources. It may not be possible to restore incorrectly swapped workbooks otherwise.
If you’re running these commands on a Linux shell (such as bash), take care to use single quotes for any --new flags below! Otherwise, bash and other shells will interpret things like ${tagName} in --new-name-regex "Area B_${tagName}" as environment variable substitution and these examples will not give the expected results.
Also, make sure you have executed seeqprompt before executing any seeq commands (as explained previously in this article). Since datasource commands tend to be long, they can run into issues (like finding no items) when executed in unconfigured or less capable shells (like sh).
1. Determine the Old and New Datasource Identifiers
The swapping action requires the knowledge of the Datasource ID for the old and new datasources. You can list all datasources with their corresponding ID fields by issuing the following command:
seeq datasource listNote the Datasource ID for the two datasources you wish to involve, copying them to a text file if necessary.
2. Create a Datasource Map
In order to switch from one set of signals (and potentially conditions and scalars as well) to another set in a different datasource, we must create a map from old to new.
Simple Mapping
If the signal names are identical between the datasources, then you can create a "simple" map by just specifying the old and new datasource names like so:
seeq datasource map same-server --datasource-id "My_Old_Datasource_ID" --new-datasource-id "My_New_Datasource_ID"Complex Mapping
If the signal names are not identical between the datasources, you will need to use Regular Expressions to map from the old to the new. If you are mapping tag names only within the same data source, the "old" and "new" data sources in the above code block should be the same. When mapped, replace the "new" columns with the mapped tag names. Contact Seeq Support for assistance in creating such a mapping.
As an example, if in the old datasource the tag looks like Area A_TagName and in the new datasource it looks like Area B_TagName the mapping command will looks like:
seeq datasource map same-server --datasource-id "My_Old_Datasource_ID" --name-regex "Area A_(?<tagName>.*)" --new-datasource-id "My_New_Datasource_ID" --new-name-regex "Area B_${tagName}"Note that the --new-name-regex and --new-data-id-regex fields truly are regular expression fields - therefore if your new name or Data ID contains any regex control characters, these must be escaped. For example, a map like
seeq datasource map same-server --datasource-id "My_Old_Datasource_ID" --data-id-regex "\*3\|Historian\|\[default\](?<rest>.*)" --new-datasource-id "My_New_Datasource_ID" --new-data-id-regex "\*3\|Historian\|\[NewTagProvider\]${rest}"could be used to map Ignition Signals that were previous associated to the default tag provider to a new tag provider NewTagProvider. The *, |, and [ characters must be escaped (along with all other reserved characters); the ] may optionally be escaped but probably doesn’t need to be.
3. Review the Datasource Map
The seeq datasource map command will create a CSV file that has columns for the old and new identifiers. Load this file into Microsoft Excel and review the columns that start with "New".
Look for cases of NO MATCHES in these columns. This is an "error" in the mapping operation such that an item in the old datasource was not found in the new. If you are sure that these items are not used in your workbooks, you may wish to ignore this error.
Look for cases of MULTIPLE MATCHES in these columns. This is also an "error" in the mapping operation such that an item in the old datasource mapped to more than one item in the new datasource. This generally happens only with Complex Mapping, so check your regular expressions.
4. Test on a Single Workbook
You may wish to duplicate the test workbook prior to executing a swap, so that you avoid damaging any important content during your test.
Execute the seeq workbook swap command on a single workbook by identifying an appropriate workbook and then copying its Workbook ID out of the browser URL:

Now execute the swap command:
seeq workbook swap --map-csv "C:\ProgramData\Seeq\data\log\pilot\seeq-datasource-map-same-server-command-output.csv" --workbook-id "D833DC83-9A38-48DE-BF45-EB787E9E8375"Once the swap command has executed, re-load the workbook by pressing F5 while in the browser.
You should see that everything that was mapped by the datasource map will have been swapped, including items in the Details Pane, inputs to calculated items scoped to the workbook, and links in the Journal.
If you are swapping an Organizer Topic, then all embedded content worksheets will have their Details Pane items swapped. However, inputs to calculated items scoped to those workbooks will not be swapped. You must execute swap on those workbooks as well.
To reverse the swap, just execute seeq workbook swap --reverse with the same arguments as above.
5. Repeat for Many Workbooks
Once you are happy with the result, you can use the --workbook-csv argument (instead of --workbook-id) to feed a list of workbooks into the seeq workbook swap command.
You can use the seeq workbook list command to produce this CSV file, which you can then manually alter with Microsoft Excel if you wish:
seeq workbook listDetermining Items and Calculations Used
It may be necessary to account for how many times a particular datasource signal is used. Often with upgrades, new Seeq formulas become available that may have a simpler approach or better performance (for example new functionality of min() and max(), or timeSince()). If an administrator wants to be able to identify where these formulas have been used so that they can target training or opportunities for improvement, they can follow this process. Note some of these calls may require administrator access, so you can pass those in through the CLI by following seeq with -u <username> and -p <password>, where <username> and <password> are replaced with appropriate admin credentials.
1. Discover all workbooks
You can use the seeq workbook list command to produce this CSV file, which you can then manually alter with Microsoft Excel if you wish:
seeq workbook list2. Discover all items used in the workbooks
You can use the seeq workbook items command to produce a CSV file that includes all items used in a workbook. This CSV can be manually altered Microsoft Excel if you wish. This example generates a list of items used in a single workbook.
seeq workbook items --workbook-id <GUID>Or you can pass in the list of workbooks to generate a full list of items used in all workbooks or some subset after filtering in Microsoft Excel.
seeq workbook items --workbook-csv <filepath/filename>seeq workbook items --workbook-csv <filepath/filename> -cIdentifying Live Doc Usage
Auto-updating Organizer Topic Documents can be configured by users as discussed on this page. While it is not recommended, users can configure frequent updates querying for long durations of data. Pending datasource performance and other server activity, these frequent large queries to a datasource can impact user experience. To access a list of all Live Docs in use, execute the command below to get a report that includes date ranges, update rates, and links to the Topic Document. Work with users who may not be applying best practices to adjust the frequency or duration of their Live Doc updates when necessary.
seeq workbook activityConfiguration Commands
Seeq uses a centralized configuration system for administration and tuning. You can view, set and unset configuration via the Seeq Command Prompt as described in Configuring Seeq.