Skip table of contents

Tool Pane Plugin Example

The Tool Pane Plugin Example is a slightly more complex frontend plugin example than the Basic Example because this example includes JavaScript. The plugin will make an API call to a Data Lab Functions (DLF) backend. We’ll see how the frontend plugin and DLF backend can be combined into a packaged Add-on that can be installed using the Add-on Manager.

This example was created using the the seeq-addon-templates project.

Frontend

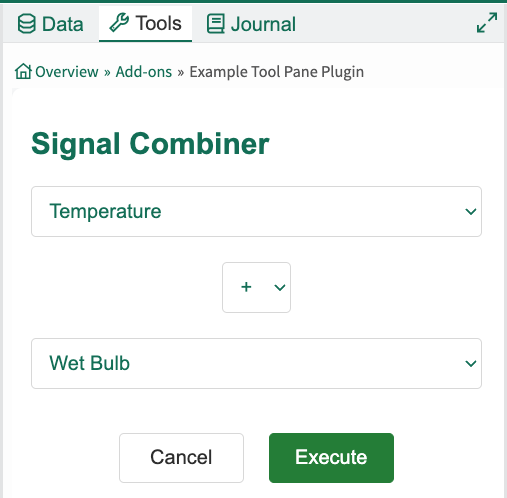
For the frontend, we’ll create a ToolPane plugin that calls a Data Lab Functions backend to combine two signals. The user interface looks like what you see below. It allows signals from the Analysis Details Pane to be selected, along with an operation to be performed on the signals. The available operations are add, subtract, divide, and multiply.

image-20250109-175953.png

HTML

The plugin’s index.html file contains the following HTML to render the UI you see above.

index.html
HTML
<!DOCTYPE html>
<html>
<head>
  <link rel="stylesheet" href="styles.css">
  <title>Signal Combiner</title>
</head>
<body>
  <div class="container">
    <h1>Signal Combiner</h1>
    <div class="dropdowns">
        <select id="signalA" class="dropdown"></select>
        <select id="operator" class="dropdown">
            <option value="+">+</option>
            <option value="-">-</option>
            <option value="*">*</option>
            <option value="/">/</option>
        </select>
        <select id="signalB" class="dropdown"></select>
    </div>
    <div id="spinner" class="spinner"></div>
    <div id="error" class="error"></div>
    <div class="buttons">
        <button id="cancelButton" class="btn cancel">Cancel</button>
        <button id="executeButton" class="btn execute">Execute</button>
    </div>
  </div>
  <script src="/plugins/sdk/seeq.js"></script>
  <script crossorigin src="main.js"></script>
</body>
</html>

JavaScript

The main.js file contains JavaScript to implement the desired behavior. In the callback from the DOMContentLoaded event, we get the Seeq plugin API by calling getSeeqApi(), and we call the API Function subscribeToSignals() to get a callback whenever the signals in the Details Pane change. When the “Execute” button is clicked, we call the calculate() function, which makes a POST request to a Data Lab Functions (DLF) /combine endpoint to combine the signals. Note the use of getDataLabProject() to get the DLF project ID and callDataLabApi() to call the DLF endpoint.

main.js
JS
const DLF_PROJECT_NAME = "com.seeq.example.data-lab-functions"

document.addEventListener("DOMContentLoaded", function() {
    registerHandlers();
    updateExecuteButton();

    document.getElementById("cancelButton").addEventListener("click", clearSelections);
    document.getElementById("executeButton").addEventListener("click", calculate);
    document.getElementById("signalA").addEventListener("change", updateExecuteButton);
    document.getElementById("signalB").addEventListener("change", updateExecuteButton);
});

function registerHandlers() {
    getSeeqApi().then(_seeq => {
        seeq = _seeq;
        seeq.subscribeToSignals(signals => syncSignals(signals));
    });
}

function syncSignals(signals) {
    const currentSignals = signals.filter(s => s.valueUnitOfMeasure !== 'string') // Filter out string signals
    updateOptionSignals("signalA", currentSignals);
    updateOptionSignals("signalB", currentSignals); 
}

function updateOptionSignals(id, signals) {
    optionElement = document.getElementById(id);
    currentValue = optionElement.value;
    removeChildren(optionElement);
    const placeholderOption = new Option('Select an option', '', true, true);
    placeholderOption.hidden = true;
    optionElement.appendChild(placeholderOption);

    signals.forEach(signal => {
        let option = document.createElement("option");
        option.value = signal.id;
        option.text = signal.name;
        optionElement.appendChild(option);
    });
    optionElement.value = currentValue;
}

function removeChildren(element) {
    while (element.firstChild) {
        element.removeChild(element.firstChild);
    }
    return element;
}

function clearSelections() {
    document.getElementById("signalA").selectedIndex = 0;
    document.getElementById("signalB").selectedIndex = 0;
    document.getElementById("operator").selectedIndex = 0;
    seeq.closeActiveTool();
}

async function calculate() {
    const idA = document.getElementById("signalA").value;
    const idB = document.getElementById("signalB").value;
    const op = document.getElementById("operator").value;

    hideError();
    showSpinner();
    disableButtons();
    try {
        const { projectId }= await seeq.getDataLabProject(DLF_PROJECT_NAME);
        const response = await seeq.callDataLabApi({
            projectId,
            notebookName: "api",
            method: "POST",
            path: "/combine",
            body: {
                idA,
                idB,
                op,
                workbookId: seeq.workbook.id,
                worksheetId: seeq.worksheet.id
            }
        })
    }
    catch (error) {
        showError(error?.data?.statusMessage);
    } finally {
        hideSpinner();
        enableButtons();
    }
}

function updateExecuteButton() {
    const signalA = document.getElementById("signalA").value;
    const signalB = document.getElementById("signalB").value;
    document.getElementById("executeButton").disabled = signalA === "" || signalB === "";
}

function showSpinner() {
    document.getElementById("spinner").style.display = "block";
}

function hideSpinner() {
    document.getElementById("spinner").style.display = "none";
}

function showError(message) {
    document.getElementById("error").style.display = "block";
    document.getElementById("error").innerText = message;
}

function hideError() {
    document.getElementById("error").innerText = "";
    document.getElementById("error").style.display = "none";
}

function disableButtons() {
    document.getElementById("cancelButton").disabled = true;
    document.getElementById("executeButton").disabled = true;
}

function enableButtons() {
    document.getElementById("cancelButton").disabled = false;
    document.getElementById("executeButton").disabled = false;
} 

CSS

You can use CSS to style your plugin. The CSS used for the Signal Combiner example is in a file called styles.css and can be seen below.

Example plugin styles.css
CSS
body {
    font-family: Arial, sans-serif;
    background-color: #f8f9fa;
    margin: 0;
    padding: 0;
    display: flex;
    height: 100vh;
}

.container {
    flex: 1;
    background-color: white;
    padding: 15px;
    padding-right: 25px;
    border-radius: 8px;
    color: #007960;
    box-shadow: 0 4px 8px rgba(0, 0, 0, 0.1);
}

h1 {
    margin-bottom: 20px;
    font-size: 24px;
    color: #007960;
}

.dropdowns {
    display: flex;
    flex-direction: column;
    justify-content: space-between;
    margin-bottom: 35px;
}

.dropdown {
    padding: 10px;
    border: 1px solid #ddd;
    border-radius: 4px;
    font-size: 16px;
    color: #007960;
}

.dropdown#operator {
    margin: 20px 0;
    align-self: center;
    width: 55px;
}

.buttons {
    display: flex;
    justify-content: center; 
    margin-top: 35px;
}

.btn {
    padding: 10px 20px;
    font-size: 16px;
    border-radius: 4px;
    cursor: pointer;
    transition: background-color 0.3s, color 0.3s;
    min-width: 100px;
}

.btn.cancel {
    background-color: transparent;
    color: #333;
    border: 1px solid #ddd;
}

.btn.cancel:hover {
    background-color: #f8f9fa;
    border-color: #ccc;
}

.btn.cancel:disabled {
    background-color: #ccc;
    color: #666;
    cursor: not-allowed;
    border: 1px solid #ccc;
}

.btn.execute {
    margin-left: 20px;
    background-color: #218838;
    color: white;
    border: 1px solid #218838;
}

.btn.execute:hover {
    background-color: #1e7e34;
    border-color: #1e7e34;
}

.btn.execute:disabled {
    background-color: #ccc;
    color: #666;
    cursor: not-allowed;
    border: 1px solid #ccc;
}

.spinner {
    display: none;
    width: 40px;
    height: 40px;
    margin-left: auto;
    margin-right: auto;
    border: 4px solid #f3f3f3;
    border-top: 4px solid #007960;
    border-radius: 50%;
    animation: spin 1s linear infinite;
}

.error {
    display: none;
    color: #721c24;
    background-color: #f8d7da;
    border: 1px solid #f5c6cb;
    border-radius: 4px;
    padding: 10px;
}

@keyframes spin {
    0% { transform: rotate(0deg); }
    100% { transform: rotate(360deg); }
}

Configuration

To create a valid plugin, a plugin.json file is needed. This file provides metadata that is needed by Seeq to install the plugin.

plugin.json
JSON
{
  "category": "ToolPane",
  "identifier": "com.seeq.example.tool-pane-plugin",
  "name": "Example Tool Pane Plugin",
  "description": "A plugin that combines two signals",
  "version": "0.0.1",
  "icon": "fa-bullseye",
  "entryPoint": "",
  "host": {},
  "options": {}
}

Plugin Artifact

With the index.html, main.js, styles.css, and plugin.json files, we have everything we need to create a plugin artifact that can be installed in Seeq.

A Seeq plugin is simply a zip archive with a .plugin file extension that contains the plugin’s files.

We can create it by running the following command.

CODE
zip Example.plugin plugin.json index.html main.js styles.css

At this point, we have a valid Example.plugin that could be installed in Seeq.

The seeq-addon-templates project provides tooling that takes care of building your plugin and packaging it into a Seeq Add-on that can be installed using the Add-on Manager. It also has tooling to watch your source files, automatically package the add-on, and upload it to Seeq whenever you change your source code during development.

Backend

With the frontend implemented, we’ll now take a brief look at the Data Lab Functions backend that is called by the plugin to combine the signals.

For more in-depth technical details about Data Lab Functions, see https://support.seeq.com/kb/latest/cloud/data-lab-functions.

A Data Lab Functions backend is a Data Lab Project that has the projectType set to DATA_LAB_FUNCTIONS. It typically has a single notebook (often name api.ipynb) that describes the backend API, and other Python files as required to implement the desired behaviors.

For this example, our backend api.ipynb notebook consists of a context cell to declare imports and a cell to define the /combine endpoint.

The context cell imports dependencies and declares the REQUEST and LOG types.

CODE
import my_datalab_functions_example
from logging import Logger
from typing import Any
REQUEST: Any
LOG: Logger

The endpoint cell defined the POST /combine endpoint.

CODE
# POST /combine

my_datalab_functions_example.api.combine(REQUEST, LOG)

The my_data_lab_functions module contains a single api.py file with the logic for the combine operation.

api.py
CODE
import pandas as pd
from logging import Logger
from seeq import spy
from typing import Any


def combine(REQUEST: Any, LOG: Logger) -> str:
    # Get params from request body
    idA = REQUEST['body']['idA']
    idB = REQUEST['body']['idB']
    op = REQUEST['body']['op']
    workbook_id = REQUEST['body']['workbookId']
    worksheet_id = REQUEST['body']['worksheetId']

    # Create the formula to add the two signals
    metadata = pd.DataFrame([{
        'Name': f'Plugin Combined Signal',
        'Formula': f"$signalA.setUnits('') {op} $signalB.setUnits('')",
        'Formula Parameters': {
            'signalA': idA,
            'signalB': idB
        },
        'Type': 'Formula'
    }])

    # Push the formula to Seeq
    LOG.info(f"Pushing formula for 'Plugin Combined Signal' to workbook {workbook_id}")
    combined_signal = spy.push(workbook=workbook_id, metadata=metadata)

    include_inventory = True if spy.user.is_admin else False

    # Get the current worksheet
    workbook = spy.workbooks.pull(workbook_id, include_inventory=include_inventory)[0]
    worksheet = next((ws for ws in workbook.worksheets if ws.id == worksheet_id), None)

    # Add the combined signal if it's not already displayed on the worksheet
    combined_signal_id = combined_signal['ID'].values[0]
    if combined_signal_id not in worksheet.display_items['ID'].values:
        LOG.info(f"Adding signal {combined_signal_id} to worksheet {worksheet_id}")
        worksheet.display_items = pd.concat([worksheet.display_items, combined_signal]).reset_index()

    # Push the updated worksheet back to Seeq
    LOG.info(f"Updating worksheet {worksheet_id} in workbook {workbook_id}")
    results = spy.workbooks.push(workbook, include_inventory=include_inventory)
    return results.to_json()

When the frontend plugin makes an API call to the backend /combine endpoint, the Data Lab Functions project is launched (if it is not already running) and the backend code runs to combine the signals.

Packaged Add-ons

Now that Seeq has the Add-on Manager available, the best way to get your frontend plugin and associated Data Lab Functions backend installed is to package them together in a packaged Add-on that can be installed and managed using the Add-on Manager.

Please see https://support.seeq.com/kb/latest/cloud/packaging for technical details about creating a packaged Add-on.

We recommend using the https://support.seeq.com/kb/latest/cloud/add-on-package-example-generator as a starting point for your project because it provides all the build infrastructure out of the box to create a packaged Add-on. This allows you to focus on your code instead of the technical details that are required to create a packaged Add-on.

As a user without administrative privileges in Seeq, you can still install packages Add-ons, but they are only visible to you. Contact an admin to get your packaged Add-on installed for other users and groups in Seeq. Also, please contact your administrator if the Add-on Manager is not available. You may need to be given permission to see and use it.

JavaScript errors detected

Please note, these errors can depend on your browser setup.

If this problem persists, please contact our support.