Overview
Administrators can configure Single Sign-On (SSO) with an OpenID Connect authentication provider.
OpenID Connect is a simple identity layer on top of the OAuth 2.0 protocol. It is possible to configure Seeq to allow users to authenticate using OpenID Connect and OAuth 2.0. Some knowledge of OpenID Connect may be helpful when configuring Seeq to use this protocol, but this knowledge is not necessarily required. For a nice overview of these standards, you can watch this video and for more in-depth information the Open ID Connect FAQ is a good place to start.
Prerequisites
OpenID Provider
Before configuring Seeq to use OpenID Connect, you must have an OpenID provider set up. There are many OpenID providers available, including Microsoft Entra ID (formerly Azure Active Directory), Active Directory Federation Services, Google, Okta, Auth0, and more. You can see a list of certified OpenID providers here. It will be necessary to register an application or client with the OpenID provider to support Seeq SSO if one does not already exist. The exact steps to register this application or client varies by OpenID provider. We have included instructions for Microsoft Entra ID (formerly Azure Active Directory) in OpenID Connect: Azure Active Directory Configuration – refer to the documentation for other OpenID providers if needed.
Provider Requirements
The OpenID provider needs to support the following features:
-
The Authorization Code Flow
-
A well-known configuration endpoint, typically located at
<Issuer URI>/.well-known/openid-configuration
Claims Configuration
Seeq requires the following claims to be configured:
-
Email
-
First Name (alternatively Name)
-
Last Name (alternatively Name)
-
User Name
Note the claim used for the username is configurable using the UsernameClaim parameter. By default, it is the sub claim. However, this can be modified in the connector configuration. Modifying this will not create a new user as long as the email remains the same.
OpenID Provider Network Considerations
If the OpenID provider is not accessible to Seeq due to being on an internal network then it will be necessary to configure OpenID Connect on a Seeq remote agent. To set up the remote agent, follow the instructions in Installing and Upgrading a Seeq Remote Agent. To configure the remote agent for OpenID Connect, just follow the instructions under Seeq Configuration for the remote agent instead of for the full Seeq installation.
Configuration
This is an example configuration template that is displayed in the Additional Configuration box that appears when you click Configure for an existing datasource (or if a new datasource is being created, in the Create new datasource connection modal that appears after clicking Add Datasource) on the Datasources administration page.
Microsoft Entra ID (formerly Azure Active Directory)
{
    "IssuerURI" : "https://login.microsoftonline.com/",
    "OidcWellKnownConfigurationPath" : "/<directory_name>/.well-known/openid-configuration",
    "ClientId" : "90eeed0f-6407-4f51-ab8b-fbfcb40e5276",
    "ClientSecret" : "SECRETS_FILE:keys\\seeq_open_id_client_secret.key",
	"CustomParams" : null,
    "RedirectURI" : "http://localhost:9124/login",
	"KeyId" : null
  }
Okta
{
    "IssuerURI" : "https://<okta-domain>.okta.com/",
    "OidcWellKnownConfigurationPath" : "/.well-known/openid-configuration",
    "ClientId" : "0oa1lzhcy4Is1VT7O357",
    "ClientSecret" : null,
	"CustomParams" : null,
    "RedirectURI" : "http://localhost:9124/login",
    "KeyId" : "1142c5ff-0050-426f-9cc2-4a12ccf45adb"
  }
Google
{
    "IssuerURI" : "https://accounts.google.com/",
    "OidcWellKnownConfigurationPath" : "/.well-known/openid-configuration",
    "ClientId" : "<redacted>",
    "ClientSecret" : "SECRETS_FILE:keys\\seeq_open_id_client_secret.key",
	"CustomParams" : null,
    "RedirectURI" : "http://localhost:9124/login",
	"KeyId" : null
  }
Refer to https://support.google.com/cloud/answer/6158849?hl=en for additional details on the process of generating an OAuth 2.0 client ID.
OpenID Connect Additional Configuration
|
Property Name |
Default Value |
Data Type |
Description |
|---|---|---|---|
|
|
|
String |
This is the URI of the OpenID provider without any path. For example, for Entra ID / Azure AD, it would be |
|
|
|
String |
This is the path to the well-known configuration document at the |
|
|
|
String |
This is the ID of the client registered with the OpenID provider. You should be able to access the correct value for this property from the OpenID provider's user interface. See Microsoft Entra ID (formerly Azure Active Directory) Single Sign-On for how to configure and retrieve this value when using Entra ID / Azure AD. |
|
|
null |
String/Secret File |
This is the client secret of the client registered with the OpenID provider. You should be able to access the correct value for this property within the OpenID provider's user interface. See Microsoft Entra ID (formerly Azure Active Directory) Single Sign-On for configuring and retrieving this value when using Entra ID / Azure AD. If this field is "null", then Seeq will attempt to use Private Key JWT authentication instead of Client Secret Authentication. |
|
|
null |
Dictionary of String / Value pairs |
This is a list of custom parameters that can be passed in the authorization request (for example a "resource" parameter). This is not required for most OpenID connect providers, only those that require non-standard parameters. |
|
|
|
String |
This is the URI for the login endpoint of the Seeq installation. The value must be an exact match with the Redirect URI registered with the OpenID provider - some OpenID providers do a simple string comparison to verify that these values are a match. For example, if you access the Seeq application at the URL https://seeq.example.com/, then you would enter a |
|
|
null |
String |
For Private Key JWT authentication, the key ID ( |
|
|
null |
String |
For Private Key JWT authentication with Azure, the X.509 certificate thumbprint ( |
|
|
sub |
String |
The claim from the token that should be used to define the username. |
|
|
true |
Boolean |
If true, group membership will be synced on user login. If false, a Seeq admin will have to place users in groups manually. |
|
|
|
|
Defines how to sync the groups from Microsoft Graph. Only applies to Entra ID / Azure AD. If not using Entra ID / Azure AD, please see this article on SCIM. |
|
|
true |
Boolean |
If true, authentication will return claims from UserInfo.
|
Identity Synchronization Configuration
|
Property Name |
Default Value |
Data Type |
Description |
|---|---|---|---|
|
|
false |
Boolean |
Controls the synchronization of groups from Microsoft Graph to Seeq. |
|
|
|
String |
Determines which groups to sync from Entra ID / Azure AD to Seeq. For more information see the AAD Configuration Article. |
|
|
|
String |
In cases where the |
For information about configuring Group sync configuration via Microsoft Graph see thisMicrosoft Entra ID (formerly Azure Active Directory) User Group Synchronization | User Group Synchronization. For Group and Membership configuration via SCIM see SCIM:
Private Key JWT Authentication
Note for Microsoft Entra ID (Azure AD) users: For detailed step-by-step instructions specific to Azure, including certificate upload and thumbprint configuration, see
Seeq supports Private Key JWT Authentication which is an alternative to Client Secret Authentication. There are a few extra steps required to configure Seeq for this method of authentication:
-
An RSA Key Pair must be generated and placed in the <Seeq Global Directory>/keys folder with the names oidc-seeq-key.pem and oidc-seeq-cert.pem for the private key and public key respectively. The keys can be generated with the following command:
openssl req -x509 -newkey rsa:4096 -keyout oidc-seeq-key.pem -out oidc-seeq-cert.pem -days 365 -nodes
-
This will generate a new key pair that will be valid for 365 days.
-
The public key (oidc-seeq-cert.pem) should be converted to a JWK and uploaded to the provider. There are many online utilities that can convert .pem files to JWKs. The JWK must contain a "kid" field with a key id specified.
-
The "
ClientSecret" field in the configuration file must be set to "null" and the "KeyId" field must contain the public key's id that can be retrieved from the JWK of the previous step.
Configuration
In order to use Private Key JWT Authentication, "Client Secret" must be set to null. Use of the empty string (i.e. "") or other values will cause the application to use Client Secret Authentication instead of Private Key JWT.
Private Key Security
It's important that the Private Key (oidc-seeq-key.pem) is not exposed outside of the server. The security of this protocol relies on the integrity of this key.
Auto Log-in
You can configure the Seeq login screen so that it automatically logs in without users having to hit the Log in button at all, see Configuring the Default Login Directory and Configuring Auto-Login.
Troubleshooting
If you experience problems configuring OpenID Connect with Seeq, there are a few things you can try:
-
Check log/jvm-link/jvm-link.log and log/appserver/appserver.log in the Seeq data directory. If there are configuration issues, then most likely a more detailed explanation of the problem will show in one of those files. Specifically, if the oidc-seeq-cert.pem and oidc-seeq-key.pem files are missing, this will be logged in the jvm-link.log.
-
For Private Key JWT Authentication, sometimes errors appear as URL parameters. Check log/webserver/webserver.log for the links clients navigate through during a login attempt. If there are problems, you may see errors encoded as follows:
/login?state=yM1lmkTt4GVjK8BclVT_REz8cofpcjOgoRikaryqnjU&error=access_denied&error_description=User%20is%20not%20assigned%20to%20the%20client%20application.Notice that the Bold portion contains the text "User is not assigned to the client application." This can be invaluable information for debugging. -
The OpenID provider displaying an error message is often caused by a misconfiguration of the redirect URIs in the OpenID provider's client registration. Make sure that the redirect URIs are configured correctly. The
"RedirectURI"setting in OAuth 2.0 Connector.json must match exactly (protocol, port number, etc... character for character) the redirect URI configured in the OpenID provider's client registration. Both values must be the URL for Seeq's login page. -
If users are taking a long time to log in with the OpenID provider (more than 10 minutes), then they will receive an error on the login page. This is by design. To resolve this issue, the user must simply log in again in a timely fashion.
-
If users are able to log in when it seems like they're not supposed to be able to, this is a provider configuration problem (i.e. check the active directory configuration or other equivalent provider). The problem can be caused by improper domain settings (e.g. allowing any organization on active directory instead of just the company's organization. With Active Directory, the settings to look out for are the signInAudience and the availableToOtherTenants settings). It can also be caused by the offending user being given guest access. Check to make sure there are no special exceptions being made for individuals outside of the organization in the provider configuration.
-
For PingFederate set Allowed Grant Type as Authorization Code.
-
SecureAuth: If you receive an error with “WWW-Authenticate scheme must be OAuth 2.0 Bearer”, it is a configuration issue in SecureAuth with permissions to the various endpoints used in the authentication workflow. This SecureAuth document lists the endpoints and how to resolve them.
Frequently Asked Questions
Does logging in with OpenID Connect for the first time create a new account? If so, how can I connect the new account(s) to my old account(s)?
When a user logs into Seeq using OpenID Connect for the first time, it does create a new account for them. After the user's first login with OpenID Connect, Seeq will attempt to retrieve the user's first name, last name, and email address from the OpenID provider. If you already have an account that does not use OpenID Connect, contact support to work on a user migration.
Why don't I have to log in with my username/password every time I log into Seeq with OpenID Connect?
With OpenID Connect there are two sessions that affect whether you will have to enter your username/password (or other credentials) with the OpenID provider: Seeq's session and the OpenID provider's session. Any time you log in to Seeq, Seeq tries to remember you are logged in for a certain amount of time (by default, this is 24 hours). This logged-in period is called a session. There are things you can do to cut the session short, such as clicking "Log Out" in Seeq or, in some cases, closing your browser. Similarly, when you log in with your OpenID provider, most providers also try to remember you are logged in for a certain amount of time. The provider has its own session. So, if you were to click "Log Out" in Seeq to end your Seeq session but you never logged out with your OpenID provider, it is entirely possible that the next time you login to Seeq, your OpenID provider will remember that you were logged in and allow you to log in to Seeq without requesting any credentials. In the same way, if you are logged in to Seeq but you logged out of your OpenID provider, Seeq will still remember that you are logged in for the length of the Seeq session. If you log out of both Seeq and the OpenID provider, then you will need to enter your credentials the next time you log in to Seeq.
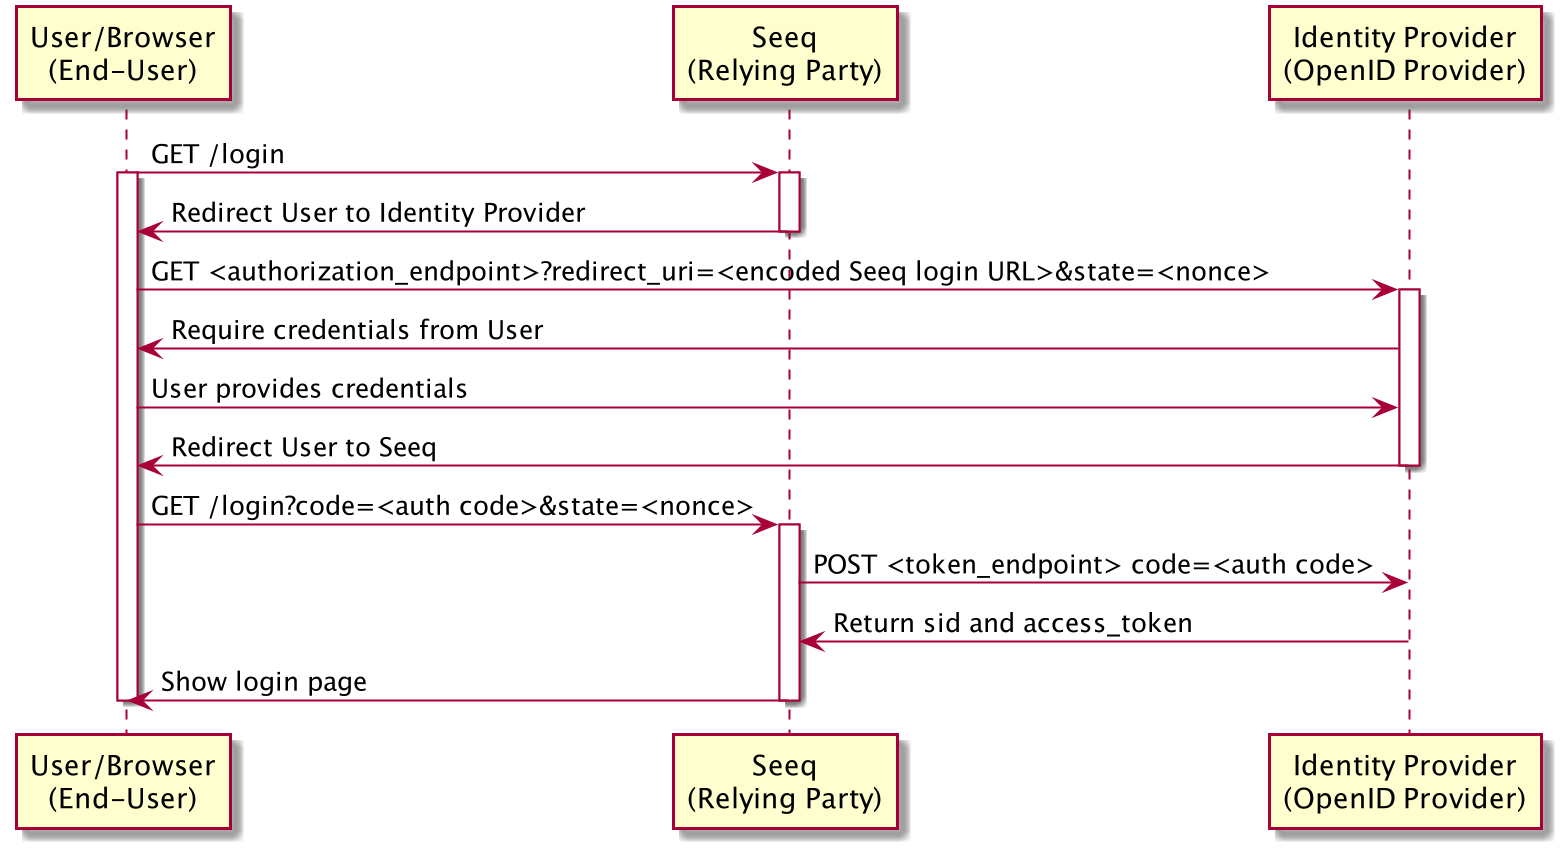
Sequence Diagram
Troubleshooting
java.net.SocketTimeoutException: Connect timed out
This error occurs when the Seeq OAuth client did not receive a response within an expected period of time. This is generally due to network, or IdP response time issues. The default expected connect timeout is 1 second. If no network modification can be made, this value can be increased by increasing the value for the ConnectTimeoutMs property. Note, that if set very high, the login time to Seeq will increase as well and more network troubleshooting should take place to ensure an adequate user experience.
Connect timed out com.nimbusds.jose.RemoteKeySourceException
This error occurs when there is a timeout trying to validate the JWK token that was received. This is generally due to poor network conditions that should be investigated. If not able to be mitigated through network optimization, the default timeout value of 500ms can be increased by adding 2 parameters to the Process/JvmLink/AdditionalVMOptions configuration item.
"-Dcom.nimbusds.jose.jwk.source.RemoteJWKSet.defaultHttpConnectTimeout=2000" "-Dcom.nimbusds.jose.jwk.source.RemoteJWKSet.defaultHttpReadTimeout=2000"
The example value above sets both the connect and the read time out to 2 seconds (2000ms). Note, that if set very high, the login time to Seeq will increase as well and more network troubleshooting should take place to ensure an adequate user experience.
Exceeded input limit com.nimbusds.jose.RemoteKeySourceException
If the error com.nimbusds.jose.RemoteKeySourceException: Couldn't retrieve remote JWK set: Exceeded configured input limit of 51200 bytes occurs, access the URL configured in IssuerURI and check if the response looks wrong (like an error) or if it is very large (over 51200 bytes).
If it looks correct and is expected to be that large, you can increase the size limit by setting the Agent configuration option Process/JvmLink/AdditionalVMOptions with a value like "-Dcom.nimbusds.jose.jwk.source.RemoteJWKSet.defaultHttpSizeLimit=100000" (don't forget the ") and restarting the Agent (or Seeq as whole if it’s a local Agent) for the change to take effect.