Exporting Signals and Conditions to OSIsoft PI
Overview
The article Exporting Signals and Conditions to a Historian describes the feature for exporting data to a historian, and this article provides additional details specific to exporting data to OSIsoft PI.
The examples in this article are based on tools, servers, and services that are specific to an environment that is used for documentation purposes:
Uses PI System Management Tools for managing PI Points
Writes to a historian named
DENVERPI0043Runs Seeq with a service account that maps to a PI Identity called
PI Engineers
Prerequisites
Ensure that export has been enabled for your connection, as described in this article: Exporting Signals and Conditions to a Historian | Enabling Export . Here are the relevant settings in the OSIsoft PI Connector.json connector file for the PI server used in these examples:
    {
      "Name": "DENVERPI0043",
      "Enabled": true,
      "Export": {
        "Enabled": true,
        "AutoCreate": false,
        "AutoUpdate": false,
        "RequireApproval": true,
        "DirectiveRefreshFrequency": "1m",
        "NewOrChanged": [],
        "BufferOption": "DoNotBuffer"
      }
    }
Configuration
BufferOption
The OSIsoft PI System’s “AFSDK” is used to write data to PI, and write operations allow for a BufferOption specification, which is controlled via the BufferOption parameter in the Seeq PI connection’s configuration and can be set to DoNotBuffer, BufferIfPossible or Buffer. It is DoNotBuffer by default. If you are using a PI Collective, you will want to set this appropriately to use the buffer subsystem (and likely set the configuration option to BufferIfPossible or Buffer). Note that the buffer subsystem must be configured correctly on the machine running the agent and hosting the Seeq PI Connector. Consult a PI administrator in your organization or contact OSIsoft for more information about buffering.
Invalid Values
Samples with invalid values within Seeq signals will be exported with a status of Bad and values of either 0 or INVALID (for numeric and string signals, respectively). If you wish to write invalid samples as a particular value (with a status of Good), use the replaceNotValid() function in your Seeq Formula as appropriate. Alternatively, you can filter out invalid values completely using the validValues() function.
Uncertain / Future Data
The Export Subsystem also cannot write future data to PI.
To write uncertain data to PI, you can use the INCLUDE UNCERTAIN token in the export directive - see Additional Export Instructions in the Exporting Signals and Conditions to a Historian article for more details.
Point Source
Beginning in R53.3.1, the PI-specific parameters “PointSourceDefault” and “PointSourceMatcher” are available in the export configuration. The PointSourceDefault is null if not provided, and in this case, Seeq will use the string “Seeq” for any PI Points created via the auto-create mechanism. When the PointSourceDefault is provided, this will be the Point Source used for auto-created PI Points or suggested in the export configuration (if auto-create is not enabled or if approval is required).
If you don’t plan to use anything other than the default for the Point Source, you can stop here; however, if you need to allow the Point Source to differ from the default, the PointSourceMatcher should be set to a JSON-escaped regular expression that will match all Point Source values of PI Points for which export directives are configured; this ensures the Point Source check Seeq does before writing data will pass.
Indexing new PI Points as Signals
The PI Points created by the export to PI will naturally be picked up on the next indexing cycle Seeq performs. In general, there should be little to no discrepancy between these Signals and the source Signals upon which the export directives were placed - this can be seen by trending the newly-indexed Signal in the same lane as the source Signal (and with the same axis, if non-string). Note, however, that numeric step Signals in Seeq will end up as PI Points that are indexed as numeric Signals using PILinear interpolation. This causes a visible discrepancy between the two Signals at the value changes. Additionally, any samples with less than 100ns (1 tick) between them in the Seeq signal may be collapsed to a single sample due to the available time resolution in .NET. Both of these phenomena can be seen in the following screenshot, in which SEEQ_EXPORT_TEST_5 is the Signal indexed from the written PI Point:
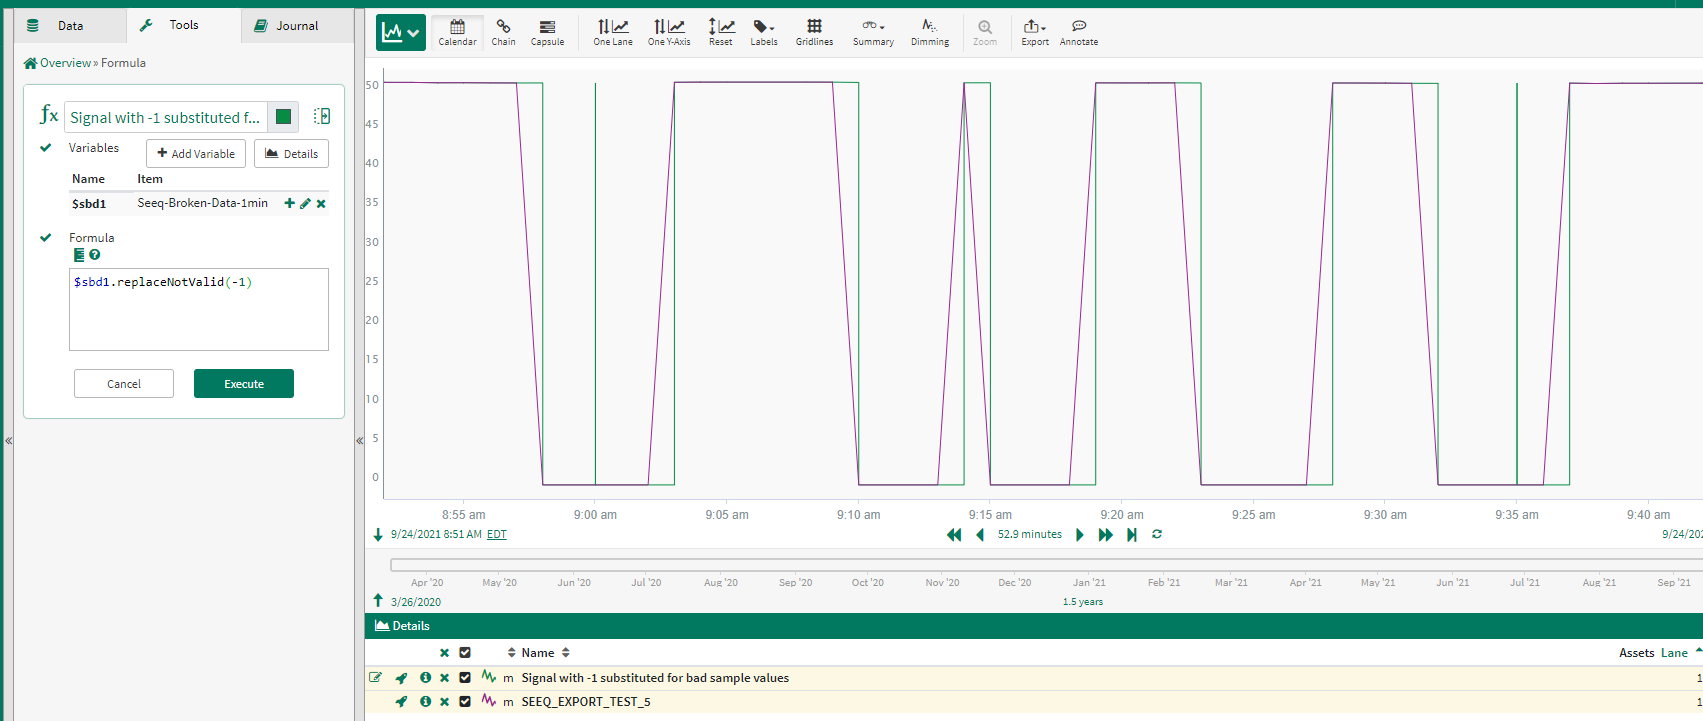
As noted above, compression on the PI Point can also cause discrepancies.
Workflow Examples
The following examples demonstrate the workflow for exporting signals to a PI server. The examples export signals based on formulas since they are easy to create. There are other ways to create signals for exporting data to a historian.
Manually Create a Signal in PI
Create a workbench analysis in Seeq.
Create a signal with a formula. Note that the formula itself is not important here; we just need something to return data that we can later write to PI.
Add a variable for any signal, like
Example > Cooling Tower 1 > Area A > Compressor Power.Provide a formula, such as
$cp * 10in the example below.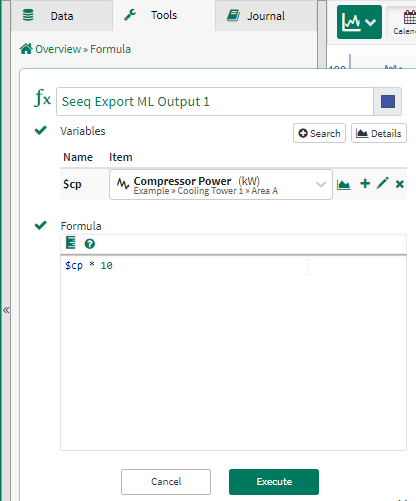
Click Execute. The signal is added to the worksheet.
Click the
 icon in the Details Pane to the left of the signal that was just created.
Click the Manage link under the Access Control section and give
EveryoneRead and Write access.
Granting Everyone access allows the Agent API Key to update the signal with metadata for managing the export directive, but this can be avoided: Exporting Signals and Conditions to a Historian | Avoiding “Everyone” Access .
In the Description field, add the export directive as follows:
[EXPORT TO "DENVERPI0043" AS "SEEQ_EXPORT_TEST_ML_OUTPUT_1" EVERY "1m"]
The EVERY command is set to 1m in order to minimize the wait time for the purpose of this example, but the Exporting Signals and Conditions to a Historian | Additional Export Instructions suggests using the largest latency you can live with.
Wait about one minute for the
DirectiveRefreshFrequency to process this change.
10. Open, or reload, the OSIsoft PI Connector.json connector file. The Export section should now look something like this:
      "Export": {
        "Enabled": true,
        "AutoCreate": false,
        "AutoUpdate": false,
        "RequireApproval": true,
        "DirectiveRefreshFrequency": "1m",
        "NewOrChanged": [
          {
            "Name": "SEEQ_EXPORT_TEST_ML_OUTPUT_1",
            "Approved": false,
            "Properties": {
              "pointsource": "Seeq",
              "instrumenttag": "0393B17B-DFED-4199-9AF4-F4AFA218C7E0",
              "engunits": "kW",
              "pointtype": "Float32",
              "step": 0,
              "exdesc": "Named 'Seeq Export ML Output 1' within http://ec2-3-85-239-140.compute-1.amazonaws.com:34216//workbook/FF059173-7C46-4BEE-B6CF-66A56482D081"
            }
          }
        ],
        "BufferOption": "DoNotBuffer"
      }
Your instrumenttag, which is the ID of the signal, and the exdesc will be different from the configuration above.
12. Wait about two minutes for the DirectiveRefreshFrequency to process the directive and to export the values.
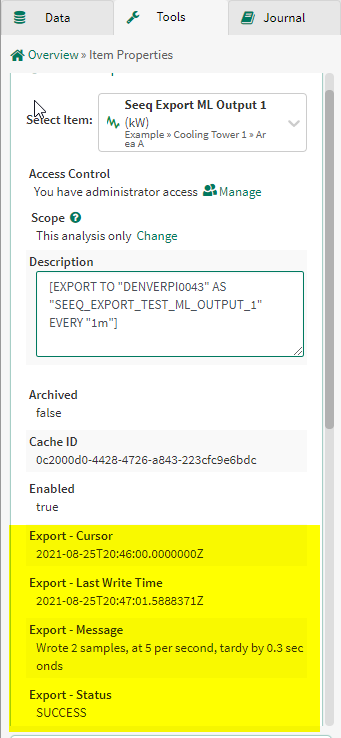
13. Click the ![]() icon in the Details Pane to the left of the signal to refresh the Item Properties, and scroll down to the Export properties. Some additional Export- properties are visible:
icon in the Details Pane to the left of the signal to refresh the Item Properties, and scroll down to the Export properties. Some additional Export- properties are visible:
Manually Update a Signal in PI
Changes to a signal that has an export directive are queued for approval. If the changes are manually applied to the PI Point, then the next directive refresh will remove the item from the queue.
This section triggers an update by changing the formula name of the signal from the previous example.
Click the Edit Formula icon in the Details Pane to the left of the signal
Change the formula name to
Seeq Export Test ML Output 1.Click the Execute button.
Wait about two minutes for the
DirectiveRefreshFrequencyto process the change.Open, or reload, the
OSIsoft PI Connector.jsonconnector file. The Export section should now look something like this:CODE"Export": { "Enabled": true, "AutoCreate": false, "AutoUpdate": false, "RequireApproval": true, "DirectiveRefreshFrequency": "1m", "NewOrChanged": [ { "Name": "SEEQ_EXPORT_TEST_ML_OUTPUT_1", "Approved": false, "Properties": { "exdesc": "Named 'Seeq Export Test ML Output 1' within http://ec2-3-85-239-140.compute-1.amazonaws.com:34216//workbook/FF059173-7C46-4BEE-B6CF-66A56482D081" } } ], "BufferOption": "DoNotBuffer" } }Note that the
exdescreflects the name change.
Wait about two minutes for the
DirectiveRefreshFrequency to process the directive.
Open, or reload, the
OSIsoft PI Connector.json connector file. The list of NewOrChanged entries should be empty. The Export section should now look something like this:
      "Export": {
        "Enabled": true,
        "AutoCreate": false,
        "AutoUpdate": false,
        "RequireApproval": true,
        "DirectiveRefreshFrequency": "1m",
        "NewOrChanged": [],
        "BufferOption": "DoNotBuffer"
      }
Automatically Create Approved Signals in PI
The export feature can be configured to automatically create signals once they are approved. This section creates another signal with a formula, and then demonstrates the approval process.
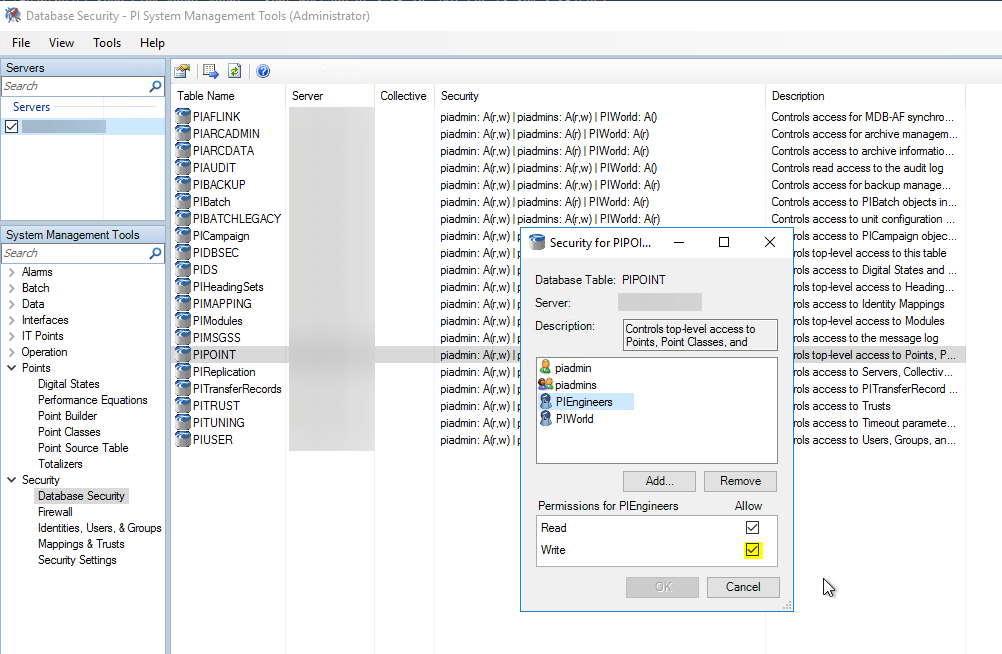
The PI Identity of the Seeq service must have Write permissions to the PIPOINT table in order to create PI Points.
Create another signal with a formula. Again, the formula itself is not important here, we just need something to return data that we can later write to PI.
Add a variable for any signal, like
Example > Cooling Tower 1 > Area A > Compressor Power.
Provide a formula, such as
$cp * 10 in the example below.
Click Execute. The signal is added to the worksheet.
Click the
![]() icon in the Details Pane to the left of the signal that was just created.
icon in the Details Pane to the left of the signal that was just created.
Click the
Manage link under the Access Control section and give Everyone Read and Write access.
In the
Description field, add the export directive as follows:
[EXPORT TO "DENVERPI0043" AS "SEEQ_EXPORT_TEST_ML_OUTPUT_2" EVERY "1m"]
Wait about one minute for the
DirectiveRefreshFrequency to process this change.
Open, or reload, the
OSIsoft PI Connector.jsonconnector file. The Export section should now look something like this:
  "Export": {
    "Enabled": true,
    "AutoCreate": false,
    "AutoUpdate": false,
    "RequireApproval": true,
    "DirectiveRefreshFrequency": "1m",
    "NewOrChanged": [
      {
        "Name": "SEEQ_EXPORT_TEST_ML_OUTPUT_2",
        "Approved": false,
        "Properties": {
          "pointsource": "Seeq",
          "instrumenttag": "02A13D89-FD2D-40A5-B6FB-C2C9B6E464AE",
          "engunits": "kW",
          "pointtype": "Float32",
          "step": 0,
          "exdesc": "Named 'Seeq Export ML Output 2' within <http://ec2-3-85-239-140.compute-1.amazonaws.com:34216//workbook/FF059173-7C46-4BEE-B6CF-66A56482D081">
        }
      }
    ],
    "BufferOption": "DoNotBuffer"
  }
}
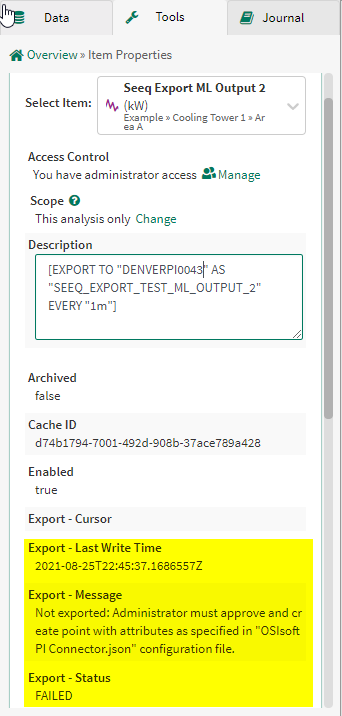
Click the
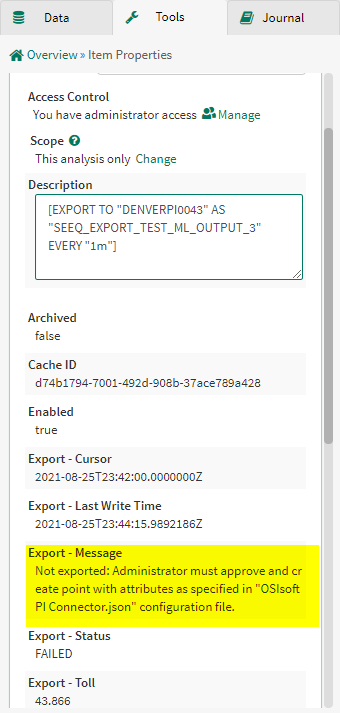
 icon in the Details Pane to the left of the signal that was just created. Note the Export - Status is Failed because an Administrator must approve the creation of the point.
Edit
OSIsoft PI Connector.jsonconnector file. Change AutoCreate totrue, change Approved totrue, and then save the file. The Export section should now look something like this:
      "Export": {
        "Enabled": true,
        "AutoCreate": true,
        "AutoUpdate": false,
        "RequireApproval": true,
        "DirectiveRefreshFrequency": "1m",
        "NewOrChanged": [
          {
            "Name": "SEEQ_EXPORT_TEST_ML_OUTPUT_2",
            "Approved": true,
            "Properties": {
              "pointsource": "Seeq",
              "instrumenttag": "02A13D89-FD2D-40A5-B6FB-C2C9B6E464AE",
              "engunits": "kW",
              "pointtype": "Float32",
              "step": 0,
              "exdesc": "Named 'Seeq Export ML Output 2' within http://ec2-3-85-239-140.compute-1.amazonaws.com:34216//workbook/FF059173-7C46-4BEE-B6CF-66A56482D081"
            }
          }
        ],
        "BufferOption": "DoNotBuffer"
      }
    }
Wait about one minute for the
DirectiveRefreshFrequencyto process this change.Open, or reload, the
OSIsoft PI Connector.jsonconnector file. The Export section should now look something like this:
      "Export": {
        "Enabled": true,
        "AutoCreate": true,
        "AutoUpdate": false,
        "RequireApproval": true,
        "DirectiveRefreshFrequency": "1m",
        "NewOrChanged": [],
        "BufferOption": "DoNotBuffer"
      }
Click the
 icon in the Details Pane to the left of the signal that was just created. Note the Export - Status is Success.
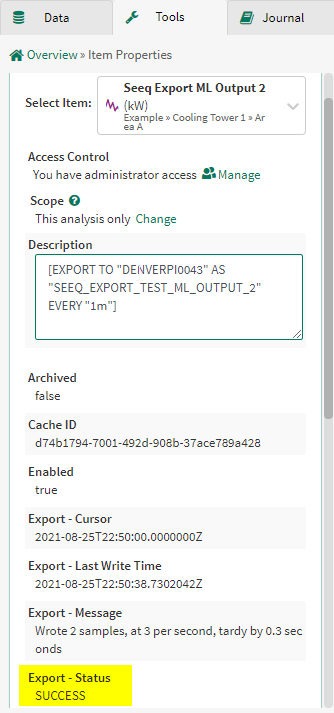
Automatically Update Approved Signals in PI
The export feature can be configured to automatically update signals once they are approved. This section updates a signal, and then demonstrates the approval process.
The PI Identity of the Seeq service must have Write permissions to the PIPOINT table in order to update PI Points.
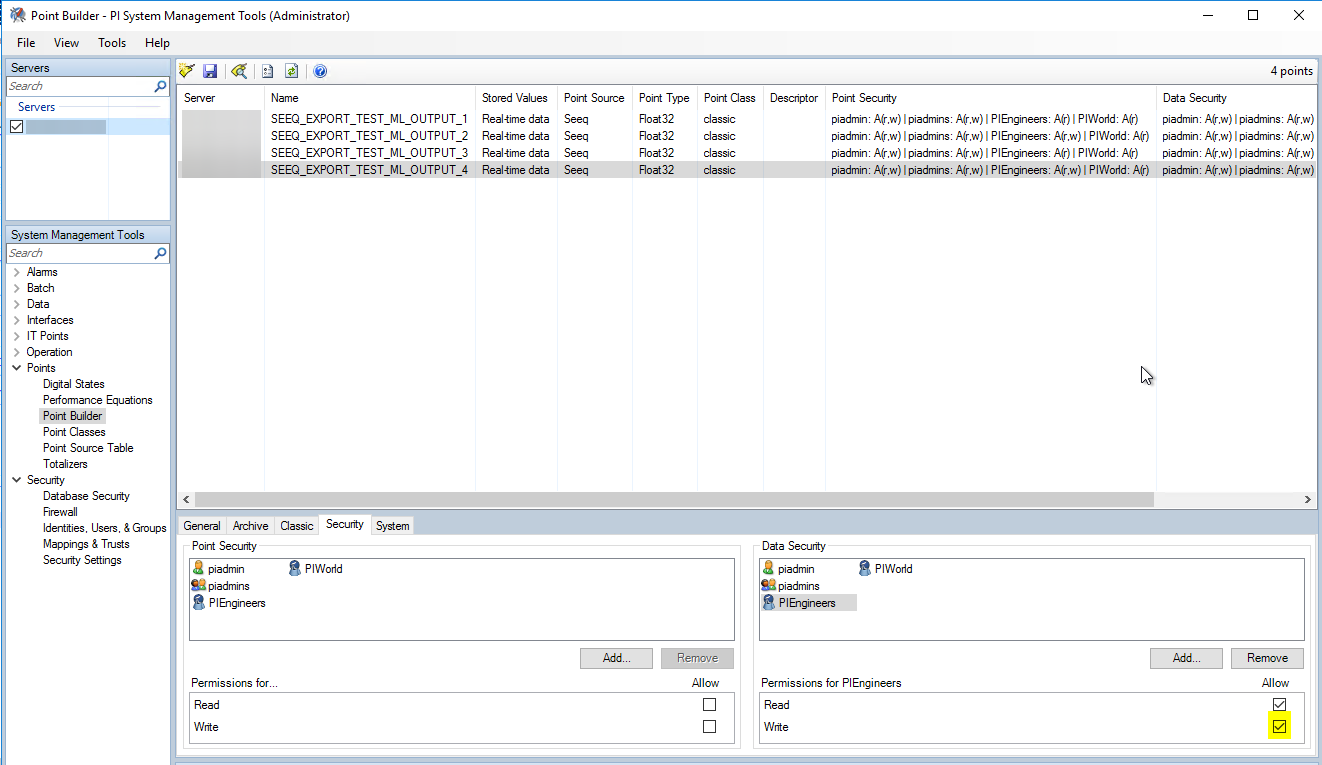
Use PI System Management Tools to give write permissions to the Seeq service account
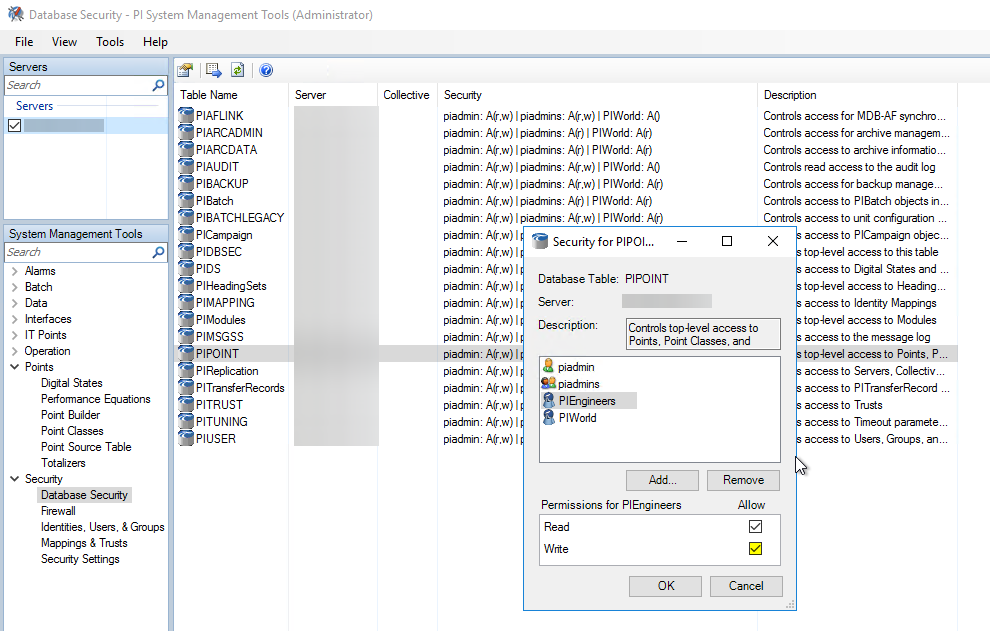
Click the Edit Formula icon in the Details Pane to the left of the signal that was created in the previous step.
Change the formula name to
Seeq Export Test ML Output 2.
Click the Execute button.
Wait about two minutes for the
DirectiveRefreshFrequency to process the change.
Open, or reload, the
OSIsoft PI Connector.json connector file. The Export section should now look something like this (Note that the exdesc reflects the name change.):
      "Export": {
        "Enabled": true,
        "AutoCreate": true,
        "AutoUpdate": false,
        "RequireApproval": true,
        "DirectiveRefreshFrequency": "1m",
        "NewOrChanged": [
          {
            "Name": "SEEQ_EXPORT_TEST_ML_OUTPUT_2",
            "Approved": false,
            "Properties": {
              "exdesc": "Named 'Seeq Export Test ML Output 2' within http://ec2-3-85-239-140.compute-1.amazonaws.com:34216//workbook/FF059173-7C46-4BEE-B6CF-66A56482D081"
            }
          }
        ],
        "BufferOption": "DoNotBuffer"
      }
    }
Edit the
OSIsoft PI Connector.jsonconnector file. Change AutoUpdate totrue, change Approved totrue, and then save the file. The Export section should now look something like this:
       "Export": {
        "Enabled": true,
        "AutoCreate": true,
        "AutoUpdate": true,
        "RequireApproval": true,
        "DirectiveRefreshFrequency": "1m",
        "NewOrChanged": [
          {
            "Name": "SEEQ_EXPORT_TEST_ML_OUTPUT_2",
            "Approved": true,
            "Properties": {
              "exdesc": "Named 'Seeq Export Test ML Output 2' within http://ec2-3-85-239-140.compute-1.amazonaws.com:34216//workbook/FF059173-7C46-4BEE-B6CF-66A56482D081"
            }
          }
        ],
        "BufferOption": "DoNotBuffer"
      }
    }
Wait about one minute for the
DirectiveRefreshFrequencyto process this change.Open, or reload, the
OSIsoft PI Connector.jsonconnector file. The Export section should now look something like this:
      "Export": {
        "Enabled": true,
        "AutoCreate": true,
        "AutoUpdate": true,
        "RequireApproval": true,
        "DirectiveRefreshFrequency": "1m",
        "NewOrChanged": [],
        "BufferOption": "DoNotBuffer"
      }
    }
Automatically Create or Update Any Signal in PI
The export feature can be configured to automatically create or update signals once they are approved. This section demonstrates the auto-create workflow.
The PI Identity of the Seeq service must have Write permissions to the PIPOINT table in order to create and update PI Points.
Use PI System Management Tools to give write permissions to the Seeq service account

Edit the
OSIsoft PI Connector.jsonconnector file. Change AutoCreate totrue, AutoUpdate totrue, change RequireApproval tofalse, and then save the file. The Export section should now look something like this:
      "Export": {
        "Enabled": true,
        "AutoCreate": true,
        "AutoUpdate": true,
        "RequireApproval": false,
        "DirectiveRefreshFrequency": "1m",
        "NewOrChanged": [],
        "BufferOption": "DoNotBuffer"
      }
    }
Troubleshooting
You can view export related entries in the net-link logs, or the _NET_Agent logs, by searching where the Message Contains ExportOrchestrator:
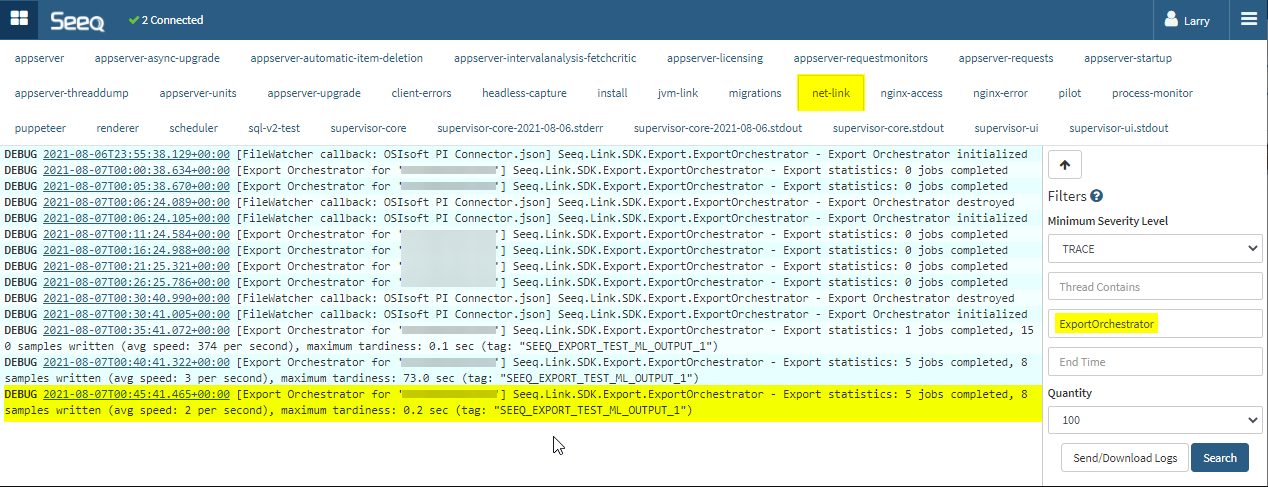
The directive is ignored
You have added the directive to a signal, and ensured that the Agent API Key (or Everyone) has Write access, and you have waited for a long time, but directive has not been processed.
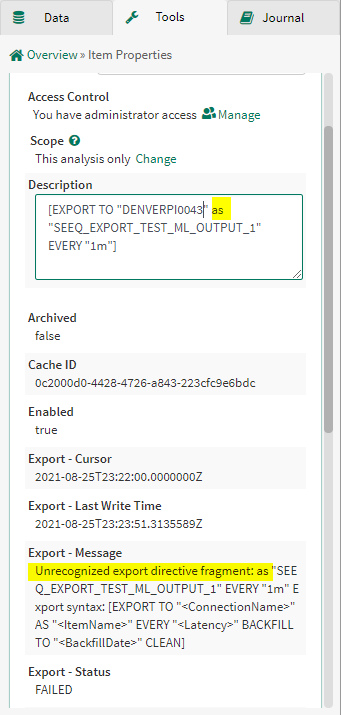
Unrecognized export directive
The Export - Message properties says “Unrecognized export directive fragment…”
Agent API Key does not have write permission to the Signal
The Agent API Key must have Write access to the the signal in order to update the Export properties on the signal.
“Not exported: Administrator must approve…”
You added a directive to a signal and waited for the directive to be processed, and now the Export - Message says “Not exported: Administrator must approve…”
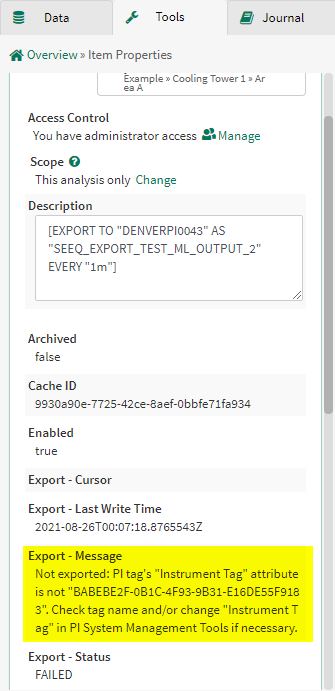
“Not exported: PI tag's "Instrument Tag" attribute is not…”
You moved the directive to another signal, and now the Export - Message shows something like Not exported: PI tag's "Instrument Tag" attribute is not "EBE6DA93-77A7-495B-96EF-6CBE68205688". Check tag name and/or change "Instrument Tag" in PI System Management Tools if necessary.
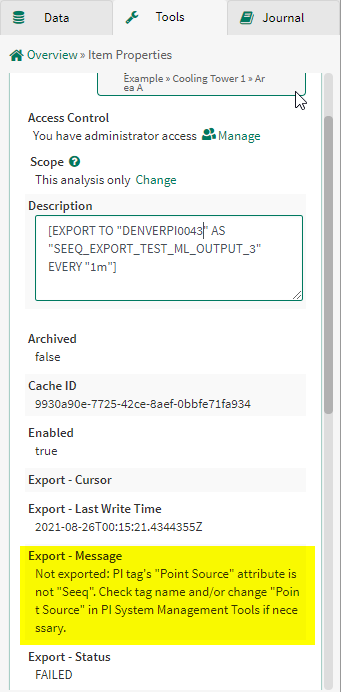
“Not exported: PI tag's "Point Source" attribute is not "…". Check tag…”
The directive seems correct and the PI Point exists, but the Export - Message shows a message like Not exported: PI tag's "Point Source" attribute is not "Seeq". Check tag name and/or change "Point Source" in PI System Management Tools if necessary.
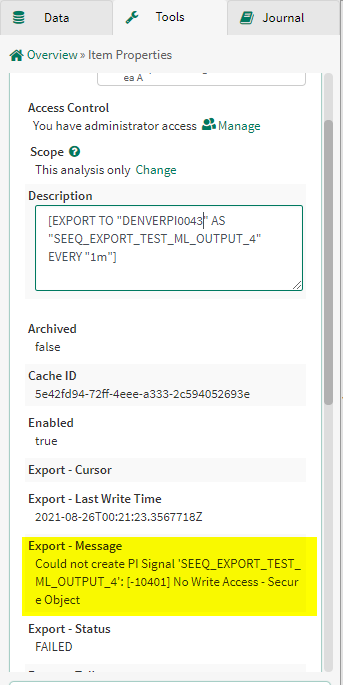
“Could not create PI Signal…”
You reviewed and approved an item in the OSIsoft PI Connector.json connector file, and now the Signal shows an error message that is similar to Could not create PI Signal 'SEEQ_EXPORT_TEST_ML_OUTPUT_4': [-10401] No Write Access - Secure Object
“Error(s) while writing values for …”
The Export - Message for a signal shows a message similar to Error(s) while writing values for 'SEEQ_EXPORT_TEST_ML_OUTPUT_4': [-10401] No Write Access - Secure Object.
Frequently Asked Questions
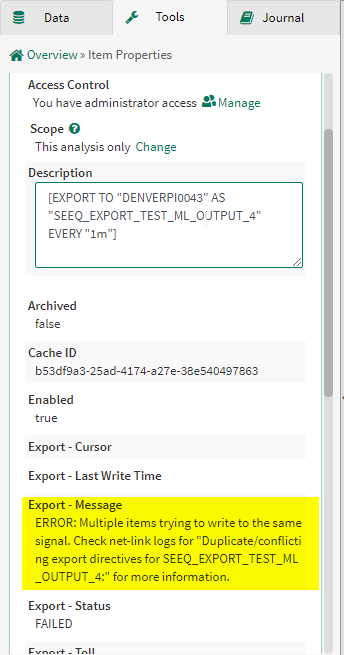
Can two signals write to the same PI Point?
No.


