Overview
It is sometimes desirable to take a signal or condition in Seeq and write its values to a historian for possible further use in that historian’s ecosystem. For example, if you write a Seeq signal to OSIsoft PI, it can be viewed in PI Vision displays.
This capability requires a specific feature license, please contact Seeq support for more information.
It is recommended to conduct throughput testing to determine how many signals or conditions can be written from Seeq to the historian while maintaining acceptable performance. Seeq’s calculation engine evaluates calculations on demand (“just in time”), querying datasources at execution time. Many datasources cannot reliably handle thousands of concurrent queries, which creates a practical limit on the number of signals that can be exported. CPU or memory-intensive calculations may further reduce export capacity.
Supported Historians
Currently, this type of exporting is only supported for OSIsoft PI (i.e., the PI Data Archive).
Export Directives
Seeq users can propose a signal to be exported by adding an export directive to a Seeq item’s Description field, which is editable directly in Seeq Workbench. Export Directives are simple, human-readable “sentences” that describe the parameters of the export activity like so:
[EXPORT TO "DENVERPI0043" AS "SEEQ_FAILURE_PREDICTOR_PUMP_05483"]
Export Directives must be added to the end of the Description field if there’s already a description there. Export Directives are case-sensitive and must not contain any newline characters.
Detailed instructions:
-
Create or find a signal or condition that you wish to export in Seeq Workbench and add it to the trend.
-
If you are exporting a condition, it must be converted to a signal. If you would like a 1 when a capsule is present and a 0 when not, then create a new signal using the Formula tool like so:
splice(0, 1, $item)where
$itemis the condition in question. -
Click the
icon in the Details Pane to the left of the signal you would like to export to bring up the Item Properties tool.
-
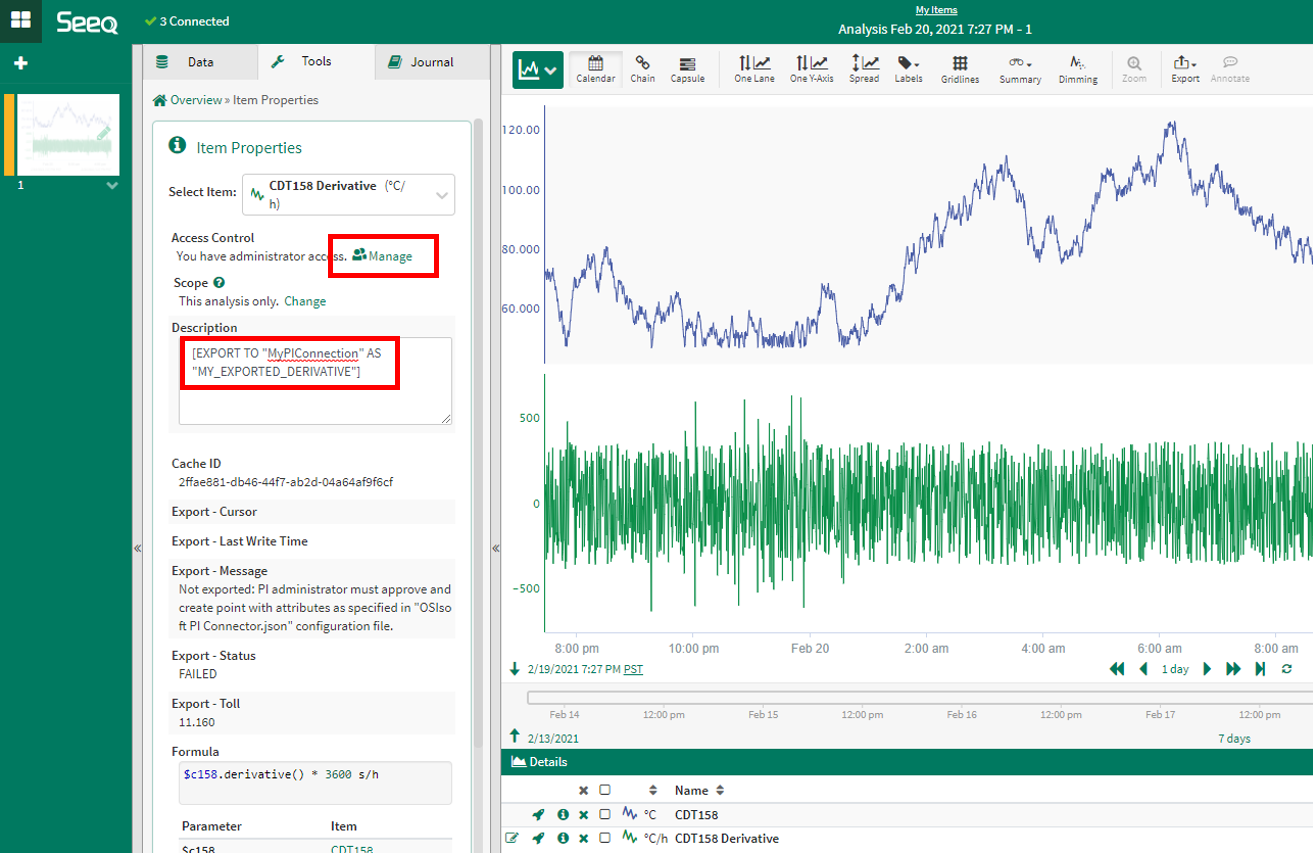
In the Description field, add the export directive like so:
[EXPORT TO "<ConnectionName>" AS "<SignalName>"]where
<ConnectionName>is the name of the connection to the historian to which you are exporting and<SignalName>is the intended name of the signal/tag/point in the historian.
Important Note: The Connection name may be different from the Datasource name that you see in the Seeq Workbench Data tab. The Connection name is visible in the Datasources tab of the Administration page, when you select your connection and click Configure: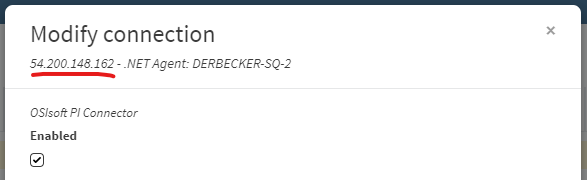
-
Click anywhere else on the screen to cause the Description entry to be saved.
-
Click the Manage link underneath the Access Control section. In the text box under the Name column, type
Everyoneand select the User Group that appears as a dropdown hint. Click the Read and Write checkboxes to the left and click Add. -
Click Save to commit the access control changes.
Why did we change the access control? The connector that will perform the exporting needs read access to the signal, and also needs write access to add important export status indicators to the signal’s item properties, as you will see later. The easiest way to do this is to grantEveryoneaccess – but you can also create a separate group to do this: See Avoiding “Everyone” Access.
Your first export directive is now in place, but nothing will happen until the Seeq administrator enables the datasource export subsystem.
Enabling Export
Exporting is performed by the datasource’s connector in the context of a particular connection. This is referred to as the datasource export subsystem.
For example, exporting to OSIsoft PI is controlled in the OSIsoft PI Connector.json configuration file and there are separate controls for each connection within the Export section:
      "Export": {
        "Enabled": false,
        "AutoCreate": false,
        "AutoUpdate": false,
        "RequireApproval": true,
        "DirectiveRefreshFrequency": "15m",
        "MinimumLatency": "15m",
        "NewOrChanged": []
      }
First, change Enabled to true to turn on the datasource export subsystem for this connection. This will not have any immediate effect, as you will need to configure other values as described below.
Destination Signal Creation and Updating
By default, the datasource export subsystem will not create or update signals (in OSIsoft PI, these are referred to as tags or points) in the destination system. Seeq administrators can exert tight controls over what actions can be taken by the subsystem.
The subsystem, acting on the frequency defined by DirectiveRefreshFrequency, will search the Seeq item database for signals with export directives.
You may wish to temporarily increase the DirectiveRefreshFrequency to, say, 15s so that your changes are picked up more frequently. The downside to having a high refresh rate is that Seeq Server will be queried more often, resulting in higher Server Load.
DirectiveRefreshFrequency does not affect the rate at which data is exported – it only affects how quickly new/changed export directives are discovered.
Once found, any new or changed directives are added to the NewOrChanged section of the configuration like so:
      "Export": {
        "Enabled": true,
        "AutoCreate": false,
        "AutoUpdate": false,
        "RequireApproval": true,
        "DirectiveRefreshFrequency": "5s",
        "NewOrChanged": [
          {
            "Name": "MY_EXPORTED_DERIVATIVE",
            "Approved": false,
            "Properties": {
              "pointsource": "Seeq",
              "instrumenttag": "5EE97426-FA5A-4DEB-A718-7E20D44CC36D",
              "engunits": "°C/h",
              "pointtype": "Float32",
              "step": 0,
              "exdesc": "Named 'CDT158 Derivative' within http://127.0.0.1:34218/workbook/50CF35A1-56A5-47AB-AEE8-C02902B8D392"
            }
          }
        ]
      }
At this point, the Seeq administrator has several options to finalize the export:
-
Create the signal/tag/point manually in the historian by copying the values seen in
Propertiesinto the appropriate historian tool. For example, for the OSIsoft PI system, you would use PI System Management Tools (PI SMT). Once created with the appropriate properties, the entry in theNewOrChangedsection will disappear during the next directive refresh cycle.
When you create a signal/tag/point manually, make sure that the permissions for it in the historian are configured such that the account used by the relevant agent/connector has read permissions on the metadata and read and write permissions on the data.
-
Allow the connector to create the signal/tag/point automatically in the historian by changing the
AutoCreate,AutoUpdate,RequireApprovalandApprovedaccording to your preferences, utilizing the guidance in the subsections below.
In order for the datasource export subsystem to create or update signals in the historian, the service account being used must have permissions to do so. For example, with OSIsoft PI, the Windows Service account that is being used for the local or remote agent must have permissions to read and write to the PIPOINT table under Security > Database Security in the PI System Management Tools.
AutoCreate
If AutoCreate is changed to true, then Seeq will automatically create the signal in the destination system. If RequireApproval is true, then it will only do so if the signal has been approved by a Seeq administrator (see below).
For exports to OSIsoft PI, if Seeq automatically creates the signal, it will have Compressing set to OFF. This is to reduce the confusion that can happen as a result of PI’s default compression settings, which can cause a signal to have far fewer samples in the historian and have a different shape than what is seen in the original calculation in Seeq.
AutoUpdate
If AutoUpdate is changed to true, then Seeq will automatically update an already-created signal in the destination system if its metadata in Seeq has changed. For example, the engineering units might change as a result of a change in the definition of a calculation. If RequireApproval is true, then it will only do so if the signal has been approved by a Seeq administrator (see below).
RequireApproval
If RequireApproval is true, then the AutoCreate and AutoUpdate features will only take action for signals that have an Approved value of true.
Export Success / Failure
Once the signal/tag/point has been created in the destination system, Seeq will attempt to export data every 15 minutes (or the specific schedule specified by the EVERY instruction – see Additional Export Instructions below). You can observe success/failure by clicking on the icon again to refresh the Item Properties Tool. You should now see a series of new properties prefixed with Export. The most important of these are Export - Status, which is either
SUCCESS or FAILED, and Export - Message, which contains information about the success or failure of the last export operation.
What if you don’t see the new Export properties? Here are some common causes:
-
The datasource export subsystem has not been enabled for the datasource in question.
-
The
Everyoneuser group has not been granted read AND write permissions to the signal in Seeq. -
The
EXPORT TO "<ConnectionName>"instruction is incorrect, or perhaps that connection is disabled or faulty.
The exported tag data in OSIsoft PI doesn’t look the same as what I see in Seeq. Why?
Make sure that the compression settings for the tag in PI are set appropriately. In fact, it’s best if you can set Compressing to OFF so that the exact same samples from Seeq are written and stored in PI.
Tardiness
Upon success, the Export - Message property may contain a reference to how “tardy” (or “late”) export was. For example:
Wrote 1033 samples at 2453 per second tardy by 31.5 seconds
This “tardy by” value indicates that the export operation finished 31.5 seconds later than what was desired by the user in reference to the EVERY clause in the Export Directive (see Additional Export Instructions below). For example, if the directive specifies EVERY "5 min", then the export finished 5 minutes and 31.5 seconds after the previous export. (The start of the last export is captured in the Export - Last Write Time property).
This tardiness measurement is meant to indicate whether or not the system is regularly meeting the requirement specified in the EVERY clause. If you are consistently seeing high tardiness numbers that affect the utility or reliability of the exported data, you may need to investigate whether the calculation is too complex or the underlying datasources are too slow to provide the data with that regularity.
Additional Export Instructions
The full syntax of the export directive is as follows:
[EXPORT TO "<ConnectionName>" AS "<SignalName>"
 EVERY "<Latency>" BACKFILL TO "<BackfillDate>" INCLUDE UNCERTAIN CLEAN VERBOSE]
where:
-
[EXPORT TO "<ConnectionName>"must be in that exact format, including identical whitespace and quotemarks. The remaining components (AS,EVERY,BACKFILL TO,INCLUDE UNCERTAIN,CLEAN,VERBOSE) may appear in any order after it. -
EVERY "<Latency">is the time span between write operations. Examples:EVERY "1h",EVERY "5m". If excluded, the default value is 15 minutes unless the configuredMinimumLatencyis a larger duration, in which case the default latency is equal to theMinimumLatency.MinimumLatencyenforces a global minimum latency for all export directives associated to the connection for which it has been specified.
It is important to specify the largest latency you can live with, because that will minimize the load that the export operation will impose on the Seeq Server. For example, if you try to export 100 signals with less than a minute of latency for each, it will be difficult to process them all in the timeframe allotted and Seeq Server will be processing requests all the time. If the normal 15-minute latency is acceptable, the export load on the Seeq Server has a better chance of not impacting other server operations.
-
BACKFILL TO "<BackfillDate>"defines how far back in time to write data on the initial export. Example:BACKFILL TO "2021-02-01T00:00:00Z". Note that once data has been written at least once, this value will be ignored unless paired withCLEAN(see below). If excluded, the default action is to backfill 5 hours into the past. -
INCLUDE UNCERTAINinstructs the export subsystem to write uncertain samples to the external system. The property “Export - Cursor” will be set to the timestamp of the most recent certain sample, though, and connectors that implement export (e.g., the PI connector) will usually remove any already-written samples after the export cursor on subsequent writes before writing new samples, whether these new samples are certain or uncertain. -
CLEANinstructs the export subsystem to first clear out all existing data to the backfill date and rewrite it. This instruction will disappear from the export directive once it is acted upon. -
VERBOSEcauses the export to log more details for this Signal and for global operations like checking for new export directives
Avoiding “Everyone” Access
As you have read above, you must grant access to the Seeq signal that is being exported so that the export subsystem can read the data and write to the signal’s properties. If you want to avoid granting everyone that access, the best alternative is to create a User Group called Agents (or some other name you choose) and populate the group with the Agent API Key user. You must do this using the Seeq SDK. Here is the Python code to accomplish it:
from seeq import spy
from seeq.sdk import *

# Must log in with a user with admin credentials. This step is unnecessary if you
# are using Seeq Data Lab and you are a Seeq admin.
spy.login(url='http://myseeqservice', username='my.username@mycompany.com', password='mypassword', force=False)

users_api = UsersApi(spy.client)
usergroups_api = UserGroupsApi(spy.client)

user = users_api.get_user_from_username(username='agent_api_key', auth_datasource_class='Auth', auth_datasource_id='Seeq')
user_group = usergroups_api.create_user_group(body=UserGroupInputV1(name='Agents', is_enabled=True))
usergroups_api.add_identity_to_user_group(user_group_id=user_group.id, identity_id=user.id)
Now you can grant read/write access to the Agents group instead of the Everyone group, thus avoiding potential data security issues.
Scaling Across Assets
To export items back to the historian they need to be independent of other items. This means doing an asset swap and trying to write the swapped tag back won’t work. In order to get around this, a deep clone of the item should be created. This can be done by duplicating the workbook or by manually duplicating the items to be exported. The normal worksheet duplication will not generate new items so it will not work for this. Once the item has been cloned you can asset swap to the desired asset. The swapping can occur before or after the cloning it doesn’t really matter.
After the cloning is finished and the item which is desired to be written back is looking at the correct asset, its asset dependencies need to be broken. To do this click on the item properties of that item and duplicate the item. The newly duplicated item can then be written back to the historian following the steps above.
Frequently Asked Questions
Q: What account will be logging in to the historian and writing the data?
A: The Windows Service account that the connector/agent is using. If the historian has tag-level security, that account must have permissions to read/write from/to the target tag.
Q: I don’t want just anyone to be able to create new tags in my historian. How do I prevent that?
A: By default, the export facility is not allowed to create new tags or update existing tags – a historian administrator must create them for use by Seeq’s export facility. Even if a Seeq administrator decides to set AutoCreate to true, appropriate permissions still must be granted within the historian to the Windows Service account that the connector/agent is using. For example, with OSIsoft PI, that account would need write permissions to the PIPOINT table in the PI System Management Tools.
Q: How do I ensure that only a specific Seeq Signal is written to a particular tag?
A: The properties of the target tag must match what Seeq expects. (See Destination Signal Creation and Updating.) For example, with OSIsoft PI, the Point Source and Instrument Tag point attributes must be set to the values that are specified in the Properties section of the NewOrChanged list, and those attributes tie the tag to a specific signal within Seeq. If the properties do not match, an error will be seen in the Export - Message property of the signal within Seeq’s Item Properties panel.