Basic Example
Implementation
At a high level, a plugin is simply a client web application that is displayed in a sandboxed iframe in Seeq. The files for the plugin web application (e.g. HTML, CSS, JavaScript) come from the installed plugin.
The plugin communicates with Seeq through an Application Programming Interface (API) that is made available to the plugin web application via a getSeeqApi() function that Seeq places on the Window object of the sandboxed iframe that hosts the plugin.
Let’s get to know plugins a little better by writing one! We’ll start by writing, packaging, installing, and running the simplest add-on possible.
The seeq-addon-templates project on GitHub provides a great way to generate an installable packaged Add-on that contains both a DisplayPane and a ToolPane plugin. You can generate a packaged Add-on to use as a reference or as a starting point for your own custom project.
Prerequisites
You’ll only need a few things to create, install, and test a basic plugin:
a running instance of Seeq with the
Features/Plugins/Enabledconfiguration setting set totrue.
web browser of your choice
text editor
zip utility to compress a couple of files into an archive
Hello World
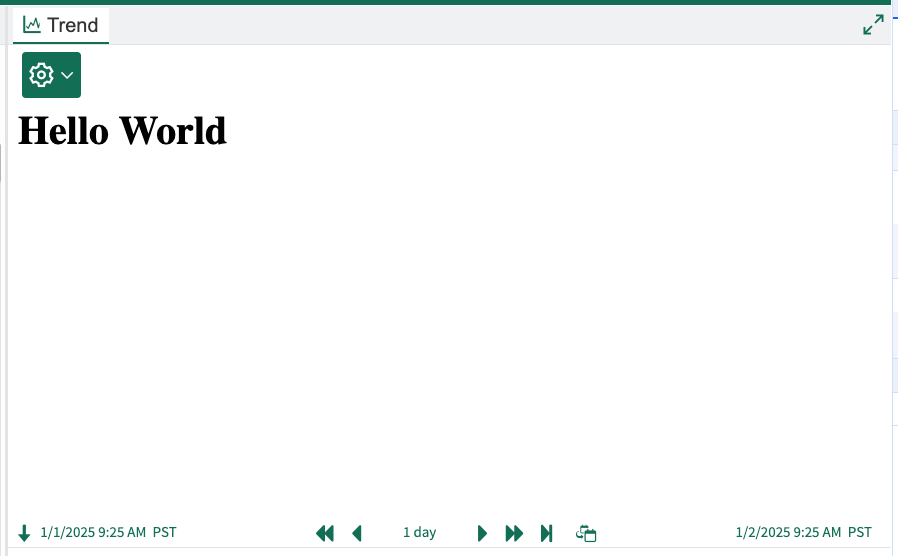
Our first plugin will display “Hello World” in the display pane. When selected in Seeq, it will look like what you see below.

To generate this plugin, we’ll need to:
create a
plugin.jsonconfiguration filecreate an
index.htmlfilezip the two files together into an archive named
HelloWorld.plugin
Step 1: Configuration
Create a file named plugin.json and copy the following json into it. Every plugin must have this file. The configuration information in this file is used by the plugin infrastructure to load and display the plugin.
{
  "category": "DisplayPane",
  "identifier": "com.seeq.plugin.helloworld",
  "name": "Hello World",
  "description": "The simplest add-on",
  "version": "0.0.1",
  "icon": "fa-gear",
  "security": "",
  "entryPoint": "",
  "host": {},
  "options": {}
}
Explanation of Options
category : Informs the plugin infrastructure where the plugin should be displayed. Currently DisplayPane, ToolPane, and HomeScreen are the only supported options.
identifier : A string that uniquely identifies your plugin. When a plugin is uploaded to Seeq, if a plugin with the same identifier is already installed, then it will be replaced.
name : The user-visible name of the plugin. The user will see this name in the display pane view selector dropdown.
description : A more detailed description of the plugin. It can be seen by an administrator when installing or reviewing installed plugins.
version : The plugin version. It’s a string, so it can have any format desired by the plugin author, but we recommend semantic versioning. It can be seen by an administrator when installing or reviewing installed plugins.
icon : The icon to be displayed in the display pane view selector dropdown and on the view selector button when the plugin is selected.
entryPoint : The entry point defines the plugin’s main HTML file. This is the file that will be displayed when the plugin is selected. It defaults to index.html if no value is supplied.
Step 2: Content
Create a file named index.html and copy the following markup into it.
<h1 style="margin-top: 50px">Hello World</h1>The words “Hello World” are displayed as a heading.
The style="margin-top: 50px" is needed to offset the words vertically so they display below the display pane view selector button instead of behind it.
Step 3: Packaging
With the plugin.json and index.html files created, all that remains is to package them together in an archive file named HelloWorld.plugin. The .plugin file extension is a convention that is required in order to be able to upload the add-on for installation in Seeq.
The seeq-addon-templates project provides tooling that takes care of building your plugin and packaging it into a Seeq Add-on that can be installed using the Add-on Manager. It also has tooling to watch your source files, automatically package the add-on, and upload it to Seeq whenever you change your source code during development.
For now you can just manually create the file using the zip tool of your choice. It can be handy to create a simple script like the one below (package.sh)
#!/bin/bash
zip HelloWorld.plugin plugin.json index.html
Step 4: Uploading
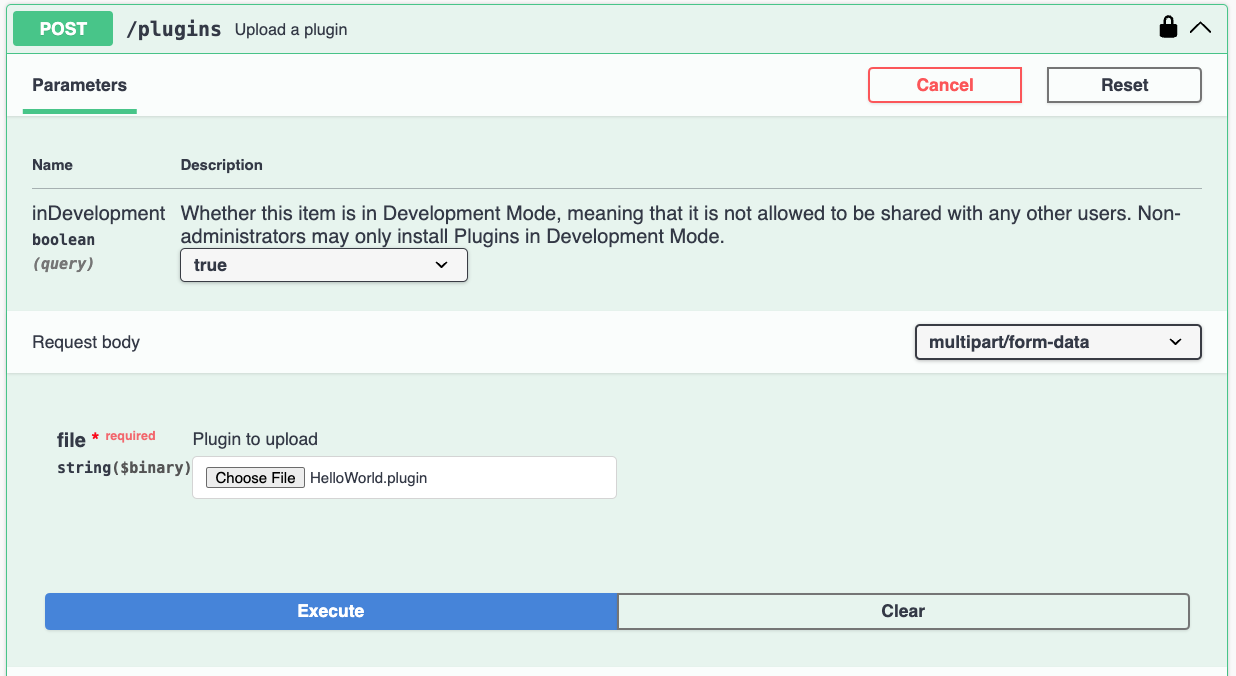
Once you’ve created the HelloWorld.plugin, all that remains is to upload it to Seeq. Users with Administrator permissions can use use the “Upload Plugin” button on the Administration Plugins tab to install the plugin and configure which Seeq users and groups have permission to use it.

Users without admin privileges can upload plugin to Seeq using the Seeq API POST /plugins endpoint. You must select true for the inDevelopment parameter and the “Choose File” to select your .plugin file and click the “Execute” button. An inDevelopment plugin installed by a non-admin user can only be seen by the user that installed it.
Plugins can be installed alone, but more typically they are installed as an element of a packaged Add-on that can be installed and managed using the Add-on Manager.
Step 5: See it in Action!
After uploading the plugin, open up an Analysis and click on the display pane view button to see the “Hello World” add-on available in the dropdown menu.
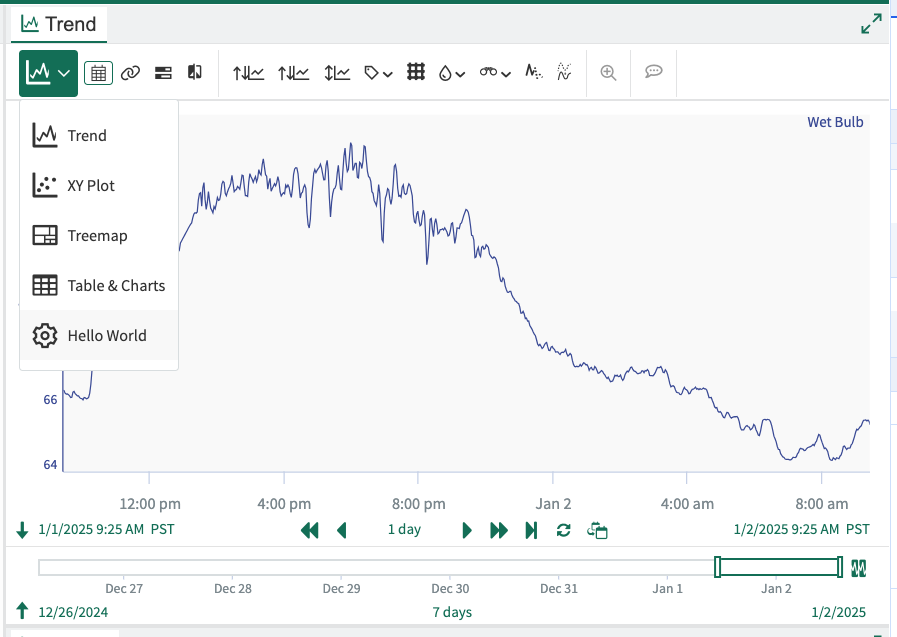
Upon selecting “Hello World” from the dropdown, we see our add-on has been loaded in the display pane!
A Peek Under the Covers
It’s interesting at this point to see that the plugin’s index.html file is simply set as the src of a sandboxed iframe, which causes the supplied HTML to be loaded in the iframe.
