Vantage-ready Conditions Best Practices
Overview
Vantage will monitor for capsules (e.g., “Events”) generated by conditions configured in Seeq. This document outlines best practices to consider when configuring conditions for consumption in Vantage. To learn how to set up Condition Sources in Vantage, please refer to this article.
Vantage can monitor any capsules generated by conditions in Seeq. Depending on your Vantage use case, you may want to generate 100s to 1000s of capsules for your given monitoring use case. There are several ways to go about generating these capsules and conditions for use in Seeq Vantage, and below are considerations for streamlining condition generation for use in Vantage.
Some of the major things to consider:
Vantage Quicktrend: Quicktrend is the trend visible at the top of the Vantage App. When constructing your conditions, consider the signals you would like to appear in the quick trend so the condition can be configured to display the desired trends.
Vantage Columns (metadata): The metadata associated to your conditions and capsules will determine which columns are available in Vantage. These columns can be used for grouping, sorting, and filtering conditions. Metadata are called condition properties and capsule properties in Seeq, configuring these intentionally will give you flexibility to organize your Vantage views.
Scale: conditions can be generated at scale using asset trees and asset groups. There are some considerations for Vantage that may require custom asset tree configuration. This can include leveraging current asset hierarchies, building new ones, or a combination.
1. Vantage Quicktrend
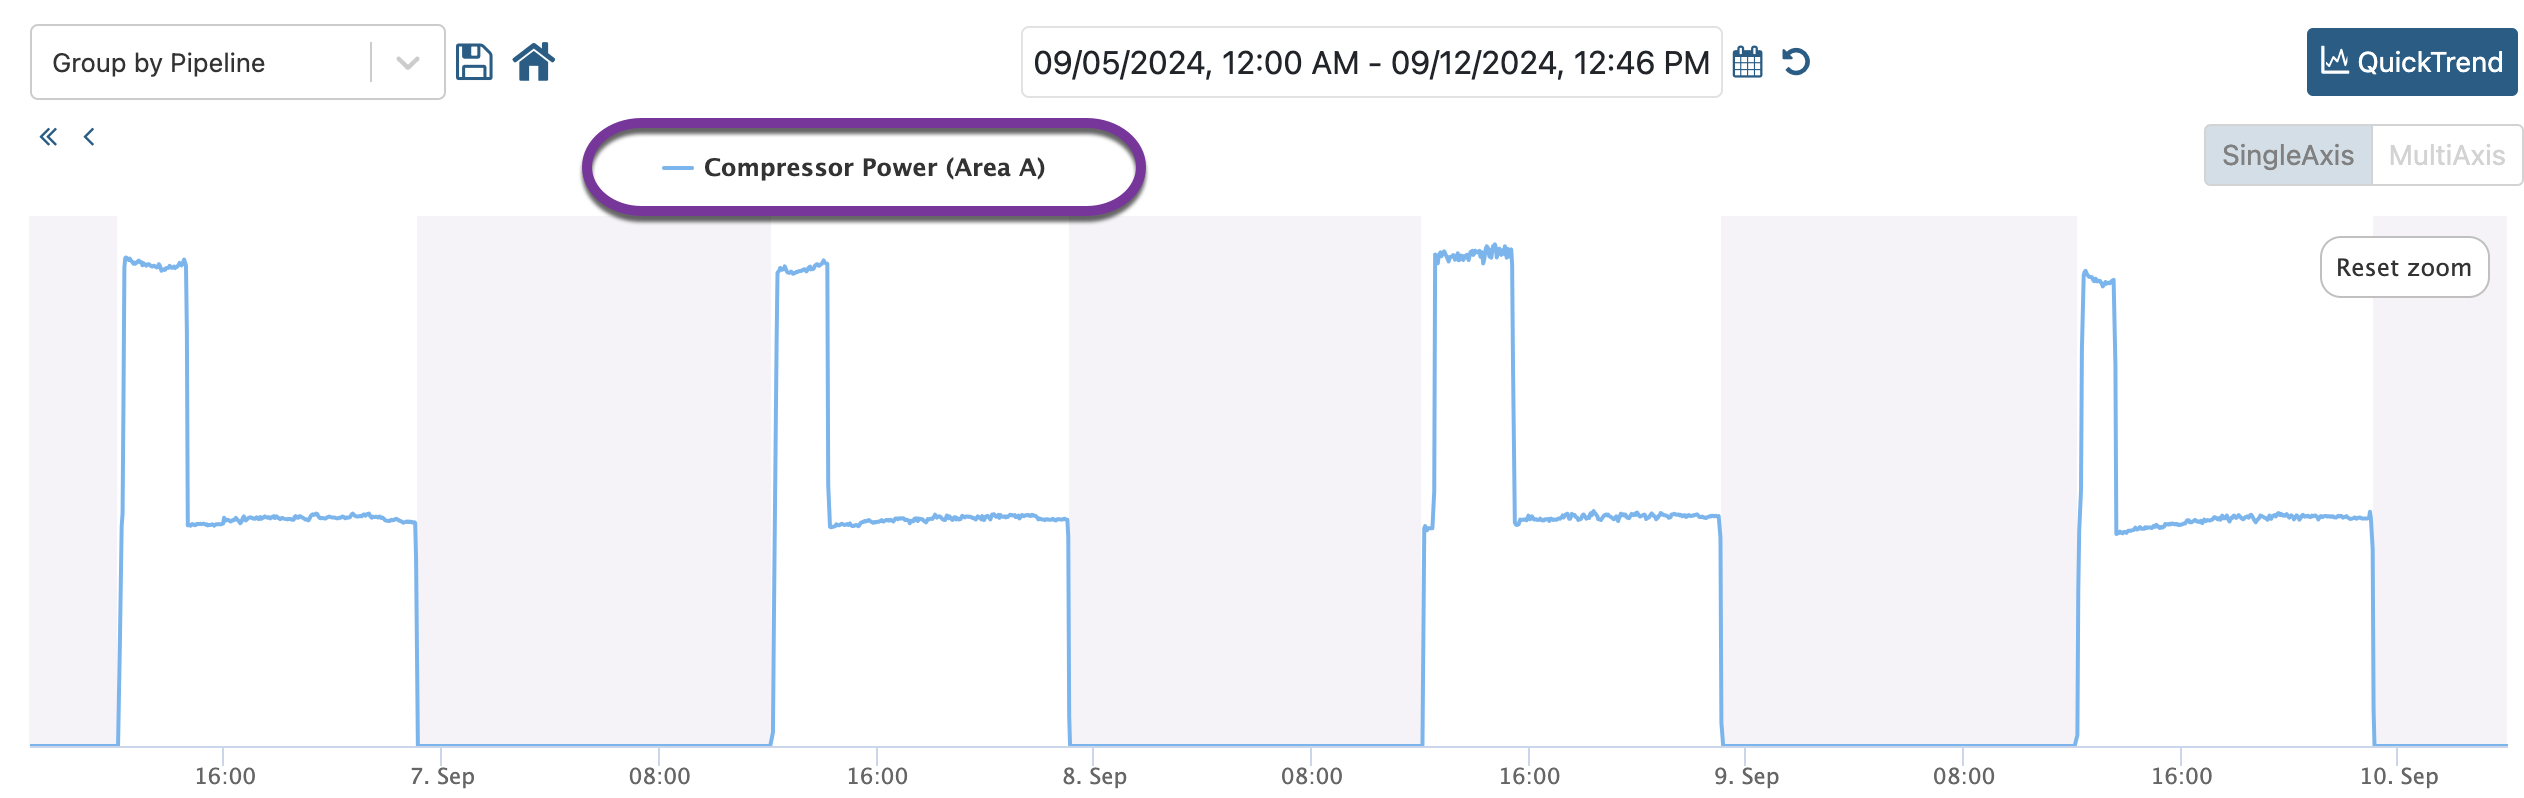
Quicktrend is a feature that allows for a quick review of event(s) picked up by Vantage. The items visible in the trend are based on the inputs associated with the Formula from which the condition was created.
If the condition contains just a single signal, for instance $power<1, then the $power signal will be represented in the Quicktrend.
Additional signals can be included in Quicktrend by adding them as variables in Formula. For example, if in addition to the $power signal, we also want to show the Temperature and Relative Humidity signals in Quicktrend, we can achieve this by setting variables $a and $b to each respective signal, even if it’s not used in the calculation:
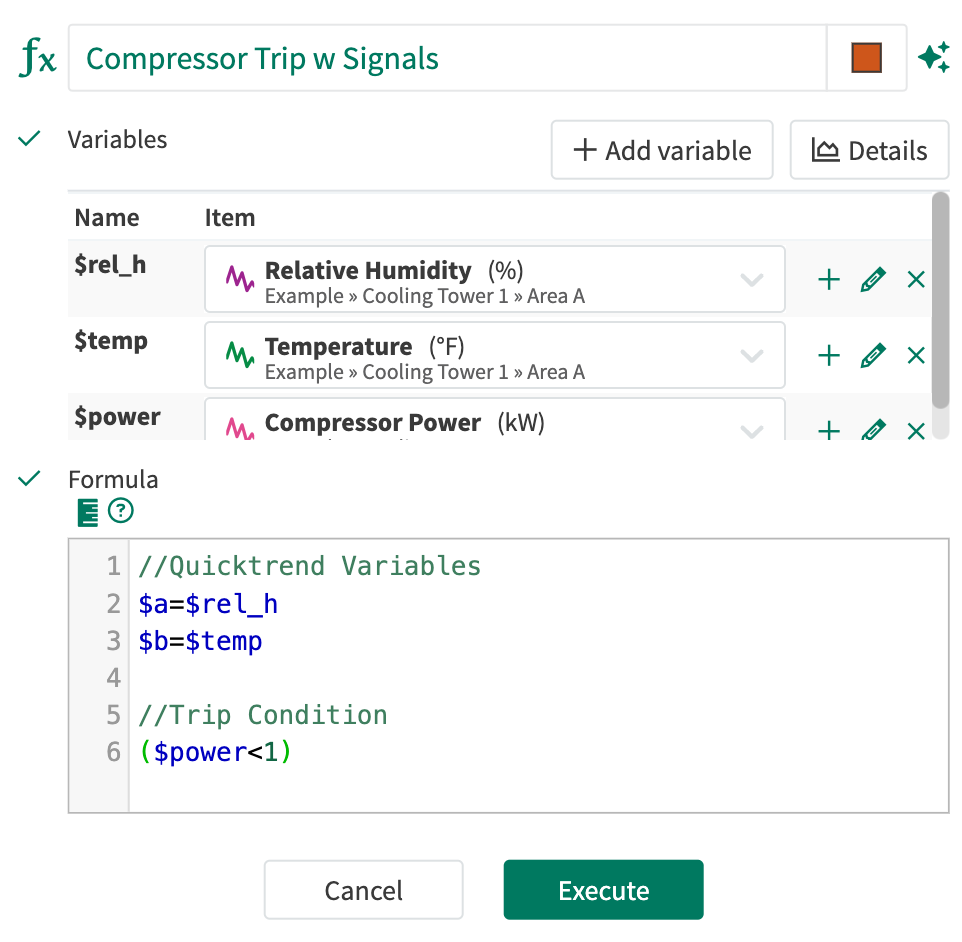
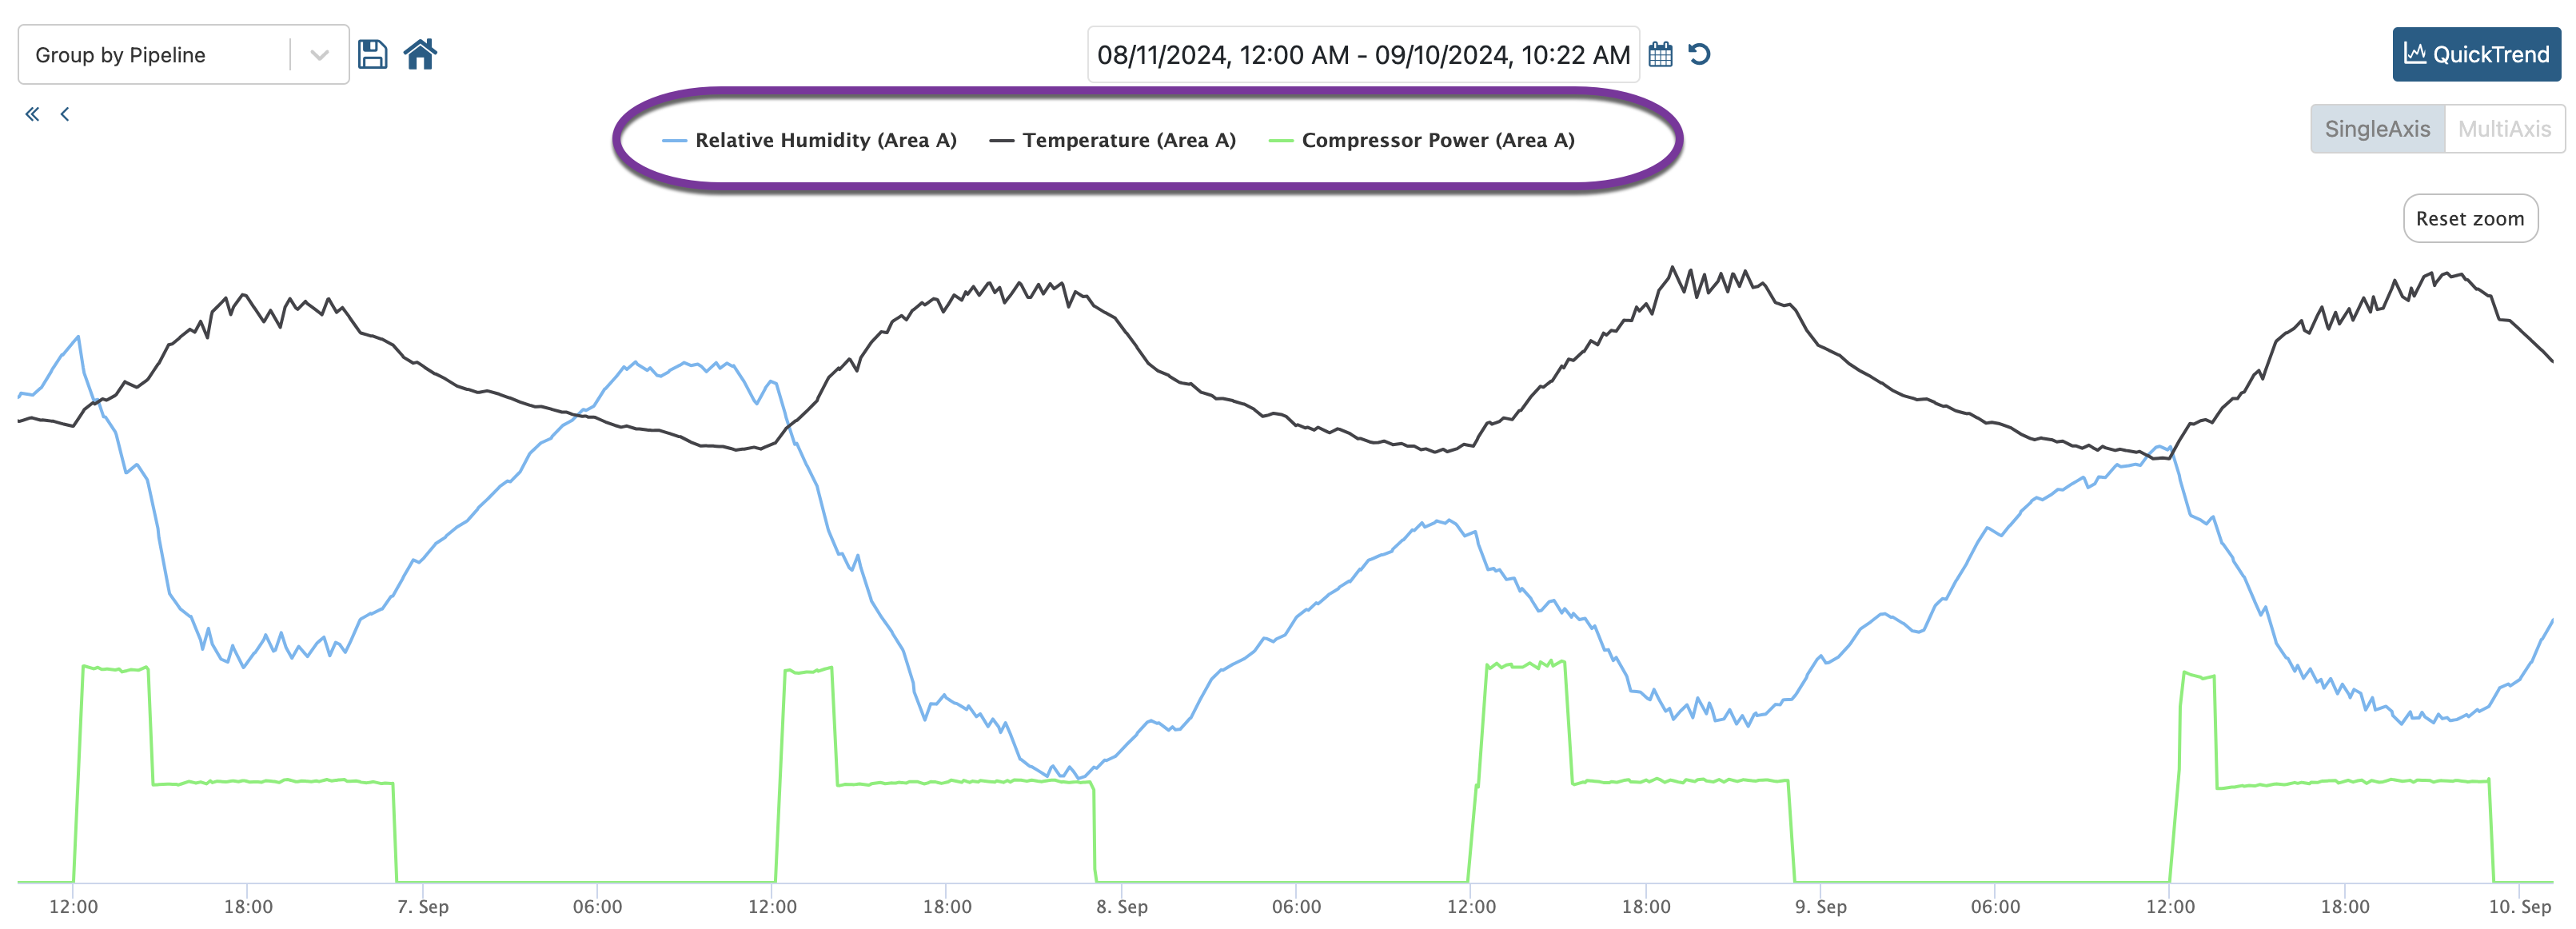
The result is Quicktrend will include Compressor Power, Temperature, and Relative Humidity signals when a capsule is found:
1.1 Capsule ID Stability and QuickTrend Highlighting
Vantage uses a unique capsule ID to identify and highlight a capsule in QuickTrend when it is selected from the evidence table. For this highlighting to work reliably, the capsule ID must be stable, meaning it must not change if the capsule is recalculated due to updated signal data.
What is an unstable capsule ID?
Some condition formulas do not produce a stable capsule ID. When this happens, Seeq's Condition Monitor synthesizes an ID from the capsule's start time as a fallback. Because this ID is derived from timing rather than a durable property, it can change if the capsule is recalculated and its timing shifts. When this happens, QuickTrend highlighting will fail.
Known causes of unstable capsule IDs
The most common cause is using combineWith() to merge multiple conditions. Because combineWith() does not preserve the original capsule IDs from the source conditions, the resulting capsules receive synthesized IDs.
How to identify capsules with unstable IDs
Vantage surfaces this issue in two places:
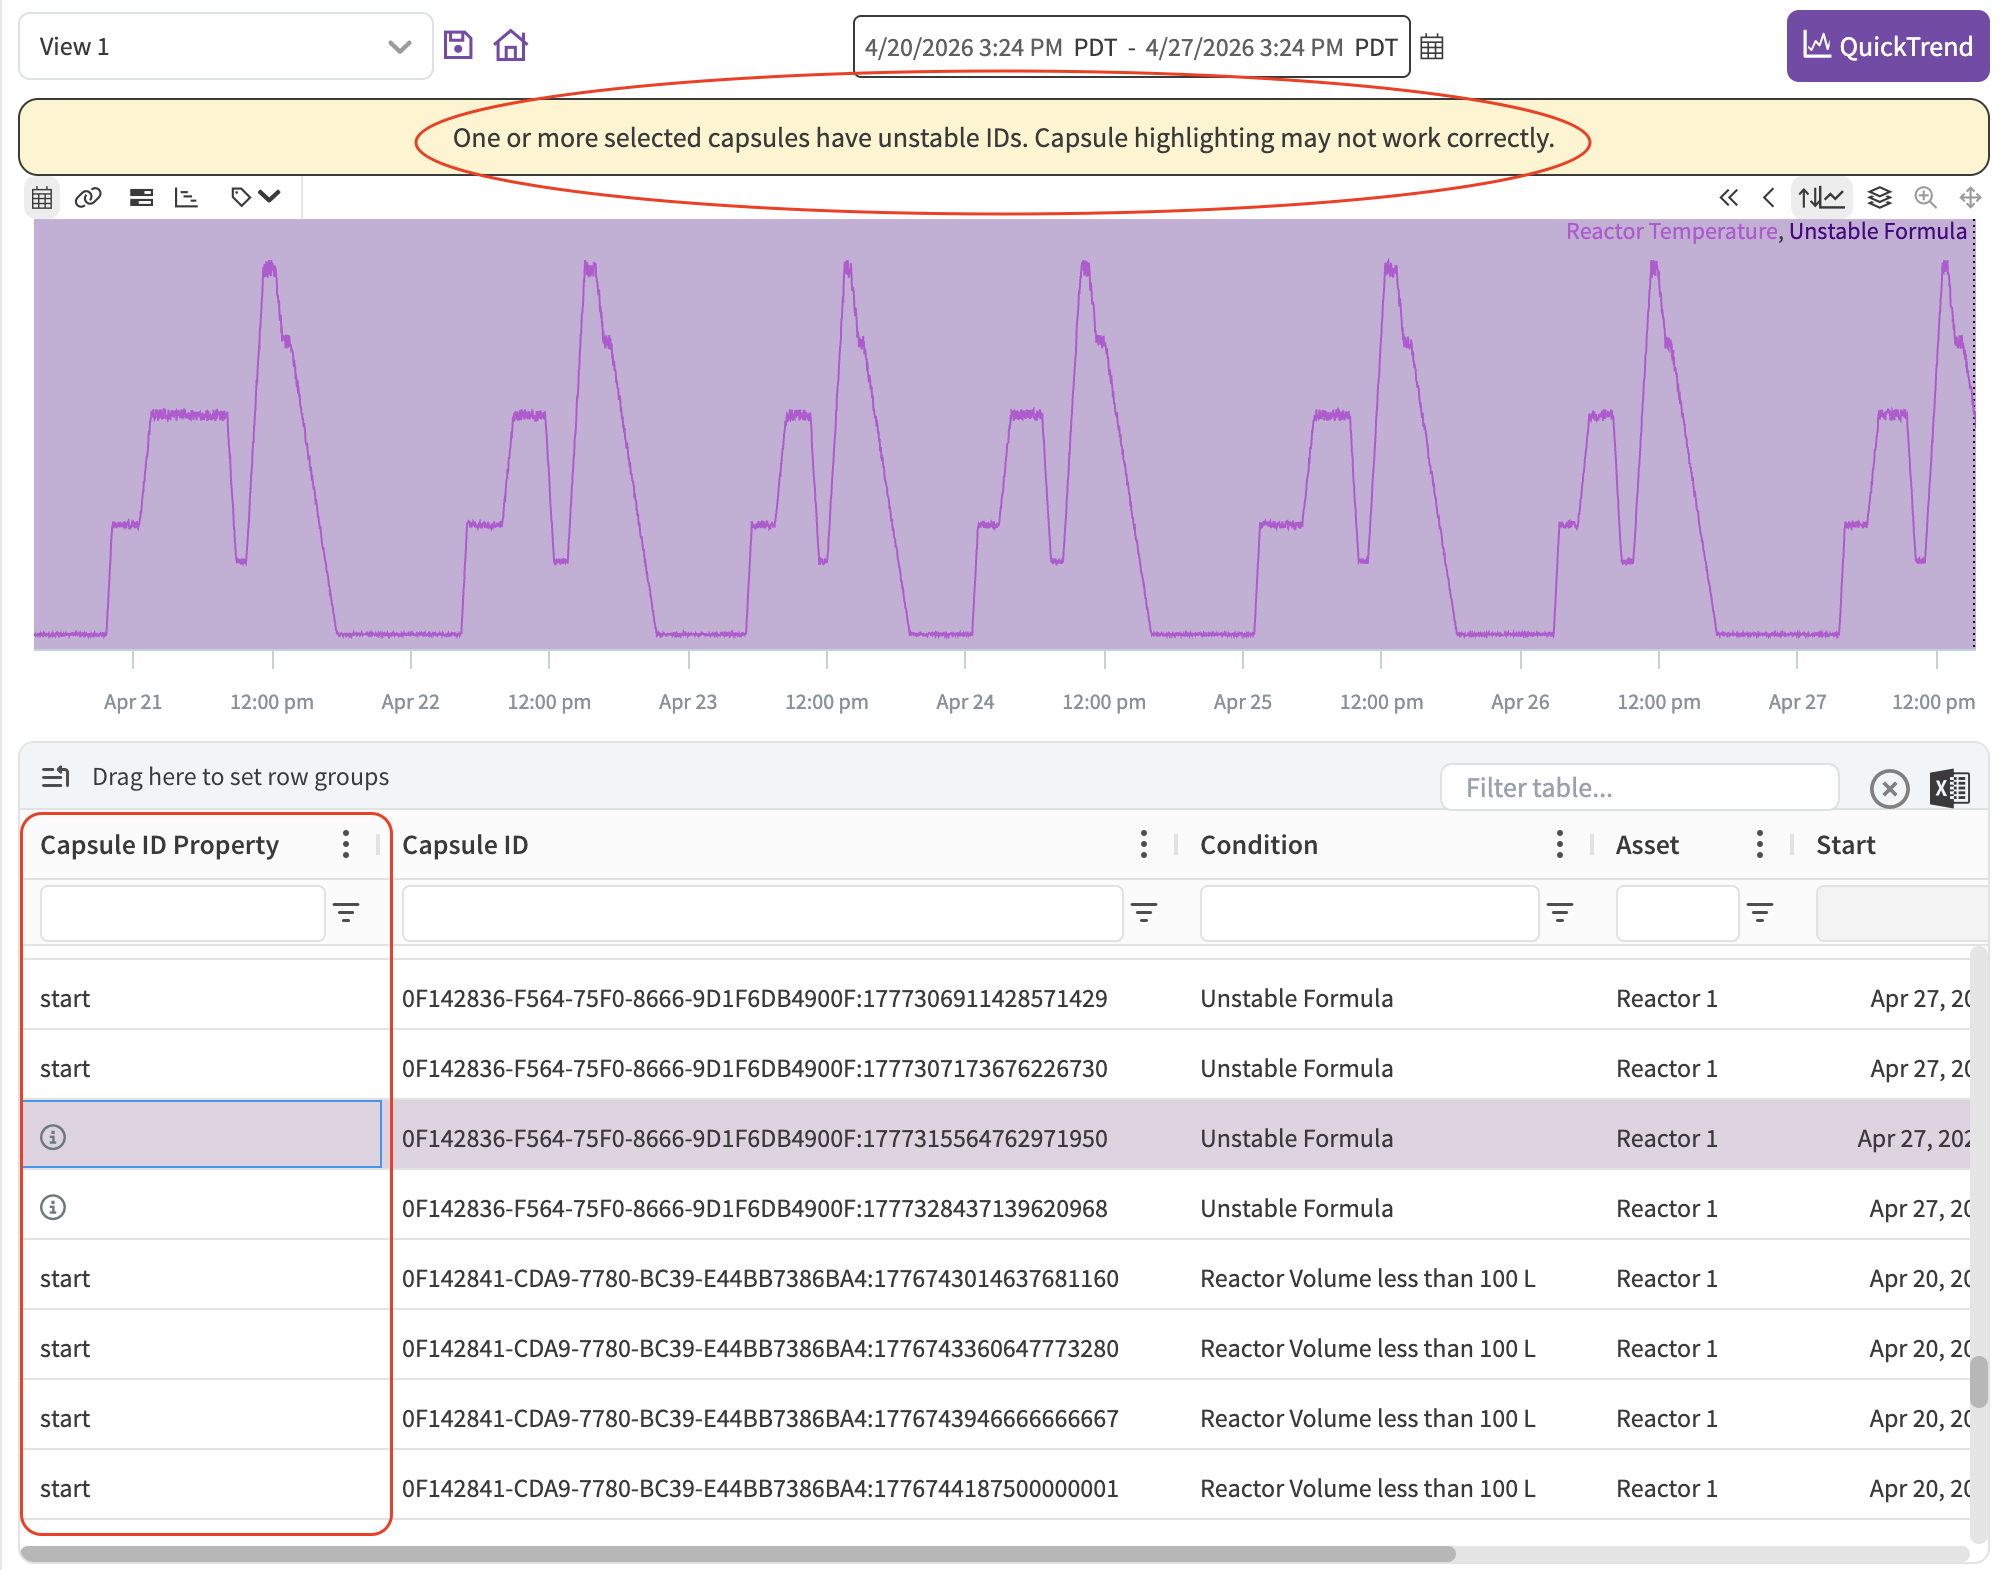
QuickTrend warning banner: When you select one or more capsules with unstable IDs, a warning appears at the top of the QuickTrend panel.
Capsule ID Property column: The evidence table includes a Capsule ID Property column. Capsules with synthesized (unstable) IDs display an info icon labeled "Unstable ID". Capsules with a stable ID display the property used (e.g.,
start). You can use this column to filter and identify which capsules are affected.
Impact on evidence tracking
Capsules with unstable IDs may not be reliably re-identified across Vantage sessions or different time ranges. If a capsule is recalculated and its timing changes, any previously recorded selection or annotation may no longer match that capsule.
How to resolve: assigning a stable capsule ID
To ensure stable capsule IDs, add .setCapsuleIdStart() to the end of your condition formula. This explicitly designates the capsule's start time as the stable ID property, which the system can reliably track:
$condition1.combinewith($condition2).setCapsuleIdStart()Once this is applied, the Capsule ID Property column in the evidence table will display start rather than "Unstable ID", and QuickTrend highlighting will work correctly.
2. Vantage Columns
Columns in Vantage are populated by properties set on the conditions or capsules being monitored. These columns can be used to help with sorting, filtering, and triaging workflows.
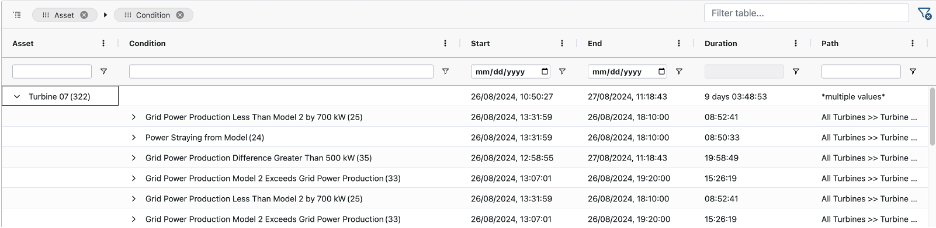
By default, Vantage will populate with the following columns:
Condition Name
Capsule Start Time
Capsule End Time
Asset Name (if condition is configured in an Asset Tree)
Path (if condition is configured in an Asset Tree)
Note: Vantage will populate the entire path as a single property. To assign individual properties for each level, use Seeq DataLab or Formula to map the levels to a corresponding property.
It may be desirable to add additional columns to Vantage by adding more properties to the conditions being monitored.
Properties to consider adding to Conditions monitored in Vantage:
Machinery – Site, Criticality, Manufacturer, etc
Quality – Site, Product Code, etc
OEE - Line, Product Code, etc
Properties can be added to the condition or capsule, Vantage will recognize either approach. Capsule Properties are assigned using setProperty() in the Formula syntax. Condition properties can be added as metadata via the Seeq REST API or the SPy library.
2.1 Adding Properties
Properties can be set on any condition via Seeq Formula. The setProperty() formula assigns capsule properties when creating a condition, which in turn can be configured in Vantage as a table column.
Example: assigning properties in Seeq Formula using setProperty()
Here we assign 4 properties. Two are static (Equipment Criticality and Unit), and two are based on other signals (Load Step and Temperature). For the latter, the values of the properties can be an instant value (in the below example, Load Step uses the value of the signal at the start of the capsule) or an aggregation (Max Temperature returns the maximum value of the temperature signal during the capsule).
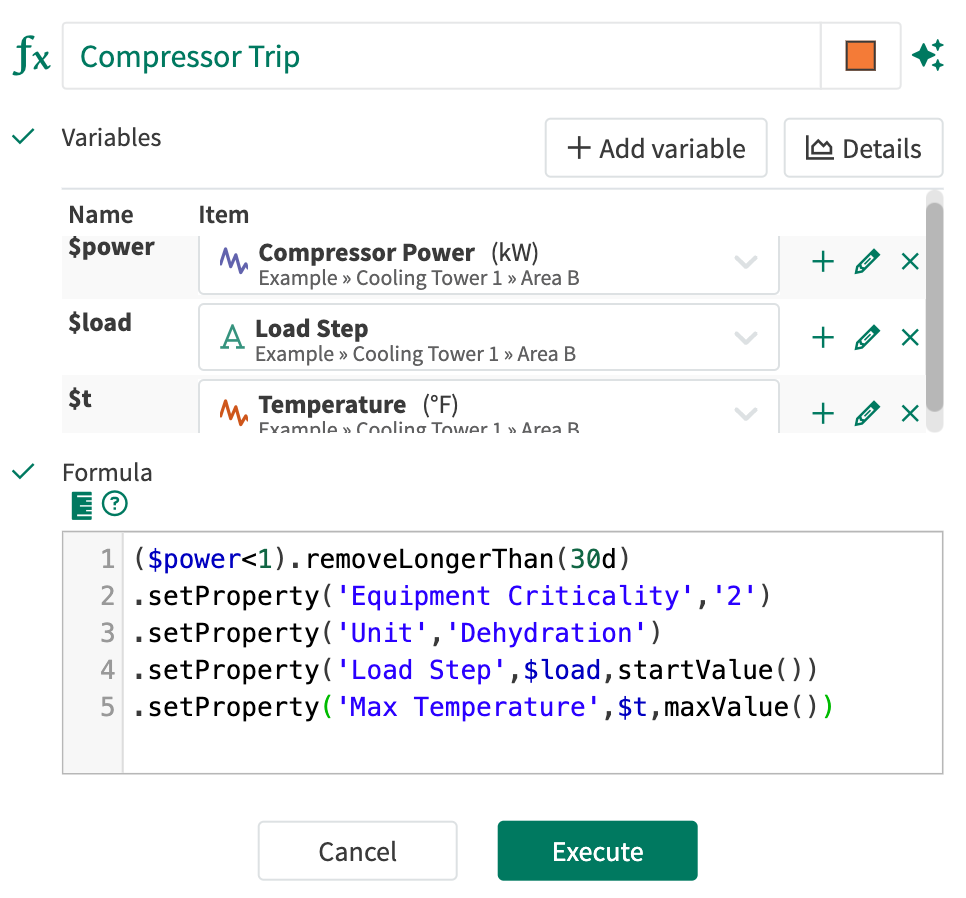
($power<1).removeLongerThan(30d)
.setProperty('Equipment Criticality','2')
.setProperty('Unit','Dehydration')
.setProperty('Load Step',$load,startValue())
.setProperty('Max Temperature',$t,maxValue())
If using Formulas on an existing Asset Tree, generally only the original condition will be discoverable by Vantage. “Asset Swap” items will not be picked up unless explicitly done by the user. In such situations, it’s strongly recommended to leverage Seeq’s Asset Groups and/or Asset Trees to create unique conditions for each asset.
2.2 Table Column Configuration
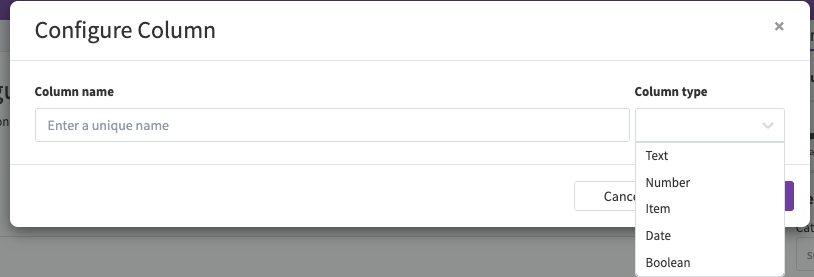
Columns can be added, edited, and deleted from the Vantage Room through the “Table Column Configuration” tab on the settings panel.
Add or edit columns, corresponding to Condition or Capsule properties from your monitored Conditions, that you would like as available as columns. The Column Type will impact the column filter and sort behavior.
Columns will have a unique name along with the type (Text, Number, Item, Date, or Boolean)
Please refert to Configuring Table Columns for detailed instructions on how to configure Columns and Column Types in Vantage.
3. Scaling Considerations
Scaling of calculations can be achieved in Seeq via Asset Groups and Asset Trees. As noted above, for Vantage usage, a condition is recommended to be created for each Asset. Creating a Seeq Asset Group or Asset Tree with the condition(s) configured for each asset will ensure all conditions are detected by Vantage, and provide additional flexibility in controlling triggering of the condition on a per-asset basis.
In general, Asset Groups are recommended for smaller, one-off use cases or situations where an existing Asset Tree exists and a smaller subset of the asset structure is leveraged (e.g., “flattening of a tree”). Asset Groups don’t require any coding knowledge and can be created directly in Workbench via a Graphic User Interface. Asset Groups are locally scoped, meaning they will only appear in the Workbench in which they are created.
For larger scale deployments (20+ assets) or situations where the asset structure needs to be shared across Workbenches, Asset Trees offer additional flexibility, including loading of structures via CSV files. Unlike Asset Groups, Asset Trees are created via Seeq Data Lab and therefore require some Python knowledge. Asset Trees can be scoped locally (single Workbench) or globally (available in all Workbenches).
3.1 Adding Properties in Asset Groups
Click “Add Column >> Add calculated item” in the Asset Group editor and leverage setProperty() as shown in the earlier Formula example. You can hard code the properties directly in the formula or reference values from other columns in the Asset Group. Each row in the Asset Group can have a unique formula, so properties and limits can be defined on a per-asset basis.
3.2 Adding Properties in DataLab
3.2.1 spy.assets.Trees()
Refer to “Asset Trees 1 - Introduction.ipynb” in the “SPy Documentation” DataLab folder for details on how to use spy.assets.Trees()
Capsule properties can assigned by including setProperty() when inserting calculations in the same manner as shown above.
Example: using spy.assets.Trees() to assign properties at scale
Inserting a “Compressor Trip” with an Equipment Criticality and Unit property for all the areas in the tree. Like Asset Groups, we could also reference other signals in the tree to set the property (not shown in this example).
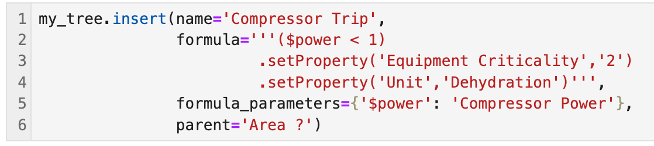
my_tree.insert(name='Compressor Trip',
               formula='''($power < 1)
                        .setProperty('Equipment Criticality','2')
                        .setProperty('Unit','Dehydration')''',
               formula_parameters={'$power': 'Compressor Power'},
               parent='Area ?')
spy.assets.Trees() does not currently support assignments of properties at the condition (vs capsule) level. If that is desired, after the tree is pushed, a dataframe containing the tree metadata can be retrieved via spy.search() and properties added as described in the next section. It should be noted that Vantage will pick up capsule level properties.
3.2.2 spy.assets() & Metadata Dataframes
Refer to “Asset Trees 2 - Templates.ipynb” in the “SPy Documentation” DataLab folder for details on how to use spy.assets.Trees()
Item properties can be added to any metadata dataframes pushed to Seeq.
Create a metadata dataframe by following the instructions in “Asset Trees 2 – Templates.ipynb” in the SPy Documentation folder or retrieve a dataframe of existing items using spy.search().
Add the desired properties as columns, then push the dataframe using spy.push(metadata=dataframe). The resulting items will include the additional properties.
Example: using spy.assets() to assign properties at scale
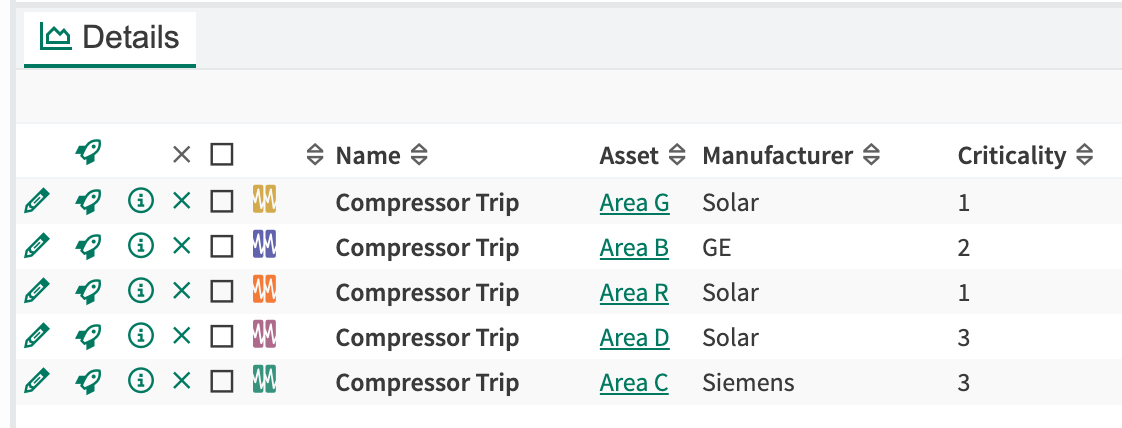
In the below dataframe, we added columns for “Criticality” and “Manufacturer”. This can be done in a variety of ways, including loading the properties from a csv and joining them with the metadata dataframe.

Use spy.push() to push the metadata into Seeq:
spy.push(metadata=df_with_properties)Depending on the item type, columns like “Formula” and “Formula Parameters” may be required as part of the metadata.
If using spy.search() to find existing items, include “all_properties=True” to retrieve the required columns before modifying the metadata dataframe.
The specified properties will be assigned to the items in the metadata dataframe and will be ready for consumption by Vantage.