Troubleshooting differences between Seeq and PI/AF
For simplicity, this article will refer to the historian as PI. This content applies to both PI and AF.
On occasion, customers have reported that Seeq is missing PI data. For example, trending Signal A in Seeq shows fewer samples than trending Signal A in Process Book, PI System Explorer, or some other trending tool.
The most common reasons for the data discrepancies are:
The customer uses a PI Collective. One or more members of the collective are missing data.
There is a permission problem with the credentials (login) that Seeq uses to access PI. An individual’s PI credentials may make different data available than are available to the Seeq service account.
Before contacting Seeq support, please investigate the above possible problems using the following techniques. The questions to answer are:
If using a PI Collective, does every member of the collective show the same samples for a signal?
When logging into PI with Seeq’s credentials, does Seeq receive all the samples from every member of the PI Collective?
It is most efficient to conduct this investigation using the service account that the Seeq agent/connector is using for PI access but if that isn’t immediately available, a PI Collective issue could be uncovered using an individual’s PI login. However, if no problems are found using an individual login, the test must be repeated using Seeq’s PI service account.
Investigation
Discrepancies in the data
Step 1: Gathering information from Seeq about the signal
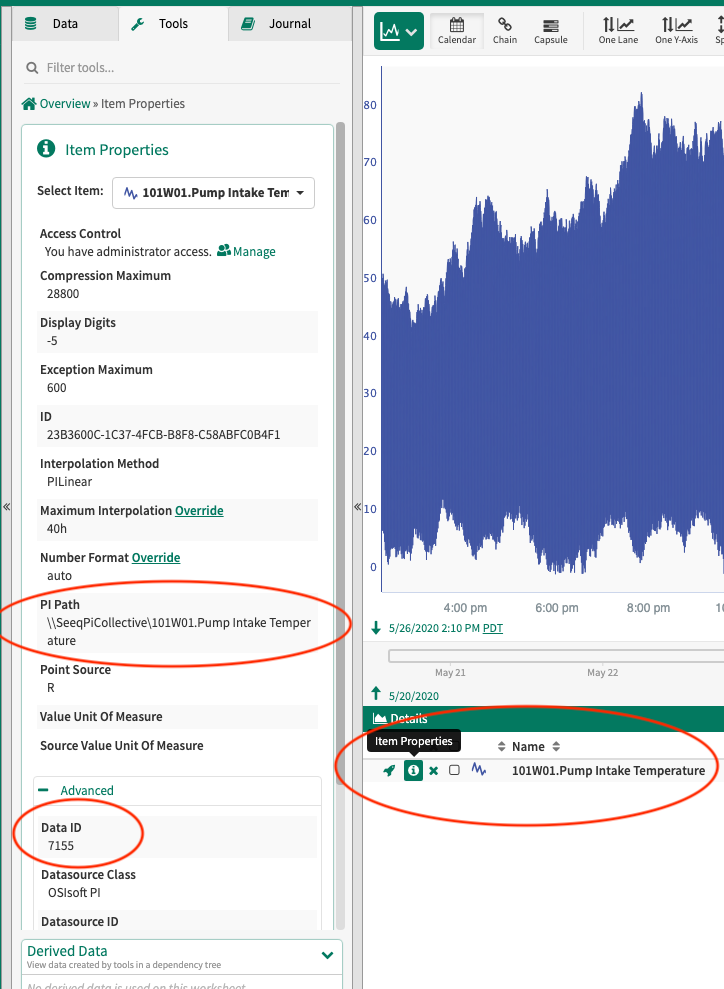
Locate the signal in Seeq and open the Item Properties.
Open the Item Properties panel to determine if the Signal is a PI Tag or AF Attribute.
AF Attributes have AF Paths and Data IDs of the pattern
guidParent/guidChildsuch asdb193b7d-3e33-11e6-9456-025ed0f19b59/c4e1dbe1-7fcf-5e75-1c7a-fe9c3870bab8.PI Tags have numeric Data IDs such as
7155and do not have an AF Path.Both AF and PI signals have PI Paths.
PI Tag: Note the
PI Server name: first section of the PI Path. (Example:
SeeqPICollective).PI Tag name: second section of the PI Path. (Example:
101W01.Pump Intake Temperature)Data ID: Advanced section (Example:
7155)ID: The unique Seeq identifier for the signal. (Example:
23B3600C-1C37-4FCB-B8F8-C58ABFC0B4F1)
AF Attribute: Note the
Location in the tree: Find the latter part of the AF Path. (Example:
Location A|Yeast Separator)PI Server name: This is the first part of the PI Path. (Example:
54.200.148.162)PI Tag name: This is the second part of the PI Path. (Example:
SINUSOID)Data ID: Advanced section (Example:
db193b7d-3e33-11e6-9456-025ed0f19b59/c4e1dbe1-7fcf-5e75-1c7a-fe9c3870bab8)ID: The unique Seeq identifier for the signal. (Example:
E6366444-A09A-4745-9F50-8B3DA157F822)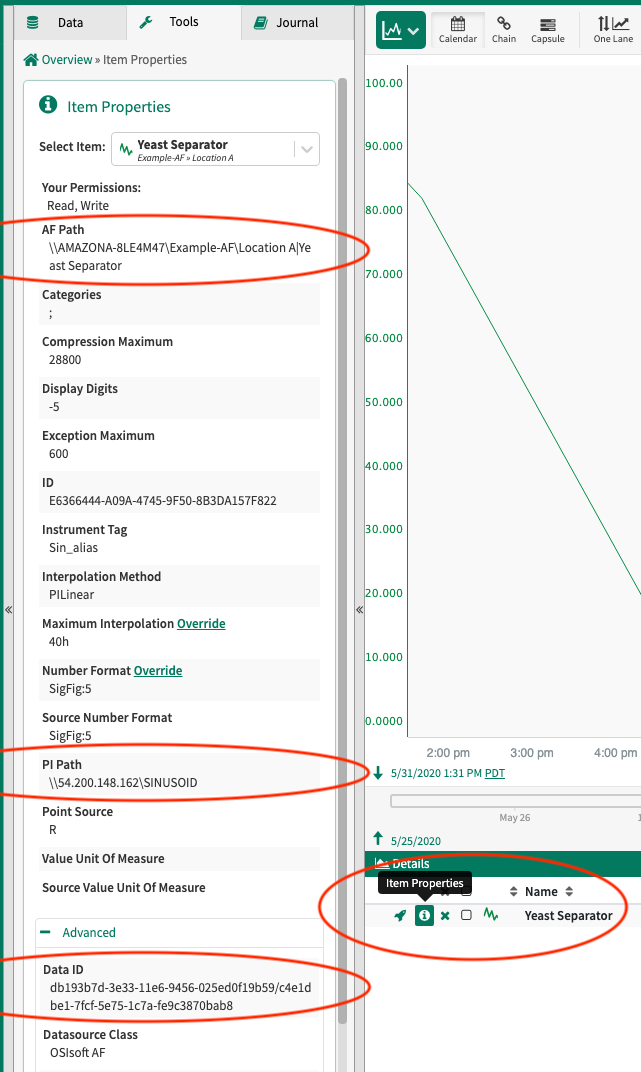
Step 2: Determine if the server is a PI Collective
This can be done from either PI System Explorer or PI Process Book.
Go to File → Connections. Find the server name that matches the PI server noted in Step 1. (Even if investigating an AF Attribute, look up the PI server from the PI Path and not the AF Server from the AF Path.)
If the type is:
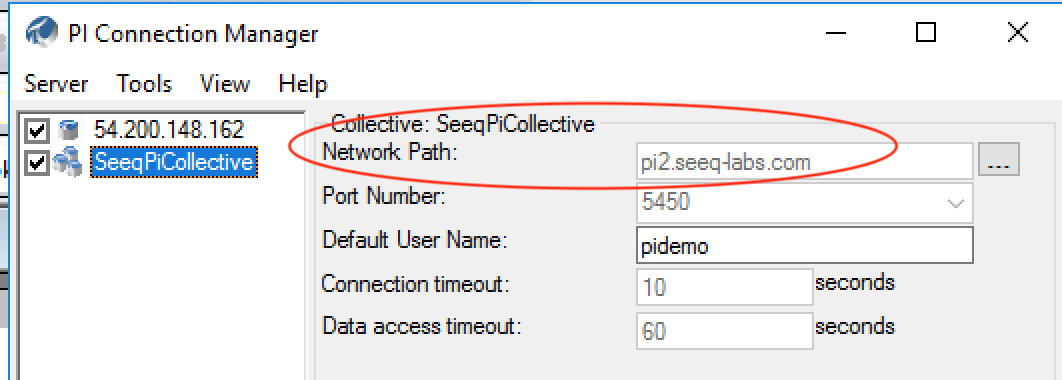
Data Collective: Seeq is connected to a PI Collective. The active member is displayed in the Host column (PI System Explorer) or the Network Path (Process Book). In this example, the active member is
pi1.seeq-labs.com.Data Server: Seeq is connected to a single PI server
View from PI System Explorer

View from Process Book
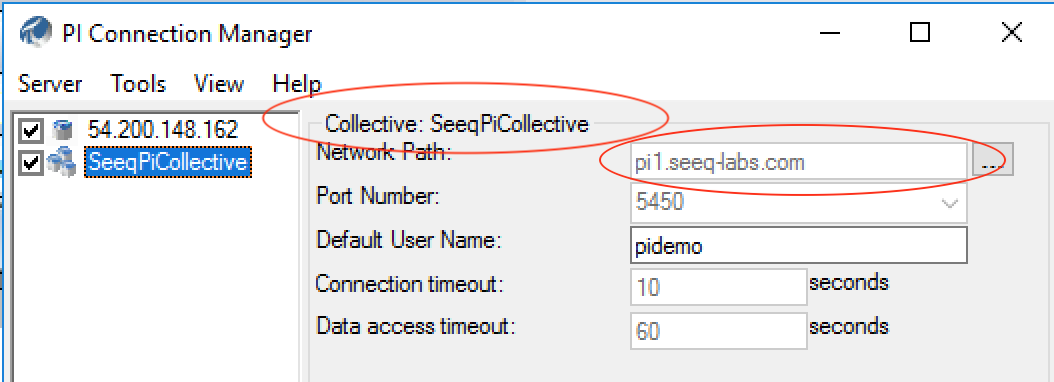
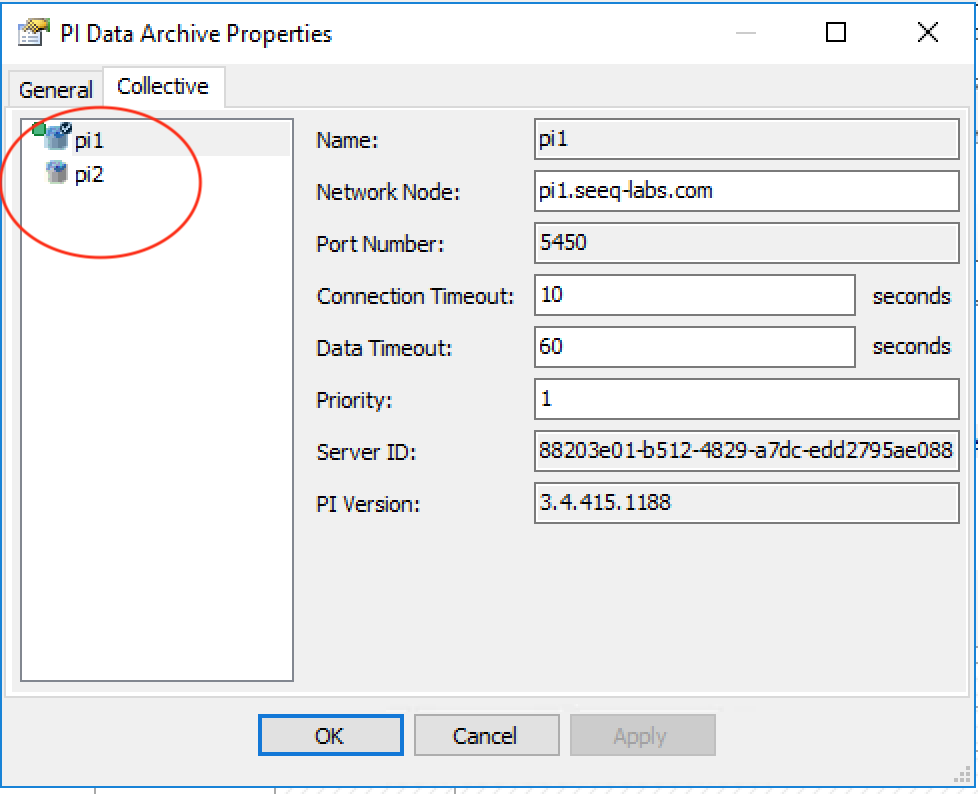
If Seeq is connected to a collective, you will need to confirm that every member of the collective has the same samples for the signal. If one of the members was behind and that is the member that served Seeq data, that will explain why Seeq is missing data.
See how many members there are in the collective. In this example, the collective has 2 members,
pi1andpi2. The active member (pi1) is denoted by the green icon.PI System Explorer: Right click on the collective and select Properties. Then go to the Collective tab.
PI Process Book: Right click on the collective and select Member Information.
View from PI System Explorer
View from PI Process Book

Step 3: Comparing samples
Often the missing samples are the most recent samples and it is pretty easy to “eyeball” the difference. However, if more careful inspection is required, remember that the Seeq trend and the Process Book trend both downsample the data. The end of this article discusses how to bypass downsampling in order to see every sample.
Step 3 for PI Tag: Comparing samples
(If starting with an AF Attribute, skip this and go to Step 3 for AF Attribute.)
PI System Explorer
Go to Search → Tag Search. Use the PI Path from Step 1 to choose the correct server. Search by point id by starting with
pointid:and following with the Data Id noted in Step 1. In this example,pointid:7155. Because point ids are unique, searching by point id ensures that you are looking at exactly the same signal in Seeq and PI and not another signal with a similar name.
Right click on the signal and choose Time Series Data to compare the signal with what is shown in Seeq.
PI Process Book
Start a trend display.
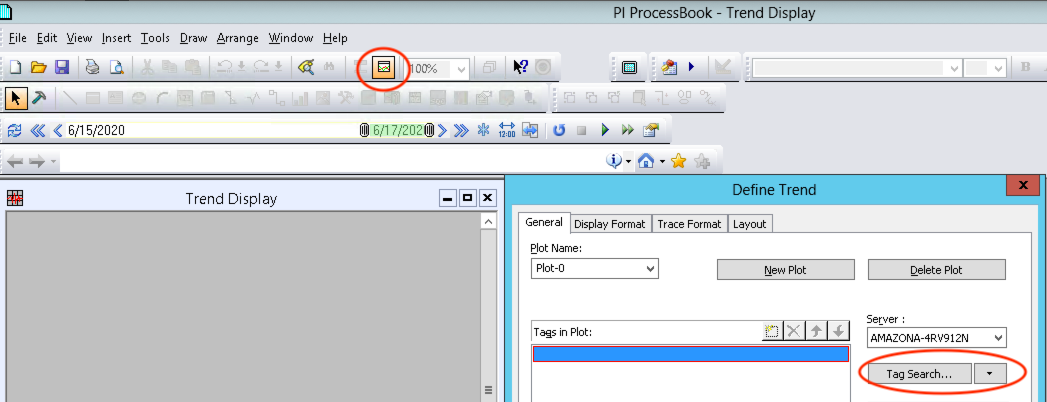
Click on Tag Search. Use the PI Path from Step 1 to choose the correct server. Search by Name.
Confirm this is the same signal being viewed in Seeq by right clicking and choosing Point Attributes. The unique
pointidshould exactly match the Seeq Data ID. In this example, that is7155.
Choose OK to add the signal to the trend (which may be downsampled).
To see all of the samples, right click and choose “Show Details and Annotations”.
Step 3 for AF Attribute: Comparing samples
(If starting with a PI Tag, skip this and go to Step 3 for PI Tag.)
Open PI System Explorer and navigate the element tree using the AF Path as your guide. In this example, the AF Path is
Location A|Yeast Separator.Confirm that this is the same signal you see in Seeq by comparing the Data ID seen in Seeq with that shown in PI System Explorer. The Data Id is of the form
guidParent/guidChildand in this example isdb193b7d-3e33-11e6-9456-025ed0f19b59/c4e1dbe1-7fcf-5e75-1c7a-fe9c3870bab8. When clicking onLocation Ain PI System Explorer, the parentGuid is shown in the bar at the bottom of the page. (You may need to right click in that area and select “Show Unique ID”.) When clicking on the AttributeYeast Separator, the childGuid is shown. These should match Seeq’s Data ID exactly.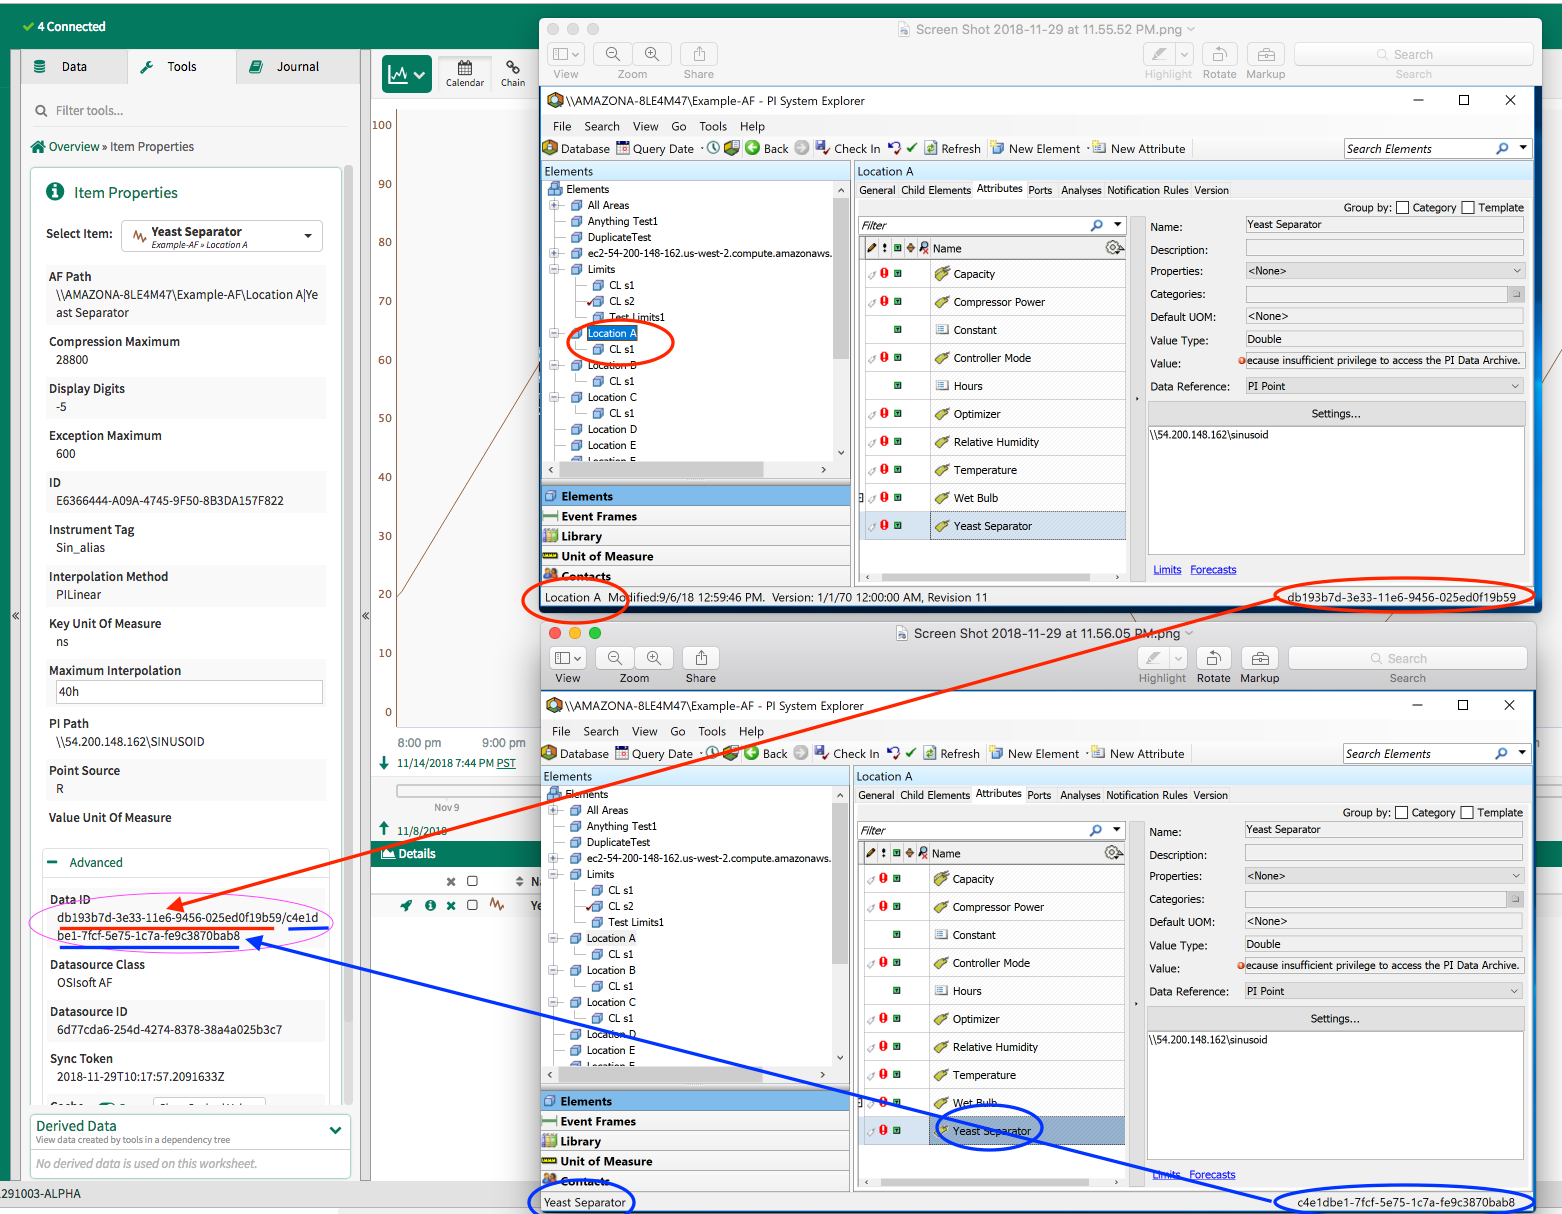
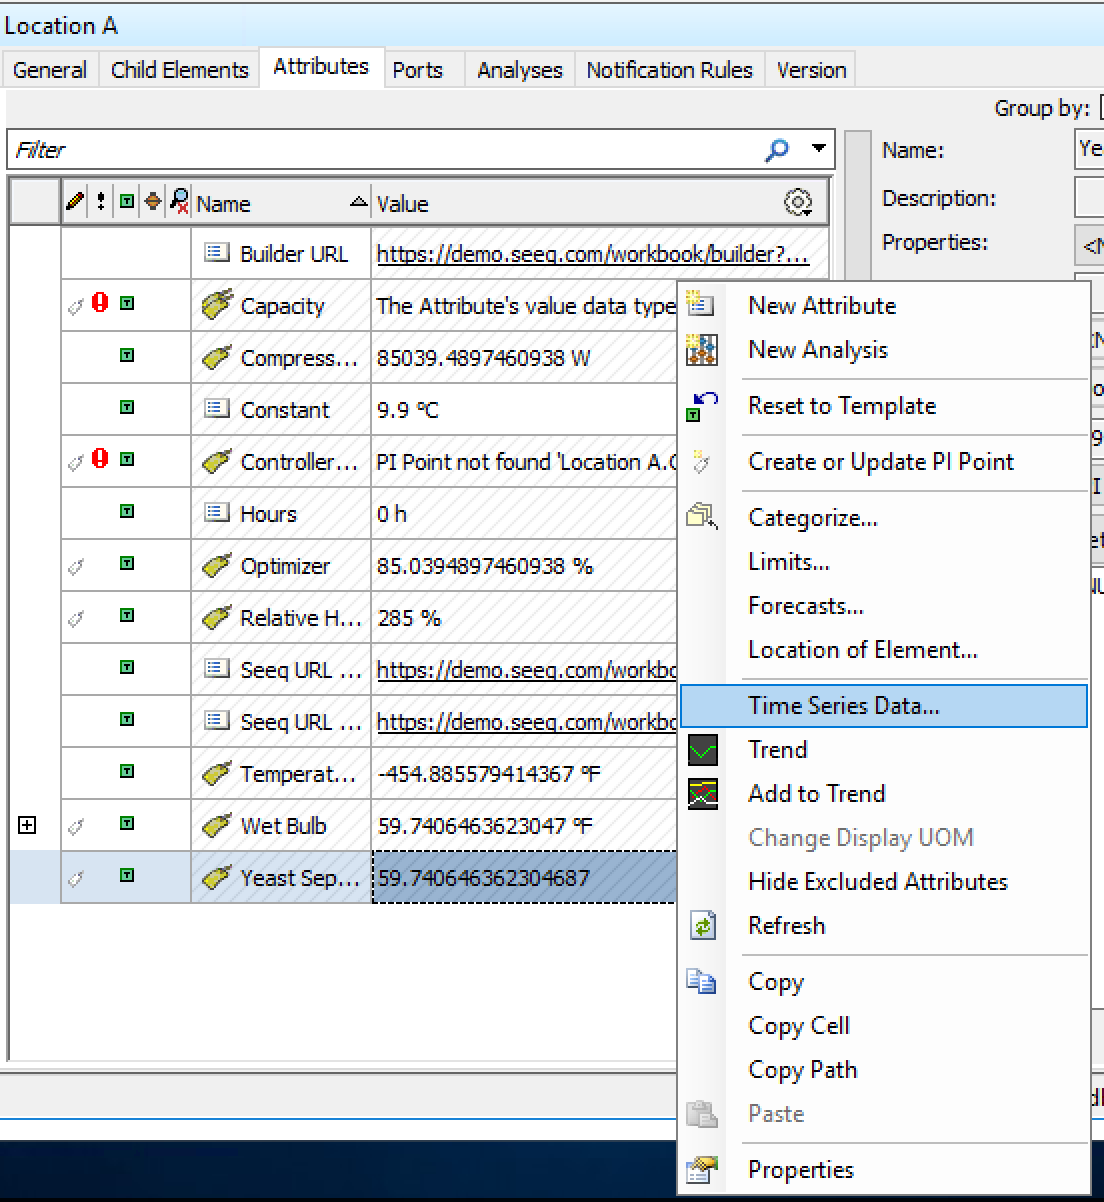
Right click on the signal and choose Time Series Data to compare the signal with what is shown in Seeq.
Step 4: Repeat for each member of the collective
If this is a PI Collective, this comparison must be done for every member of the collective.
To check the next member of the collective, return to Files → Connections. Right click on the collective and select “Switch Member”.
PI System Explorer View: The host noted in the Host column will change.

PI Process Book View: The server noted in the Network Path will change.
Repeat the above steps to compare samples using a different collective member.
Step 5: Consider clearing the Seeq cache
Typically, caching is not necessary for Signals coming from AF or PI, but if caching is turned on, changes may have occurred to the PI/AF data that are not reflected in the data seen in Seeq. Note also that cache is on by default for calculated Seeq items, so changes in the PI/AF data that are no longer apparent in the raw Signals may be seen in items that depend on them. The most common case for cache discrepancies with PI points is when an archive file was offline when the Signal was first queried. The result is a Signal with an apparent gap, because Arc-offline is one of the PI Point digital states that gets converted to Invalid samples in Seeq. Another case is when an AF Attribute has a non-PIPoint Data Reference. Examples include “Table Lookup”, “Formula”, and “Analysis” data references, as shown in PI System Explorer here:
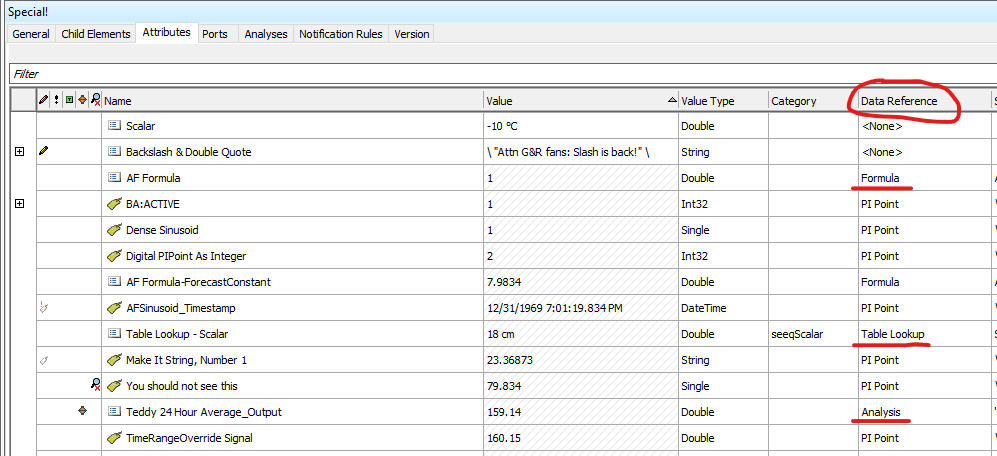
The values and trends for Attributes with such Data References are computed upon request, so if any of the inputs to the calculation change, the samples in Seeq may no longer be “correct”. See SUP-20073 - Seeq dropping pressure trends at end of time
Closed
for an example of this where the Data Reference is of type “Analysis”. In such cases, clearing the cache may resolve discrepancies between Seeq and OSIsoft clients like PI System Explorer, ProcessBook, and PI Vision. Since discrepancies due to “stale cache” like this are not always avoidable, it is important in such cases to explain how Seeq’s cache works, including the caches for Seeq-calculated items, and to distinguish between AF Attributes for which the source data is stored or computed on demand.
Missing Elements or Attributes
When an AF Attribute or Element or a PI Point is missing from Seeq, there will usually be some indication in the net-link (or _My_Remote_Agent_NET-link) logs, in the form of a reference to the item’s Data ID. This can be found under the Advanced tab of the Item Properties tool:
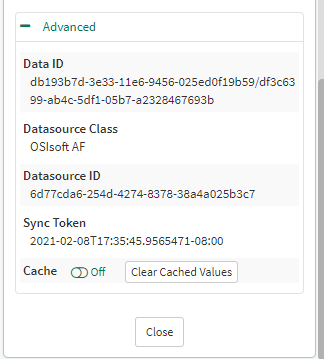
The Data ID for an Attribute will be of the form element_ID/attribute_ID, as shown above. The Data ID for an Element (not a reference Element) will be just element_ID. You can check the ID of an Element or Attribute in AF by right-clicking on the bar at the bottom of PI System Explorer and choosing “Show Unique ID”:

After doing this, as you click on Elements or Attributes in PI System Explorer, the ID shown at the bottom right of the window will update to match the selected item. Additionally, you can search for the Element portion of the ID by clicking Search > Element Search… from the PI System Explorer toolbar:

Then in the Element Search window, enter the element_ID portion of the Seeq Data ID, preceded by ID:, as follows:
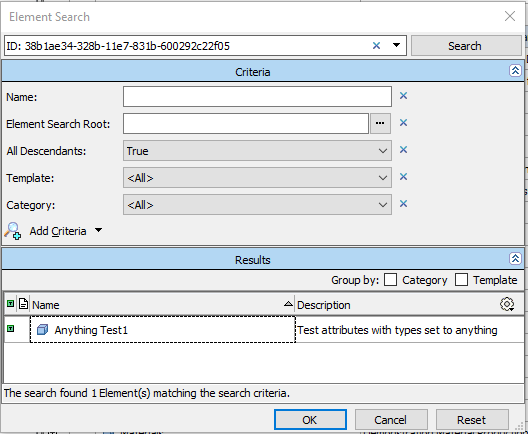
From here, you should be able to find the Element in the AF Database Element tree, see its path, and review its properties and Attributes.
Problem Resolution
Collective Member is Missing Data
Workaround
If one or more collective members are missing data regardless of the PI login used, a workaround for the problem is to change (perhaps temporarily) the priority settings of the Seeq collective. Priority determines which member is preferred. This change must be made on the server that is running the Seeq connector agent to the PI Historian. After making the change, the Seeq connector agent must be restarted so that Seeq and the PISDK used by Seeq reconnects to the collective.
To change priorities, go to Files → Connections.
PI System Explorer: Right click on the collective and select Properties. Then go to the Collective tab. Edit the priority field of each member as appropriate.
PI Process Book: Right click on the collective and select Member Information. Edit the priority field of each member as appropriate.
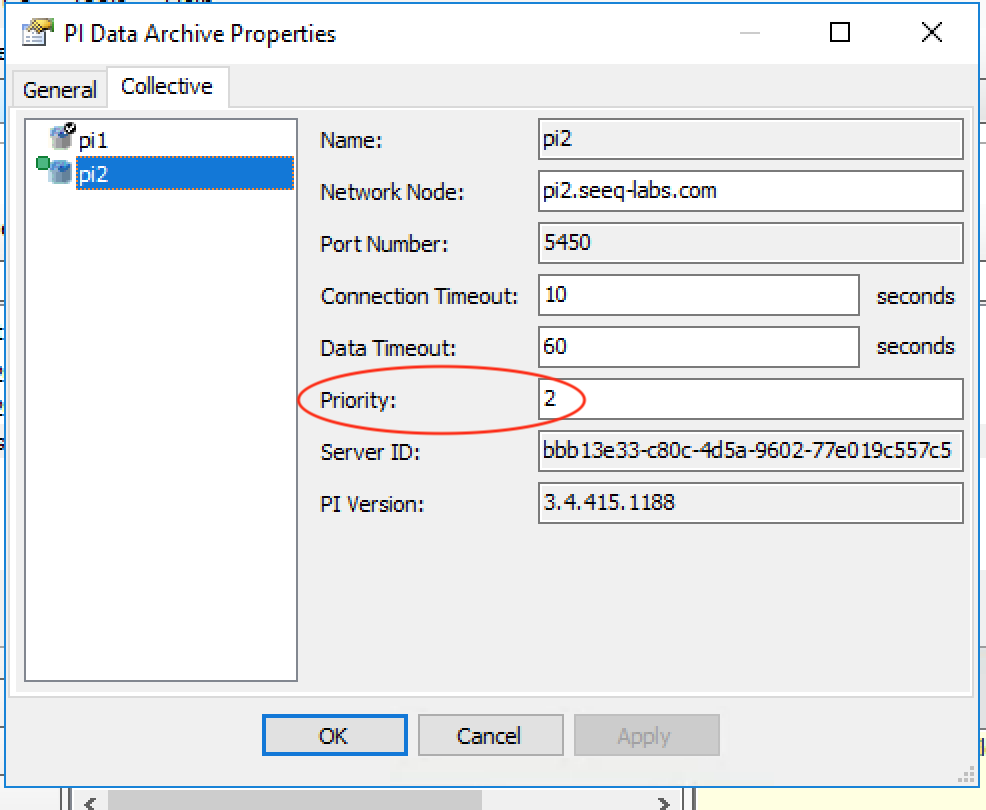
Note that if every member has priority 1, which member is serving Seeq may be randomly determined. It may be better to pick a top priority member and give the other members lower priority.
Long term solution
The ultimate solution is to work with your PI Administrator to determine why a collective member is falling behind.
Seeq’s Login is Missing Permissions
If only the Seeq login is missing data, work with the PI Administrator to investigate the permissions for that account.
PI Point ID not found in archive
Sometimes the attribute’s data reference does not match what is stored in the database and the tag ID associated with the PI Point may no longer exist. As an example, Seeq displays an OSIsoft PIPointInvalidException indicating that the Point ID does not exist:
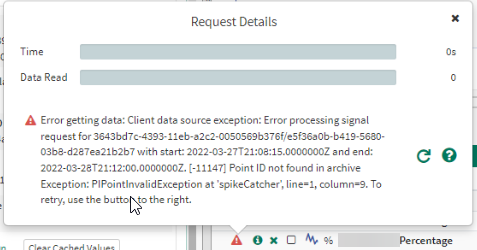
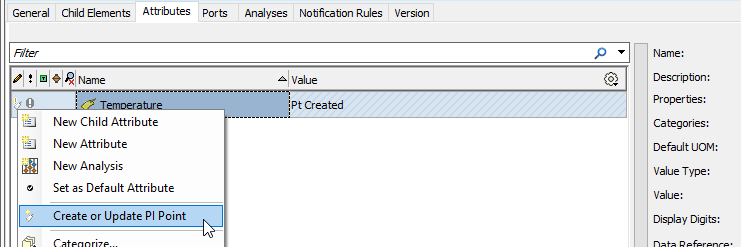
Inspect the attribute with PI System Explorer and if a warning icon is present then its tooltip may indicate steps to resolve the issue:

In this case, the issue was resolved with a right mouse click on the attribute and selecting Create or Update PI Point:
Avoiding the effects of downsampling
If you need to avoid downsampling, do the following:
Seeq
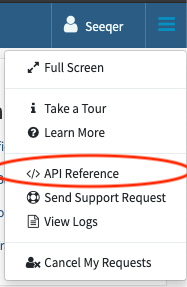
Use the REST API to request the samples.
Open the API Reference from the Seeq menu
Go to the Signals sections
Find
GET signals/{id}/samplesand enter the Seeq ID of the signal that was noted earlier. In the PI example, this was23B3600C-1C37-4FCB-B8F8-C58ABFC0B4F1. Also enter start and end dates for the request.
Process Book
Enter Run mode (the button with a cursor arrow on it).
Right click on the trended signal and choose “Show Details and Annotations”.
PI System Explorer
As shown in the earlier examples, use the Tag Search, right click and choose “Time Series Data”.
