Creating User Defined Formula Functions
User-Defined Formula Functions (“UDFs”) enable sufficiently skilled users to create snippets of Formula that can be used like built-in Seeq operators. Like with the built-in Seeq operators, the documentation for UDFs is viewable in the Formula Tool. A set of UDFs and their Formula Docs are stored within a Formula Package.
Alternatively, you can also use the Seeq developed user-interface for creating, editing, and deleting User Defined Formula Functions (UDFs).
Installation instructions can be found here: https://github.com/seeq12/seeq-udf-ui#installation
User Guide can be found here: https://seeq12.github.io/seeq-udf-ui/user_guide.html
If you prefer to use the SDK, please proceed with the instructions below.
Instructions using the Seeq SDK
1. Create a Formula Package
A Formula Package is the container for a set of related UDFs and their documentation. The package stores basic metadata such as who created it, the creator’s contact information, who installed it, and the version. Packages must be unique by name within the server.
name: What the package will be called. Package names must be unique within the server. Names must be 3-49 characters long, must contain onlyA-Z,a-z,0-9, or_, and must start with a letter.versionString(optional): What will be displayed as the Package’s version in the Formula Docs.installer(optional): Allows system managers to know who added a Package. Defaults to the authenticated user. Administrators may set this to the ID of another user.creatorName(optional): The name that will be displayed as creating the Package in the Formula Docs. Defaults to the Name of the installer.creatorContactInfo(optional): The contact info that will be displayed in the Formula Docs. Defaults to the email address of the installer.datasourceClass(optional): The class of the datasource that hosts the Package. Defaults to the Seeq datasource.datasourceId(optional): The identifier of the datasource that hosts the Package. Defaults to the Seeq datasource.dataId(optional): The identifier of this Package within the datasource. Defaults to thename.
2. Create the User-Defined Formula Function(s)
A User-Defined Function is a snippet of Formula that can be called similarly to a built-in Seeq operator.
When creating a UDF, there are some considerations that should be kept in mind:
UDFs can output any Formula type, but limiting to Signal, Condition, or Scalar will likely be easiest for people using your UDF.
Like with other formulas, UDFs do not utilize persistent caching during intermediary steps. This means that complicated UDF usage may have significantly worse performance than if the intermediate steps had been persisted and cached, particularly with uncertain data. See Example 3 for an instance of UDFs that is much faster when intermediary caching is used.
UDFs can have both “bound” (hard-coded, unchangeable) and “unbound” (dynamic, passed in when the end user calls the UDF) input parameters. Although bound parameters will be most commonly used, unbound can enable some interesting workflows.
UDFs must have a unique signature (name plus unbound parameters by type) within their Package. UDFs with the same name, but different parameters will be documented in the same Formula Doc.
name: What the function will be called. Multiple UDFs can exist with the same name as long as their input types are unique within the Package. Names must be 3-49 characters long, must contain onlyA-Z,a-z, or0-9, and must start with a letter.type: Must beUserDefinedFormulaFunction.packageName: The name of the Package that should contain this UDF.formula: The Formula text to use as the body of this function.parameters: A list of parameter inputs. Each parameter contains:name: How the parameter is referred to in theformula. Do not include the$. Note that parameters currently do not support descriptions so please ensure the variable names are as self-explanatory as possible.unbound: This will nearly always betrue.
Iftrue, this parameter must be passed as an argument by the UDF user.
Iffalse, this is a static input that will always be the same, no matter what the UDF user specifies. This can be useful for passing in a reference signal or defining a constant.A parameter
formulaorid. This will nearly always beformula.When
unbound=true,formuladefines what the type of the input parameter should be.
For instance, to define the parameters formyUdf($inputSignal, $inputCondition, $inputScalar).inputSignalcould haveformula='0.toSignal()',inputConditioncould haveformula='days()', andinputScalarcould haveformula='0'.When
unbound=false,idcan be set to the Seeq ID of any data item such as a lookup signal, a condition of batch events, or a scalar constant defined elsewhere. The specified item will always be available to the UDF’s formula without the user needing to specify it.
datasourceClass(optional): The class of the datasource that hosts the Package. Defaults to the Seeq datasource.datasourceId(optional): The identifier of the datasource that hosts the Package. Defaults to the Seeq datasource.dataId(optional): The identifier of this UDF within the datasource. Defaults to a random GUID.
3. Add Formula Docs
A Formula Doc is what documents a Package or UDF. Docs are matched to a UDF by name or to the Package if the doc’s name is index. When a Package or UDF is created, a stub doc will be created automatically. Docs can be created without a UDF of that same name existing, but its usefulness will be limited.
Regular docs will have the title of functionName(). Package docs will default to PackageName, but can be changed to any custom title. Docs can also have a description, examples, and search keywords.
Docs must be unique be name within their Package.
name: What the doc is called. Doc names must be unique within the Package. Names must be 3-49 characters long, must contain onlyA-Z,a-z, or0-9, and must start with a letter.title(optional): If this is the Package’sindexdoc, allows you to set a custom title.description(optional): The main body of the documentation page. Limited HTML formatting is supported in the description (<h1>through<h6>,<b>,<strong>,<i>,<em>,<u>,<strike>,<small>,<sub>,<sup>,<cite>,<q>,<blockquote>,<pre>,<code>,<span>,<p>,<br>,<dl>,<dt>,<dd>,<ol>,<ul>,<li>,<a>, and<sq-link>to link to other Formula Docs).examples(optional): The list of examples for this doc.description(optional): The caption explaining what this example does.formula(optional): The formula text of the example. This will be formatted as a code block. A recommend maximum line width is 45 characters.\ncan be used to create line breaks.
searchKeywords(optional): A list of additional words or phrases that allow users of the Formula Tool to more easily search for your doc
4. Add permissions
The Package is the item which should have the access control settings applied to it. Read permission will allow users to find and use the UDFs and docs within. Read+Write permission will grant users full control over the Package contents.
Examples
Seeq does not currently include the two-argument version of atan() in its native operators. This creates a function that can calculate atan2() from two input signals.
This example uses the Java SDK.
package com.seeq.examples;

import java.util.List;
import com.seeq.ApiClient;
import com.seeq.api.AuthApi;
import com.seeq.api.FormulasApi;
import com.seeq.api.ItemsApi;
import com.seeq.api.UserGroupsApi;
import com.seeq.model.AceInputV1;
import com.seeq.model.AuthInputV1;
import com.seeq.model.FormulaDocInputV1;
import com.seeq.model.FormulaPackageInputV1;
import com.seeq.model.FormulaParameterInputV1;
import com.seeq.model.FunctionInputV1;
import com.seeq.model.PermissionsV1;

public class ITCreateUdf {
    public void createArcTan2(String accessKey, String accessKeyPassword) {
        // Step 0: Create the APIs and log in
        // Step 0.1: Create the Seeq APIs we'll use.
        String url = "http://localhost:34218/api";
        var client = new ApiClient().setBasePath(url);
        var authApi = new AuthApi(client);
        var formulasApi = new FormulasApi(client);
        var itemsApi = new ItemsApi(client);
        var userGroupsApi = new UserGroupsApi(client);
        // Step 0.2: Log into Seeq, making the API client valid
        authApi.login(new AuthInputV1().username(accessKey).password(accessKeyPassword));

        // Step 1: Create a new FormulaPackage with the default metadata
        // Note: Package names can only include alphanumeric characters and underscores ('_').  Given this name, all
        // of the UDFs we create below will be prepended with 'Trigonometry_'.
        String packageName = "Trigonometry";
        // Note: This input chooses to leave the creatorName and creatorContact blank, defaulting it to that of the
        // logged-in user.
        var packageOutput = formulasApi.putPackage(packageName, new FormulaPackageInputV1());

        // Step 2: Create the User-Defined Function
        // Declare two unbound signal parameters for the input
        // Note: Parameters currently do not support additional documentation. Choose a descriptive name if applicable.
        var ySignalInput = new FormulaParameterInputV1()
                // This means this input from the UDF user will be referred to as `$y` within Formula.
                .name("y")
                // This just needs to be a formula that represents the expected type from the UDF user.
                // (E.G. '1' for a scalar input, '1.toSignal()' for a signal, 'days()' for a condition)
                .formula("1.toSignal()")
                // Unbound indicates that this input will be a parameter for the UDF.
                .unbound(true);
        var xSignalInput = new FormulaParameterInputV1()
                .name("x")
                .formula("1.toSignal()")
                .unbound(true);
        // Also declare a bound scalar parameter for pi.
        // Note: Instead of using .formula(), this could be `.id("29026252-13B7-...")` to utilize a constant that
        // can be modified independently of the UDF
        var piInput = new FormulaParameterInputV1()
                .name("pi")
                // Because unbound=false, this formula value will actually be evaluated and used.
                .formula("Constant.PI")
                .unbound(false);
        // This is the name that, when combined with the Package's name, will be the fully-qualified function name.
        // So in combination with the Package and parameter_input, UDF users will
        // call 'Trigonometry_atan2($someYSignal, $someXSignal)' in the Formula Tool.
        // Note: UDF names can only include alphanumeric characters.
        String functionName = "atan2";
        // This is the actual body of the Formula that defines the UDF.
        // Note: The '$y' and '$x' are from the FormulaParameterInputV1s we defined above.
        String formula = "$yx = $y/$x\n" +
                "$base = atan($yx)\n" +
                "$plusY = atan($yx)+$pi\n" +
                "$minusY = atan($yx)-$pi\n" +
                "$X0plusY = ($pi/2).toSignal()\n" +
                "$X0minusY = (-$pi/2).toSignal()\n" +
                "$X0Y0 = Scalar.Invalid.toSignal()\n" +
                "$base.splice($plusY, $x<0 && $y>0)\n" +
                "  .splice($minusY, $x<0 && $y<0)\n" +
                "  .splice($X0plusY,$x==0 && $y>=0)\n" +
                "  .splice($X0minusY,($x==0 && $y<0))\n" +
                "  .splice($X0Y0,($x==0 && $y==0))";
        var udfInput = new FunctionInputV1()
                .packageName(packageName)
                .name(functionName)
                .type("UserDefinedFormulaFunction")
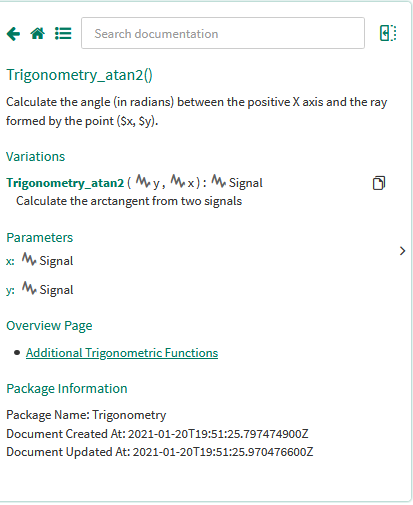
                .description("Calculate the arctangent from two signals")
                .formula(formula)
                // The order of the unbound parameters here will be the same as the actual UDF that gets created
                .parameters(List.of(ySignalInput, xSignalInput, piInput));
        // Actually create the UDF
        formulasApi.createFunction(udfInput);
        // Note: When modifying an existing UDF, use this function to update rather than create.
        //formulasApi.updateFunction('my-udf-id', udfInput);

        // Step 3: Create the Formula Docs
        // Note: Basic placeholder docs are automatically created for any Packages & UDFs.

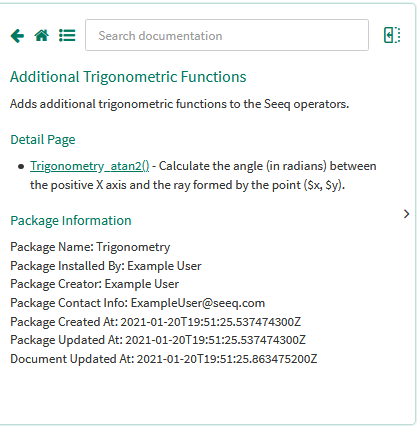
        // Step 3.1: Fill out the details for the Package's index page. Shown in Image 1 below this code.
        var indexDocInput = new FormulaDocInputV1()
                // Index pages (the doc representing the Package) may have a custom title.
                .title("Additional Trigonometric Functions")
                // The description is the main body of the doc. Basic HTML formatting is allowed.
                .description("Adds additional trigonometric functions to the Seeq operators.");
        formulasApi.putFormulaDoc(packageName,
                "index", // 'index' means we're modifying the Package's index doc.
                indexDocInput);

        // Step 3.2: Fill out the details for the UDF's doc. Shown in Image 2 below this code.
        // Note: UDF docs also allow basic HTML formatting, but not custom titles.
        String description = "Calculate the angle (in radians) between the positive X axis and the ray formed by the " +
                "point ($x, $y).";
        var atan2DocInput = new FormulaDocInputV1()
                .description(description);
        formulasApi.putFormulaDoc(packageName, "atan2", atan2DocInput);

        // Step 4: Share the package (and therefore UDF) with Everyone
        var everyoneId = userGroupsApi.getUserGroups("Everyone", null, null, null, 0, 1).getItems().get(0).getId();
        itemsApi.addAccessControlEntry(packageOutput.getId(),
                new AceInputV1().identityId(everyoneId).permissions(new PermissionsV1().read(true)));
    }
}
This set of UDFs can convert a numeric signal to a binary string. There are two different UDFs to allow users to choose the number of bits they will need.
This example uses the Python SDK.
### Step 0: Add imports, log in, and create the APIs we'll use
from seeq.sdk import *

## Step 0.1: Log into Seeq and get a valid API client.
# Option 1: SPy with Seeq Data Lab
from seeq import spy
api_client = spy.client

# Option 2: Using SPy without SDL
#from seeq import spy
#spy.login(url='http://localhost:34216', credentials_file='../credentials.key', force=False)
#api_client = spy.client

# Option 3: Using just the Seeq Python SDK
#api_client = ApiClient("http://localhost:34218/api", header_name='Accept', header_value='application/vnd.seeq.v1+json')
#auth_api = AuthApi(api_client)
#authInput = AuthInputV1()
#authInput.username = "MyAccessKey"
#authInput.password = "MyAccessKeyPassword"
#auth_api.login(body=authInput)

## Step 0.2: Create the Seeq APIs we'll use.
formulas_api = FormulasApi(api_client)
items_api = ItemsApi(api_client)
user_groups_api = UserGroupsApi(api_client)


### Step 1: Create the Formula Package
# Note: Package names can only include alphanumeric characters and underscores ('_').
# Given this name, all of the UDFs we create below will be prepended with 'BinaryConversion_'.
my_package_name = 'BinaryConversion'
# Note: creator_name and creator_contact_info are optional. They'll default to your name and email.
package_input = FormulaPackageInputV1(creator_name='Jane Doe',
                                      creator_contact_info='[email protected]')
package_output = formulas_api.put_package(package_name=my_package_name, body=package_input)


### Step 2: Create the User Defined Formula Functions
## Step 2.1: Create a UDF that can convert a signal with values from 0-15 into binary.
# Create one unbound (must be provided by the UDF user) signal input.
# Note: Parameters currently do not support additional documentation. Choose a descriptive name if applicable.
parameter_input = FormulaParameterInputV1(
    # This means this input from the UDF user will be referred to as `$signal` within Formula.
    name='signal',
    # This just needs to be a formula that represents the expected type from the UDF user.
    # (E.G. '1' for a scalar input, '1.toSignal()' for a signal, 'days()' for a condition)
    formula='1.toSignal()',
    # Unbound indicates that this input will be a parameter for the UDF.
    unbound=True)
# This is the name that, when combined with the Package's name, will be the fully-qualified function name.
# So in combination with the Package and parameter_input, UDF users will
# call 'BinaryConversion_convertToBinary4bit($someSignal)' in the Formula Tool.
# Note: UDF names can only include alphanumeric characters.
my_four_bit_function_name = 'convertToBinary4bit'
# This is the actual body of the Formula that defines the UDF.
# Note: The '$signal' is from the parameter_input we defined above.
four_bit_formula = '''
  $i = $signal.round().setUnits('').within($signal.isBetween(0, 15))
  $div1=($i/2).floor()
  $div2=($div1/2).floor()
  $div3=($div2/2).floor()
  $div4=($div3/2).floor()
  $rem1=($i/2-$div1).ceiling().toString()
  $rem2=($div1/2-$div2).ceiling().toString()
  $rem3=($div2/2-$div3).ceiling().toString()
  $rem4=($div3/2-$div4).ceiling().toString()
  $rem4+$rem3+$rem2+$rem1
  '''
udf_input = FunctionInputV1(package_name=my_package_name,
                            name=my_four_bit_function_name,
                            type='UserDefinedFormulaFunction',
                            formula=four_bit_formula,
                            parameters=[parameter_input])
formulas_api.create_function(body=udf_input)
# Note: When modifying an existing UDF, use this function to update rather than create.
# formulas_api.update_function(id='my-udf-id', body=udf_input)

## Step 2.2: Create another UDF with a different name that can convert 0-255 into binary.
# Create one unbound (to be provided by the UDF user) signal input.
# Note (again): Parameters currently do not support additional documentation. Choose a descriptive name if applicable.
parameter_input = FormulaParameterInputV1(
    # This means this input from the UDF user will be referred to as `$signal` within our Formula.
    name='signal',
    # This just needs to be a formula that represents the expected type from the UDF user.
    # (E.G. '1' for a scalar input, '1.tosignal()' for a signal, 'days()' for a condition)
    formula='1.toSignal()',
    # Unbound indicates that this input will be a parameter for the UDF. The UDF user must provide it.
    unbound=True)
# This is the name that, when combined with the Package's name, will be the fully-qualified function name.
# So in comination with the Package and parameter_input, UDF users will
# call 'BinaryConversion_convertToBinary8bit($someSignal)' in the Formula Tool.
# Note: UDF names can only include alphanumeric characters.
my_eight_bit_function_name = 'convertToBinary8bit'
# This is the actual body of the Formula that defines the UDF.
# Note (again): The '$signal' is from the parameter_input we defined above.
eight_bit_formula = '''
  $i = $signal.round().setUnits('').within($signal.isBetween(0, 255))
  $div1=($i/2).floor()
  $div2=($div1/2).floor()
  $div3=($div2/2).floor()
  $div4=($div3/2).floor()
  $div5=($div4/2).floor()
  $div6=($div5/2).floor()
  $div7=($div6/2).floor()
  $div8=($div7/2).floor()
  $rem1=($i/2-$div1).ceiling().toString()
  $rem2=($div1/2-$div2).ceiling().toString()
  $rem3=($div2/2-$div3).ceiling().toString()
  $rem4=($div3/2-$div4).ceiling().toString()
  $rem5=($div4/2-$div5).ceiling().toString()
  $rem6=($div5/2-$div6).ceiling().toString()
  $rem7=($div6/2-$div7).ceiling().toString()
  $rem8=($div7/2-$div8).ceiling().toString()
  $rem8+$rem7+$rem6+$rem5+$rem4+$rem3+$rem2+$rem1
  '''
udf_input = FunctionInputV1(package_name=my_package_name,
                            name=my_eight_bit_function_name,
                            type='UserDefinedFormulaFunction',
                            formula=eight_bit_formula,
                            parameters=[parameter_input])
formulas_api.create_function(body=udf_input)
# Note (again): When modifying an existing UDF, use the below function to update rather than create.
# formulas_api.update_function(id='my-udf-id', body=udf_input)


### Step 3: Create formula docs (optional)
# Note: Basic placeholder docs are automatically created for any Packages & UDFs.

## Step 3.1: Fill out the details for the Package's index page. Shown in Image 1 below this code.
# Index pages (the doc representing the Package) may have a custom title.
index_title = 'Binary Conversion'
# The description is the main body of the doc. Basic HTML formatting is allowed
index_description = '''
    Allows conversion from numeric signals to a binary string signals consisting of '0' and '1's. Created from a
    <a href="https://www.seeq.org/index.php?/forums/topic/710-converting-a-number-to-a-binary-code">community discussion by Teddy Turfitt</a>
    '''
index_doc_input = FormulaDocInputV1(
    title=index_title,
    description=index_description,
    # Additional keywords can be added to allow for easier searching.
    search_keywords=FormulaDocKeywordListInputV1(keywords=['toBinary']))
formulas_api.put_formula_doc(
    package_name=my_package_name,
    # 'index' means we're modifying the Package's index doc.
    doc_name='index',
    body=index_doc_input)

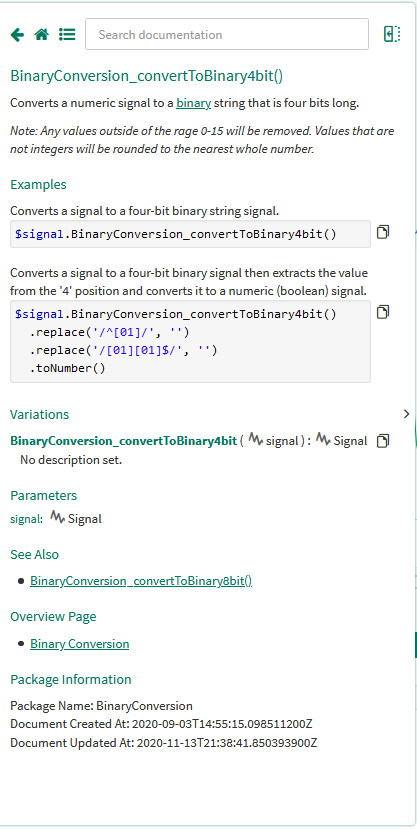
## Step 3.2: Fill out the details for the four-bit UDF's doc. Shown in Image 2 below this code.
# Note: UDF docs also allow basic HTML formatting, but not custom titles.
four_bit_description = '''
    <p>Converts a numeric signal to a
    <a href='https://en.wikipedia.org/wiki/Binary_number'>binary</a>
    string that is four bits long.</p>
    <p><i>Note: Any values outside of the rage 0-15 will be removed. Values
    that are not integers will be rounded to the nearest whole number.</i></p>
    '''
# Examples are the best way to demonstrate using the UDF.
four_bit_examples = FormulaDocExampleListInputV1(examples=[
    FormulaDocExampleInputV1(description='Converts a signal to a four-bit binary string signal.',
                             formula='$signal.BinaryConversion_convertToBinary4bit()'),
    FormulaDocExampleInputV1(description="Converts a signal to a four-bit binary signal then extracts the value from the '4' position and converts it to a numeric (boolean) signal.",
                             formula="$signal.BinaryConversion_convertToBinary4bit()\n  .replace('/^[01]/', '')\n  .replace('/[01][01]$/', '')\n  .toNumber()")
])
four_bit_doc_input = FormulaDocInputV1(description=four_bit_description,
                                       examples=four_bit_examples)
formulas_api.put_formula_doc(package_name=my_package_name,
                             doc_name=my_four_bit_function_name,
                             body=four_bit_doc_input)

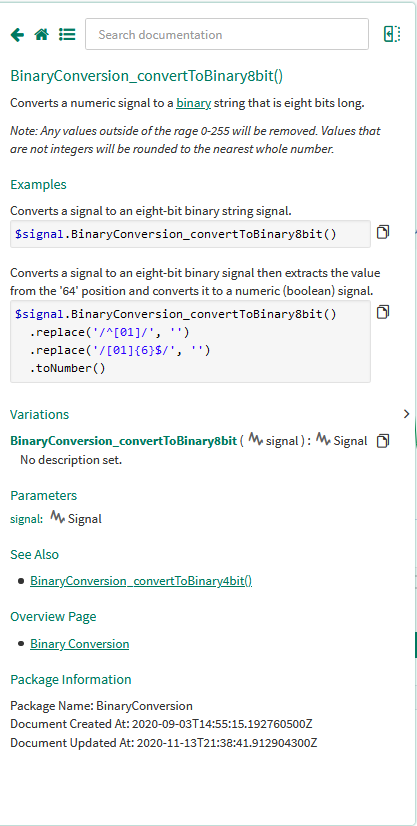
## Step 3.3: Fill out the details for the eight-bit UDF's doc. Shown in Image 3 below this code.
eight_bit_description = '''
    <p>Converts a numeric signal to a
    <a href='https://en.wikipedia.org/wiki/Binary_number'>binary</a>
    string that is eight bits long.</p>
    <p><i>Note: Any values outside of the rage 0-255 will be removed. Values
    that are not integers will be rounded to the nearest whole number.</i></p>
    '''
eight_bit_examples = FormulaDocExampleListInputV1(examples=[
    FormulaDocExampleInputV1(description='Converts a signal to an eight-bit binary string signal.',
                             formula='$signal.BinaryConversion_convertToBinary8bit()'),
    FormulaDocExampleInputV1(description="Converts a signal to an eight-bit binary signal then extracts the value from the '64' position and converts it to a numeric (boolean) signal.",
                             formula="$signal.BinaryConversion_convertToBinary8bit()\n  .replace('/^[01]/', '')\n  .replace('/[01]{6}$/', '')\n  .toNumber()")
])
eight_bit_doc_input = FormulaDocInputV1(description=eight_bit_description,
                                       examples=eight_bit_examples)
formulas_api.put_formula_doc(package_name=my_package_name,
                             doc_name=my_eight_bit_function_name,
                             body=eight_bit_doc_input)


# Step 4: Share the Package with Everyone
everyone_id = user_groups_api.get_user_groups(name_search='Everyone').items[0].id
ace_input = AceInputV1(identity_id=everyone_id, permissions=PermissionsV1(read=True))
items_api.add_access_control_entry(id=package_output.id, body=ace_input)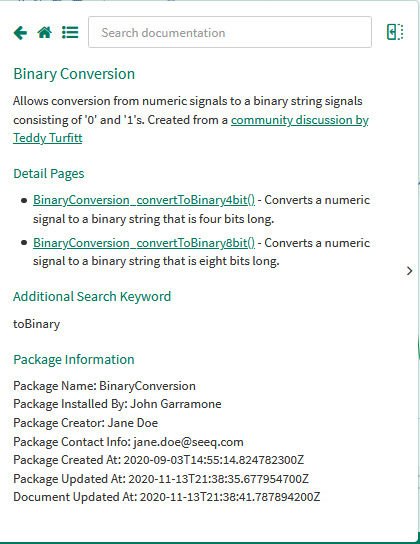
This example has two related functions: createPredictionCondition and applyPredictionCondition. createPredictionCondition will create a regression model for each capsule in a condition given the input signals and store that regression model as capsule properties. applyPredictionCondition will then take that condition and apply the regression model to the input signals. Having the condition be cached allows performance to be significantly improved.
This example uses HTTP requests with JSON payloads.
Step 1: Create the Package using POST /api/formulas/packages/RunningPrediction
{
  "versionString": "1.0.0"
}
Step 2: Create the UDFs using POST /api/formulas/functions. Note that createPredictionCondition and applyPredictionCondition each has two variants. This pattern could be expanded to include however many variants are useful for your use case.
{
  "name": "createPredictionCondition",
  "description": "Create a PredictionCondition from one training signal",
  "formula": "$condition.transform($capsule -> {$model = $target.regressionModelPCA(group($capsule), 1, $signal1) $capsule.setProperty('coefficient1', $model.get('coefficient1')).setProperty('intercept', $model.get('intercept'))})",
  "packageName": "RunningPrediction",
  "type": "UserDefinedFormulaFunction",
  "parameters": [
    {
      "unbound": true,
      "name": "condition",
      "formula": "days()"
    },
    {
      "unbound": true,
      "name": "target",
      "formula": "0.toSignal()"
    },
    {
      "unbound": true,
      "name": "signal1",
      "formula": "1.toSignal()"
    }
  ]
}
{
  "name": "createPredictionCondition",
  "description": "Create a PredictionCondition from two training signals",
  "formula": "$condition.transform($capsule -> {$model = $target.regressionModelPCA(group($capsule), 2, $signal1, $signal2) $capsule.setProperty('coefficient1', $model.get('coefficient1')).setProperty('coefficient2', $model.get('coefficient2')).setProperty('intercept', $model.get('intercept'))})",
  "packageName": "RunningPrediction",
  "type": "UserDefinedFormulaFunction",
  "parameters": [
    {
      "unbound": true,
      "name": "condition",
      "formula": "days()"
    },
    {
      "unbound": true,
      "name": "target",
      "formula": "0.toSignal()"
    },
    {
      "unbound": true,
      "name": "signal1",
      "formula": "1.toSignal()"
    },
    {
      "unbound": true,
      "name": "signal2",
      "formula": "2.toSignal()"
    }
  ]
}{
  "name": "applyPredictionCondition",
  "description": "Apply a PredictionCondition that was created with two training signals",
  "formula": "$target*0 + $signal1.transform($s -> {$key = $s.key() $currentCapsule = $modelCondition.toGroup(capsule($key, $key+1h), CapsuleBoundary.Overlap).first() $signal1Value = $s.value() $coefficient1 = $currentCapsule.property('coefficient1').toNumber() $value1 = setUnits($signal1Value * $coefficient1, '') $signal2Value = $signal2.valueAtOrBefore($key) $coefficient2 = $currentCapsule.property('coefficient2').toNumber() $value2 = setUnits($signal2Value * $coefficient2, '') $intercept = setUnits($currentCapsule.property('intercept').toNumber(), '') sample($s.key(), $value1 + $value2 + $intercept)})",
  "packageName": "RunningPrediction",
  "type": "UserDefinedFormulaFunction",
  "parameters": [
    {
      "unbound": true,
      "name": "modelCondition",
      "formula": "days()"
    },
    {
      "unbound": true,
      "name": "target",
      "formula": "0.toSignal()"
    },
    {
      "unbound": true,
      "name": "signal1",
      "formula": "1.toSignal()"
    },
    {
      "unbound": true,
      "name": "signal2",
      "formula": "2.toSignal()"
    }
  ]
}
{
  "name": "applyPredictionCondition",
  "description": "Apply a PredictionCondition that was created with one training signal",
  "formula": "$target*0 + $signal1.transform($s -> {$key = $s.key() $currentCapsule = $modelCondition.toGroup(capsule($key, $key+1h), CapsuleBoundary.Overlap).first() $signal1Value = $s.value() $coefficient1 = $currentCapsule.property('coefficient1').toNumber() $value1 = setUnits($signal1Value * $coefficient1, '') $intercept = setUnits($currentCapsule.property('intercept').toNumber(), '') sample($s.key(), $value1 + $intercept)})",
  "packageName": "RunningPrediction",
  "type": "UserDefinedFormulaFunction",
  "parameters": [
    {
      "unbound": true,
      "name": "modelCondition",
      "formula": "days()"
    },
    {
      "unbound": true,
      "name": "target",
      "formula": "0.toSignal()"
    },
    {
      "unbound": true,
      "name": "signal1",
      "formula": "1.toSignal()"
    }
  ]
}
Step 3: Update the Formula Docs using POST /api/formulas/docs/RunningPrediction/....
Step 3.1: POST /api/formulas/docs/RunningPrediction/index
{
  "title": "Running Prediction",
  "description": "<p>Perform a prediction where the model is updated and reapplied periodically.</p><p>The first step calculates a new <sq-link href='/formulas/docs/Seeq/regressionModelPCA'>PCA regression</sq-link> for each capsule in the passed-in condition and adds the output as capsule properties. The second step takes those capsule properties and applies the regression model to the signal.</p><p><i>Note: This could be done in a single function, but this two-step process takes significant advantage of caching.</i></p>",
  "searchKeywords": {
    "keywords": [
      "Prediction", "PCA", "Aggregation"
    ]
  }
}
Step 3.2: POST /api/formulas/docs/RunningPrediction/createPredictionCondition
{
  "description": "<p>Transforms a condition such that each capsule will now include the RegressionModel properties for that region of time.</p><p>This is done by calculating a new <sq-link href='/formulas/docs/Seeq/regressionModelPCA'>PCA regression</sq-link> for each capsule in the passed-in condition then storing the output RegressionModel as capsule properties. These properties can then be viewed in an analysis or fed into <sq-link href='/formulas/docs/RunningPrediction/applyPredictionCondition'>applyPredictionCondition</sq-link>.</p>",
  "examples": {
    "examples": [
      {
        "description": "Create a PredictionCondition every day using the target signal and one training signal.",
        "formula": "RunningPrediction_createPredictionCondition(\n  days(), $target, $signal)"
      },
      {
        "description": "Create a PredictionCondition every hour using the target signal and two training signals and then apply it. Note that this does not allow the cache to be used so data consumption will be significantly higher.",
        "formula": "$condition =\n  RunningPrediction_createPredictionCondition(\n    hours(), $target, $signal1, $signal2)\nRunningPrediction_applyPredictionCondition(\n  $condition, $target, $signal1, $signal2)"
      }
    ]
  }
}
Step 3.3: POST /api/formulas/docs/RunningPrediction/applyPredictionCondition
{
  "description": "<p>Calculates the running prediction of a signal. Using the passed in <sq-link href='/formulas/docs/RunningPrediction/createPredictionCondition'>PredictionCondition</sq-link> and the input signals, applies the regression model and calculates the expected signal.</p>",
  "examples": {
    "examples": [
      {
        "description": "Apply a PredictionCondition that was created using the target signal and one training signal.",
        "formula": "RunningPrediction_applyPredictionCondition(\n  $condition, $target, $signal)"
      },
      {
        "description": "Create a PredictionCondition every hour using the target signal and two training signals and then apply it. Note that this does not allow the cache to be used so data consumption will be significantly higher.",
        "formula": "$condition =\n  RunningPrediction_createPredictionCondition(\n    hours(), $target, $signal1, $signal2)\nRunningPrediction_applyPredictionCondition(\n  $condition, $target, $signal1, $signal2)"
      }
    ]
  }
}