Export to OData
Overview
Legacy OData exports are deprecated as of October 2024 and will be removed after March 2026.
Please migrate all exports to modern OData endpoints before this date to avoid disruptions.
Seeq has an OData export feature that allows trends and calculations to be exported to Spotfire, Tableau, or Microsoft applications Excel and Power BI.
OData exports can be read directly by these software programs for use in dashboards or for further analysis.
Users can authenticate the OData feed using a Seeq Access Key or username & password. Alternatively, if Seeq is set up with Windows Auth and a user is reading an OData export in a Windows product (e.g. Excel, Power BI), the user can authenticate the OData feed seamlessly.
Viewing OData Exports
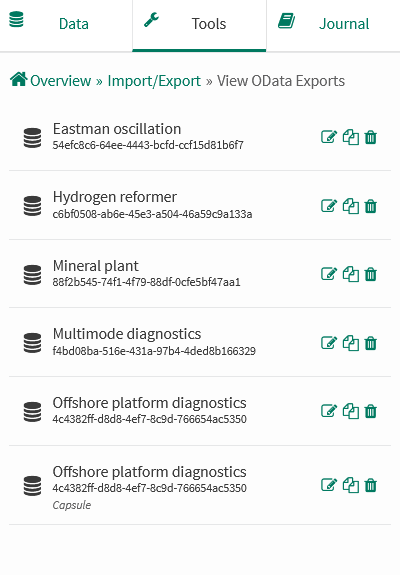
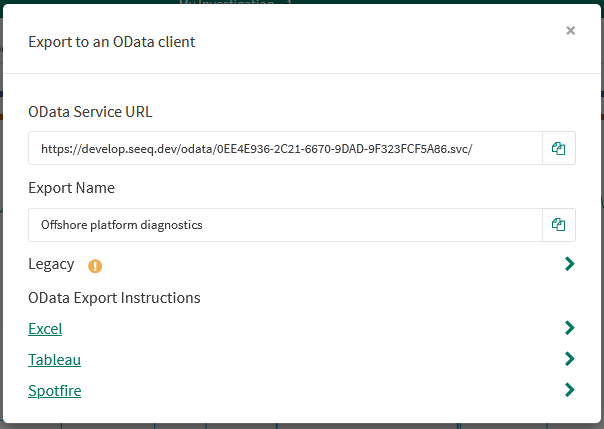
Previously-created OData exports can be accessed using the “View OData Exports“ panel from the Tools menu in an Analysis, within the “Import/Export” section.
This list alphabetically shows all OData exports that have been created within this Analysis.
Each export includes buttons for editing the configuration, copying the link to your clipboard, and deleting the export. Clicking the body of an export will display the modal with the link(s) and instructions.
Creating & Editing OData Exports
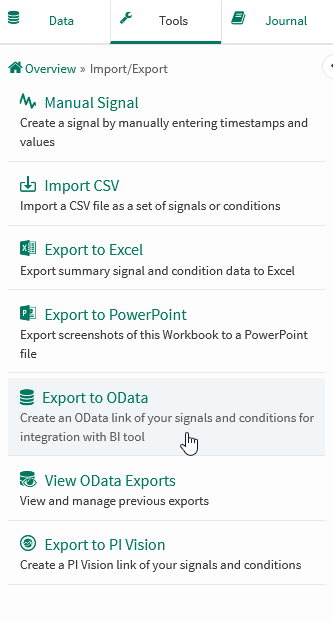
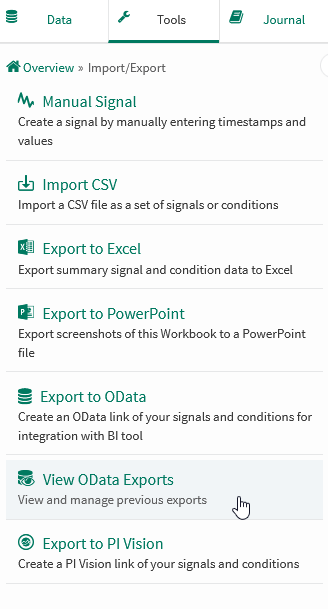
The “Export to OData” tool panel can be accessed from the Tools menu in an Analysis, within the “Import/Export” section.
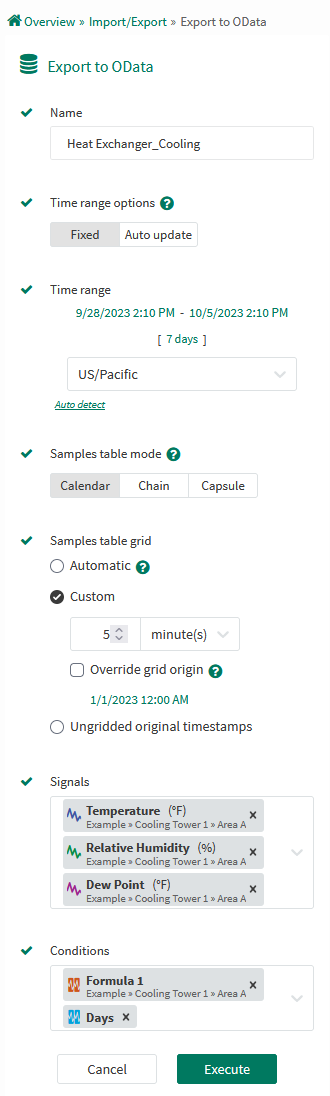
Name: Provide a relevant name that will be helpful to identify the export. The name provided here will be appended with a unique identifier.
Time range options: Select a Fixed time range or select Auto update for a moving time window.
Auto update: When this option is selected, the time range is adjusted to end at ‘now’ whenever the export URL is queried by your OData client. The originally-selected duration is used to determine the start date. The auto update "scheduling" portion needs to be configured in the BI tool.
Time range: Specify the time range by adjusting the start, end and duration fields.
Time Zone: This is the time zone to be used for all times within the export. This setting defaults to that of the source worksheet. If the selected zone observes daylight savings time, ambiguities may occur at these events.
Samples table mode: The format to be used for the Samples sheet.
Calendar: Lists all signals' and conditions' values using real-world timestamps.
Chain: The same as Calendar mode, but filtered to only include timestamps where capsules are present.
Capsule: Lists signal values within each capsule. Timestamps are zero-based from the start of each capsule.
Sample table grid: The grid option determines the timestamps that will be reported in the sample table.
Automatic: Resamples the signals to a grid period based on the amount of time being exported.
For example, exporting 1 week of data will result in a grid period of 5 minutes. A 1 year export will use a 1 day grid period.Custom: Resamples the signals according to the grid period you set. For example, a grid period of 1 hour leads to values with timestamps separated by an hour.
Override Grid Origin: The specific date and time to orient the grid period. For example, this allows a weekly grid to be calculated every Monday at 9:00 AM rather than the default of Sunday at midnight.
Ungridded original timestamps: Each signal’s original samples will be output.
Signals: Modify the list to only include the signals desired in the export.
Conditions: Modify the list to only include the conditions desired in the export.
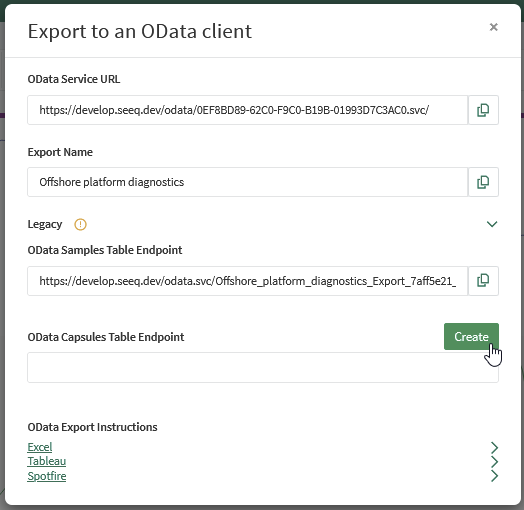
Exporting to Other Applications
From the 'Export to an OData client' window, select the desired import application from the menu at the bottom for detailed instructions.
Copy the data export link and paste it to your preferred application.
Data Exports
There are two parallel OData services available: Legacy and Modern.
All defined OData exports are able to be exported using either service. Specifying a Modern or Legacy URL will dictate which service Seeq will utilize.
Administrators can set the Features/OData/DefaultProtocol configuration option to 4.0 to enable the Modern service as the default experience. 2.0 will show the Legacy export URLs instead.
Modern OData Exports
Modern exports are accessed via /odata/{id}.svc URLs. These endpoints support up to OData Version 4.0.
Six tables are available within each OData Export: Information, Items, Samples, Capsules, Statistics, and StatisticsSignalsWithinCapsules.
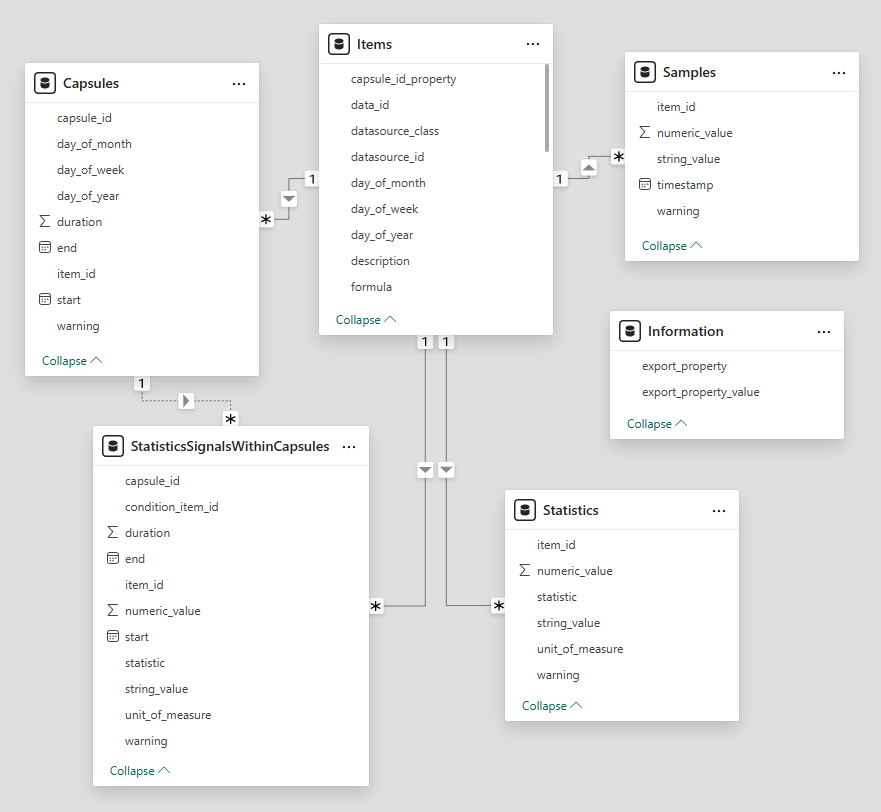
Information Table
The Information table details the meta information about the export. It includes which configuration options were used to generate the export, the link back to Seeq where this export can be modified, and other such data.
Items Table

The Items table lists the properties of all exported items.
Their Seeq ID, type, name, asset path, and description are listed first. All other metadata properties follow after that in alphabetical order (minus specific properties that are unlikely to be useful such as UI Config). Finally, any conditions with capsule properties list those properties alphabetically and their associated unit of measure.
Note: The Asset Path column uses the ǀ (Unicode U+01C0) character as the asset separator if trying to split this value based on a delimiter in the other application. This character is used to avoid accidental splits on strings that may contain other characters readily available on the keyboard.
Samples Table
The Samples table reports the value of each signal at different timestamps. The grid period options determine the timestamps that will be output. The signal’s value at the given timestamp will be present in either the numeric_value or string_value column, depending on the signal type.
Calendar and Chain mode
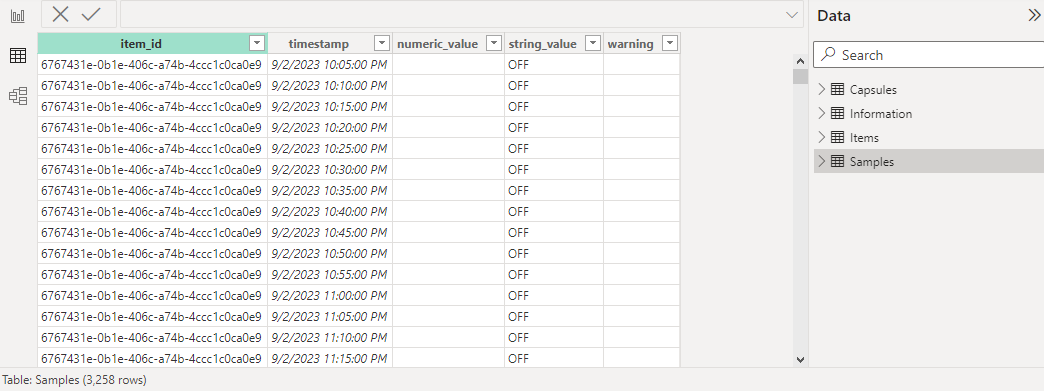
These modes output the signals' value at each real-world timestamp. Calendar mode lists all timestamps within the exported interval. Chain mode filters out times where no capsules are present.
Capsule mode
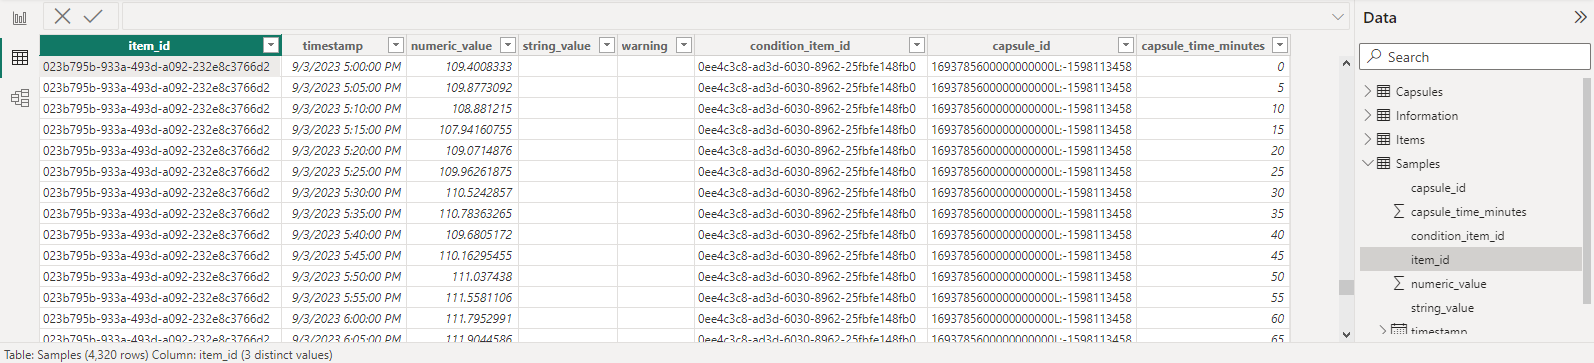
Capsule mode represents a signal segment within each capsule. This data includes the same columns as Calendar/Chain mode, but also include the condition’s ID, the capsule’s ID, and the time this sample is located relative to the capsule’s start (in minutes).
Capsules Table

The Capsules table lists all capsules within the exported time range. The start, end, and duration are listed for all capsules (when available) followed by the capsule properties in alphabetical order.
Statistics Table

The Statistics table reports on the overall statistic values over the exported time range. The output statistic options differ based on whether each item is a numeric/string signal or a condition.
Stipulations about statistics:
Statistics for interpolated signals are time-weighted based on the interpolation method. The
.toDiscrete()formula can be used to get unweighted statistics.Statistics are calculated over the entire exported time range. Interpolated signals' can include weightings that are not represented in the Samples table if the export start and end are not aligned to the sample keys. The selected Samples table mode is not used to limit statistics' inputs.
Infinite and Invalid input values are filtered away to not skew results.
Infinite and Invalid output values are represented in the
string_valuecolumn.
Statistics Signals Within Capsules Table
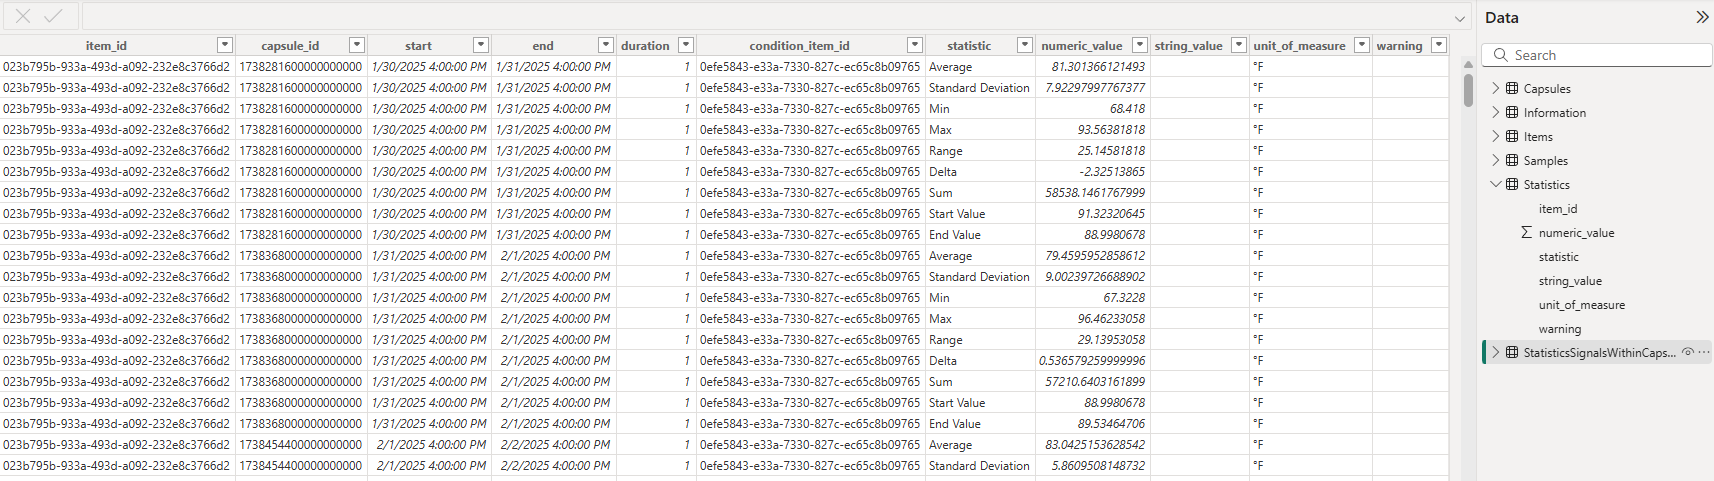
The “Signals within Capsules“ Statistics table reports on the signal statistic values within each capsule. The output statistic options differ based on whether each signal segment is numeric or string.
Stipulations about statistics:
Statistics for interpolated signals are time-weighted based on the interpolation method. The
.toDiscrete()formula can be used on the signals to get unweighted statistics.Statistics are calculated over the entire capsule’s time range. Interpolated signals' can include weightings that are not represented in the Samples table if the capsule start and end are not aligned to the sample keys.
Capsules where the start and end timestamps are identical are considered by the system as having a length of 1ns for calculating statistics.
Infinite and Invalid input values are filtered away to not skew results.
Infinite output values are represented in the
string_valuecolumn. Invalid output values are filtered away.
Legacy OData Exports
Legacy OData exports are deprecated as of October 2024 and will be removed after March 2026.
Please migrate all exports to modern OData endpoints before this date to avoid disruptions.
Note: The columns output by legacy OData exports are based on the signal and condition names & asset paths. If any duplicate columns are present, it can cause errors for some clients. If exports with duplicate columns are defined, archive those exports and clear your client cache to fix the issue.
Note: Memory limitations for legacy exports may cause exports to return 502 Bad Gateway responses or 400 responses with a This OData export is estimated to be larger than the server configuration allows... error message. Systems which regularly export large amounts of data will likely want to preemptively increase Memory/Appserver/Size and/or Memory/Appserver/OData/MaxEstimatedMemoryUtilization config options to ensure legacy exports work as expected.
It is generally a good idea to limit the expected size of legacy exports to prevent memory errors and to get responses quickly. The specifics vary from server to server, but ensuring your exports have fewer than 10 items and 100,000 rows is a good upper boundary to help ensure performance.
Legacy exports are accessed via /odata.svc/{name}_DataSet URLs. These endpoints support up to OData Version 2.0.
Each export configuration equates to a single table. This table can either be a Samples or Capsules export.
When the Features/OData/DefaultProtocol configuration is set to 4.0, the legacy export links can be accessed by expanding the Legacy section of the “Export to an OData client” modal.
Samples Export
The Samples table reports the value of each signal (and condition) at different timestamps. The grid period options determine the timestamps that will be output.
Note: For items coming from asset trees, Seeq includes the asset pathway along with the item name in column names. If trying to split this name based on a delimiter in the other application, the character Seeq uses to separate the asset pathway is ǀ (Unicode U+01C0). This is due to the OData standard’s column name limitations and to avoid accidental splits on strings that may contain other characters readily available on the keyboard.
Calendar and Chain mode
These modes output the signals' value at each real-world timestamp. Conditions are represented as signal-like data using the $condition.countOverlaps() formula function.
Calendar mode lists all timestamps within the exported interval. Chain mode filters out times where no capsules are present.
Capsule mode

Capsule mode outputs a column for each signal + capsule pair. The signal segments are gridded from the start key of each capsule.
Capsules Export

The Capsules table lists all capsules within the exported time range. The start, end, and duration are listed for all capsules (when available) followed by the capsule properties in alphabetical order.
Parameters
The following parameters can be specified in the URL when fetching an OData table:
Parameter | Description | Examples |
|---|---|---|
| Use the specified start and end for the exported time range instead of the originally-configured values. Supported date-time formats include ISO-8601 with offset ( Applies only to the tables with time-based outputs. See also: Note: When used with the Samples table, be sure you’ve specified a custom Sample Table Grid or Ungridded to ensure consistent sample frequencies are output. | Export the month of January 2022 (within the specified time zone) instead of the originally-configured time range. |
| Filter out rows that do not match the specified predicate(s). Supported predicates include the following:
Note: All rows that would be output by the unfiltered table must still be calculated (except as specified below). It is more efficient to do filtering natively in your analysis due to caching and the more robust compute service. As an alternative to the Supported by Modern exports only. | Return only sample rows where the value is positive. Filter to only rows where the sample value is a string that contains the word “Transition.” Output only a specific condition’s capsules. Find all capsules before January 3rd that have a valid value for “My Custom Capsule Property.“ Query for all samples from March 21st in Mountain Standard Time, regardless of the time range configured in Seeq. |
| Output only the columns specified in the parameter. Supported by Modern exports only. | Output only the Name, Item ID, and Type columns of the Items table. |
| Specify the maximum number of seconds to wait for each page of data from the Calculation Service before the sub-task is cancelled. Data requests that exceed this timeout are output as an Entity with descriptive Warning text. If not specified, the configuration option defaults to 10 minutes. Supported by Modern exports only. Only affects tables that use the Calculation Service. | Allow each page of data to take up to 20 minutes to complete before a cancellation occurs. |
| Set the maximum number of page timeouts that may occur before the OData service will cancel the request rather than outputting a warning. If not specified, the configuration option defaults to the number of concurrent sub-tasks that can run at once ( Supported by Modern exports only. Only affects tables that use the Calculation Service. | Cancel the request immediately when the first |
Administration and Performance
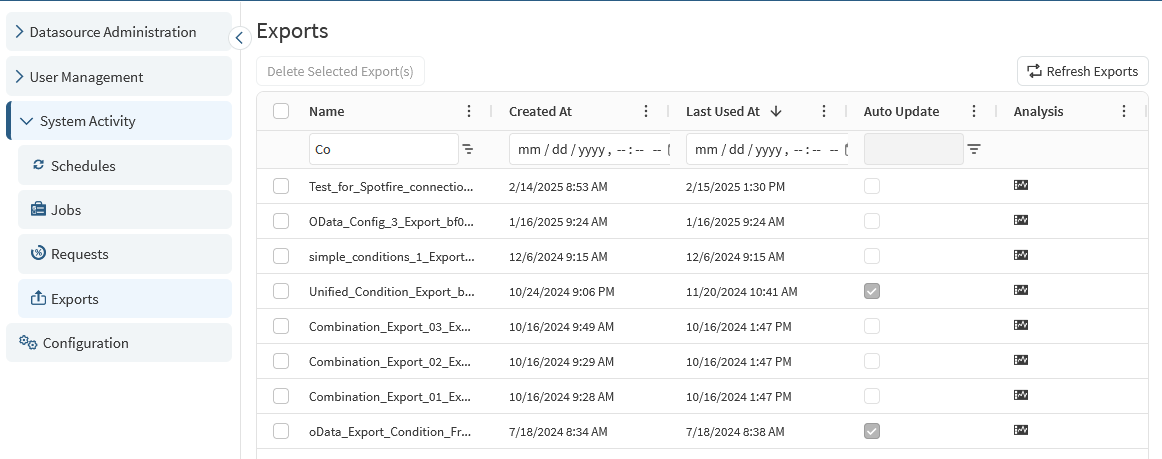
View OData Exports
The complete list of OData exports can be viewed from the Administration page’s “Exports” tab. This page allows filtering, sorting, and archiving exports as needed. The page also includes the date the date the export was created and was last run/updated (adjusted to your local time zone) and a link to the workbook it was made from.
Configuration Options
Many configuration options are available that alter the behavior and performance of OData exports from a system administration perspective.
Features/OData/DefaultProtocol decides which service will be shown by default - 4.0 will provide users with Modern export links, 2.0 will use the Legacy service’s URLs. This option can be overridden by fully disabling the Legacy service using Features/OData/Legacy/Enabled and forcing only the modern service to be used.
Threads/OData/*/Count corresponds to the number of worker threads that will be available to process OData requests concurrently. The Initialization thread pool handles initial triage and metadata requests while Processing covers the actual table outputs. Higher values mean that more requests can be processed concurrently, but could have negative impacts on the rest of the system performance and reliability.
Threads/CalcEngine/Parallelization/MaxThreadsPerODataExport indicates the maximum number of concurrent sub-tasks that each Threads/OData/Processing/Count thread will break work into, usually one sub-task per signal/condition being exported. Each parallel sub-task can take up to Features/OData/StreamPageTimeout seconds (default 600 sec) before it will be cancelled and output a warning; each export can endure Features/OData/StreamPageTimeoutMaxWarnings timed-out tasks before the entire export fails. These latter two configurations can be overridden per request using the corresponding URL parameters.
Any requests that are not actively being worked on by the thread pool go into a queue, whose size is dictated by Threads/OData/*/QueueSize. Actively running requests can also be sent back into the queue based on the Features/Reprioritizer/* configuration.
If requests to the Legacy metadata endpoints (/odata.svc and /odata.svc/$metadata) are negatively impacting request throughput, the Features/OData/Legacy/SkipCapsuleTimeSchemas configuration option can be enabled to skip the output of Capsule Time exports from those metadata documents. Not needing to calculate the capsule data can greatly reduce the processing time of these documents.
The Features/OData/PreventDuplicateConcurrentRequests configuration can be enabled to cause older versions of requests to be cancelled if an identical re-request of data is made by the same user.
Refer to the configurations' description of the remaining OData options for more details.
Examples:
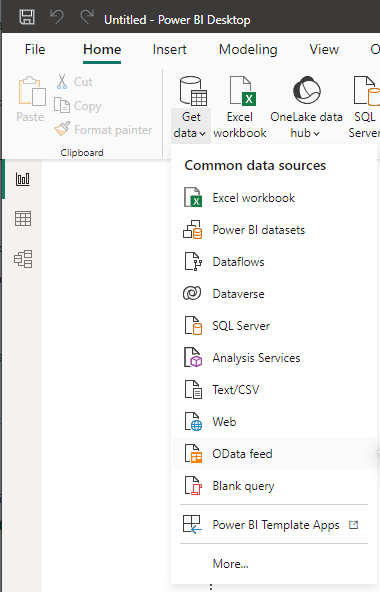
Authenticating using Seeq Username and Password or Access Key in Microsoft Power BI Desktop
Step 1. Open Microsoft Power BI and navigate to the "Get Data" dropdown → OData option selection (note it must be the desktop version of the application).
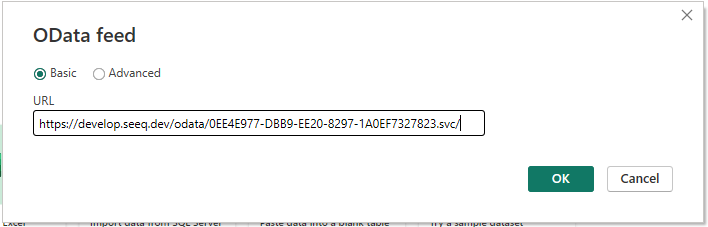
Step 2. Insert the export URL and click OK. Select “Basic” authentication and enter your Seeq login credentials.
Either an Access Key or your regular username+password are acceptable. Access Keys must be used if you log into Seeq using Single Sign-On such as Azure Active Directory or Okta.
Note for OData automations: Access Keys by default are valid for 1 week after logging into Seeq interactively. You may need to work with an admin to increase your key’s duration.

Step 3. Load the relevant tables.
Select the desired tables and click Load.
It’s usually simplest to load all tables. You may be able to omit the Information and either Samples or Capsules tables depending on the information needed.

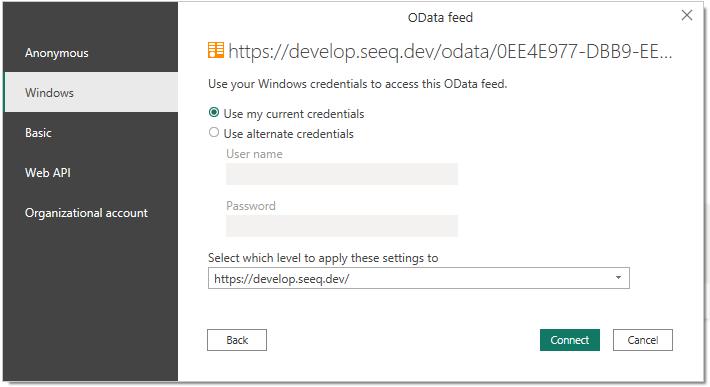
Authenticating using Passwordless Windows Auth in Microsoft Power BI Desktop
Step 1. Open Microsoft Power BI and navigate to the "Get Data" dropdown → OData option selection (note it must be the desktop version of the application).
Step 2. Insert the export URL and click OK. Select “Windows” authentication and click "Use my current credentials."
Note that this method is only supported for systems using the Windows Auth Connector or the LDAP Connector to provide passwordless authentication for users, and the user logged into Windows must match a Seeq user who has access to the exported content. If you are using an authentication provider that is not currently supported, please utilize Access Keys as credentials for the OData Export.
Configuring Automatic Refresh in Power BI Cloud Service
Objective: Automatically re-import all data from Seeq to Power BI on a periodic basis to ensure dashboards are up to date with the latest information.
This method is best for smaller data sets, static periods of time, or where the underlying data is subject to change.
Step 1. If you have created your dashboard in Power BI Desktop, navigate to the publish button and select your target workspace. Publish your report and the associated dataset to the Power BI Service.
Step 2. Navigate to the Settings page of your dataset in the Power BI Service. Click configure on your Data Source Credentials
Insert your Access Key here as the username & password. Access Keys must be used if you log into Seeq using Single Sign-On such as Azure Active Directory or Okta.
Note for OData automations: Access Keys by default are valid for 1 week after logging into Seeq interactively. You may need to work with an admin to increase your key’s duration for a particular user account.
Step 3. Configure refresh schedule
When the dataset refreshes it will pull the latest data that matched the configuration of your oData export. In order get live data your export must either use the "Auto update" option in your initial configuration or the "End Date" of your configuration needs to be set into the future such as 1/1/2030
=
Configuring Incremental Refresh in Power BI Cloud Service
Objective: Automatically import only the latest data from Seeq to Power BI on a periodic basis to ensure dashboards are up to date with the latest information.
This method is best for larger data sets, rolling windows of time, and where most of the historic data is not subject to change.
Step 1. From Power BI Desktop, authenticate an OData Connection as described in the applicable “Authenticating … in Microsoft Power BI Desktop” example section.
Select the desired tables and click “Transform Data” (not “Load”) to open the Power Query Editor.
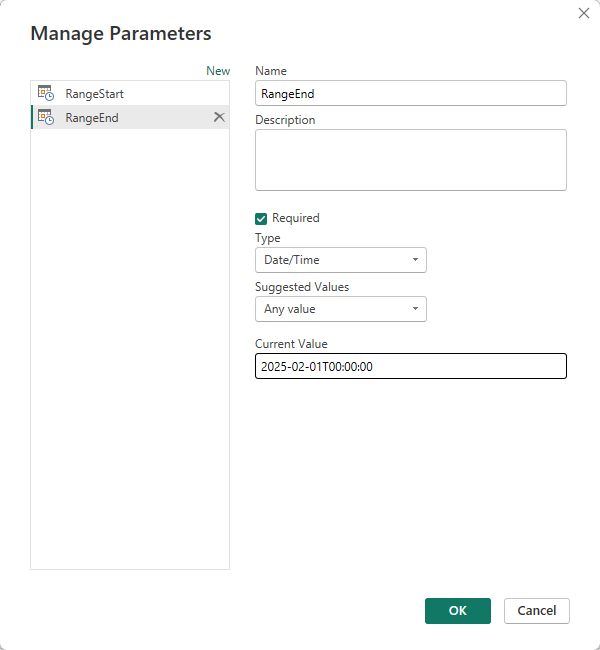
Step 2. From the Home ribbon, choose “Manage Parameters.”
Create two new parameters named RangeStart and RangeEnd, both of type “Date/Time” (not “Date/Tome/Zone”) and give them both a reasonable default value for testing. Click “OK.”
Note: These are special parameter names designated by Power BI. More information here about what is allowed and their usage.
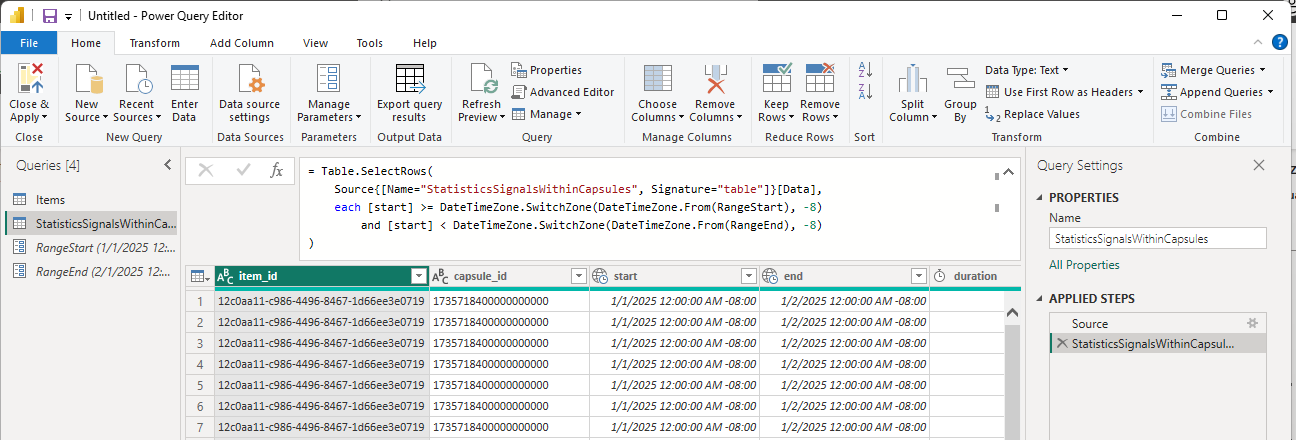
Step 3. Modify the Power Query of the table(s) to filter the start, end, or timestamp column to only include values between RangeStart & RangeEnd. For example, the below Power Query gets all capsule stats which start in the specified range (in US/Pacific). Verify the data looks as expected then click “Close & Apply.”
= Table.SelectRows(
  Source{[Name="StatisticsSignalsWithinCapsules", Signature="table"]}[Data],
  each [start] >= DateTimeZone.SwitchZone(DateTimeZone.From(RangeStart), -8)
    and [start] < DateTimeZone.SwitchZone(DateTimeZone.From(RangeEnd), -8)
)
Note: You must either convert the RangeStart & RangeEnd values to DateTimeZones type or convert the start, end, or timestamp column to DateTimes type to be able to compare them. Power BI does not currently support incremental refresh with DateTimeZone parameters.
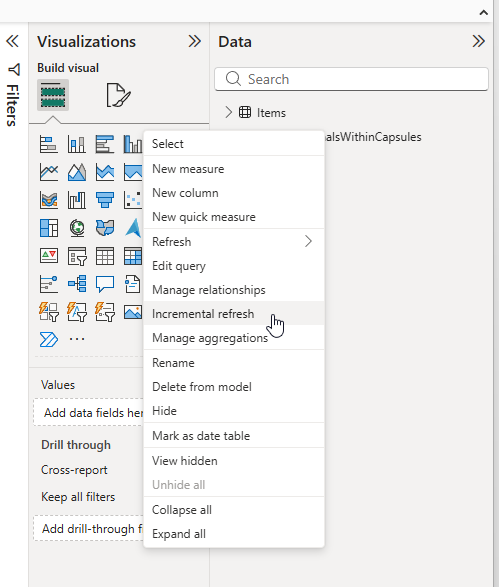
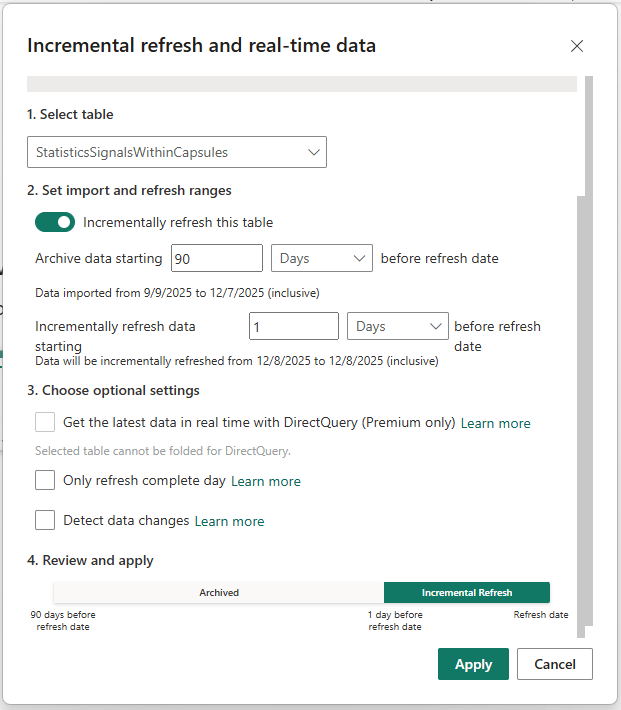
Step 4. In the Data pane, right-click on each of the applicable tables and choose “Incremental refresh.”
Enable “Incrementally refresh this table“ and choose the config options that make sense for your dashboard. Click “Apply.”
Note: Be sure that the “Incrementally refresh data starting {duration} before refresh date” time is large enough to fully encompass non-cachable regions as seen in Workbench or use the .certainOnly() formula to only export certain data. Power BI may cache incorrect values if this is not configured correctly.
Joining Modern OData Tables in Microsoft Excel
Objective: Merge a modern OData data table, such as Samples or Capsules, with item information to make the results more human-readable.
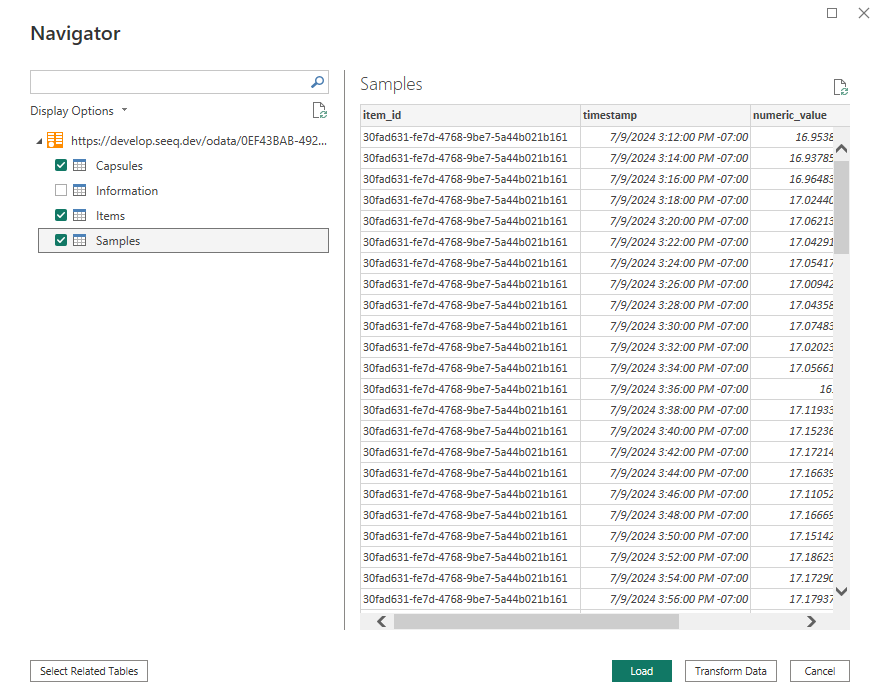
Step 1. Launch the Import Data tool.
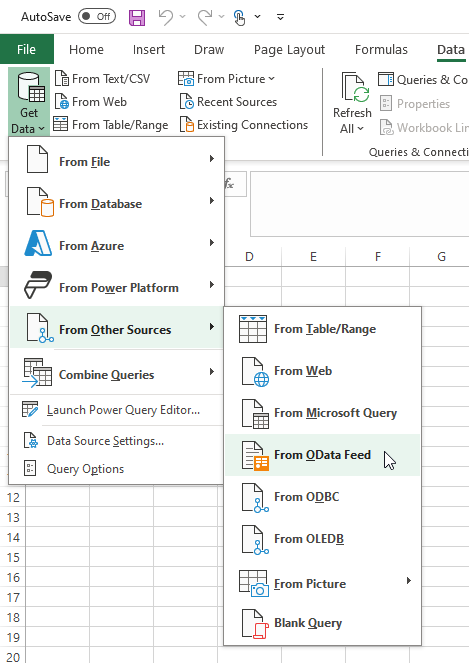
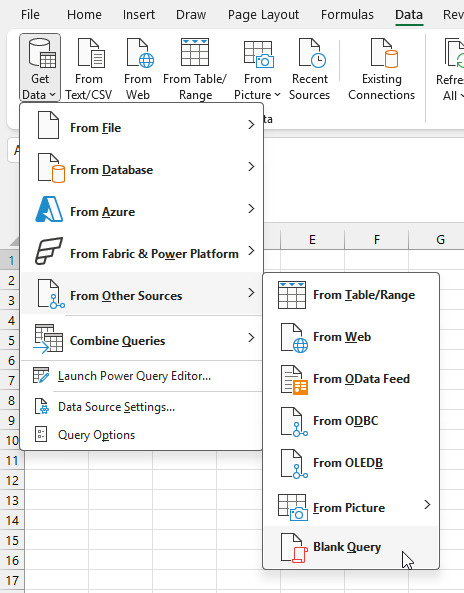
Open Microsoft Excel. Navigate to the “Data” tab, choose the "Get Data" dropdown → “From Other Sources“ → “OData Feed.“ Insert the export URL and click OK.
If necessary, authenticate using an Access Key or Windows Auth as described above.
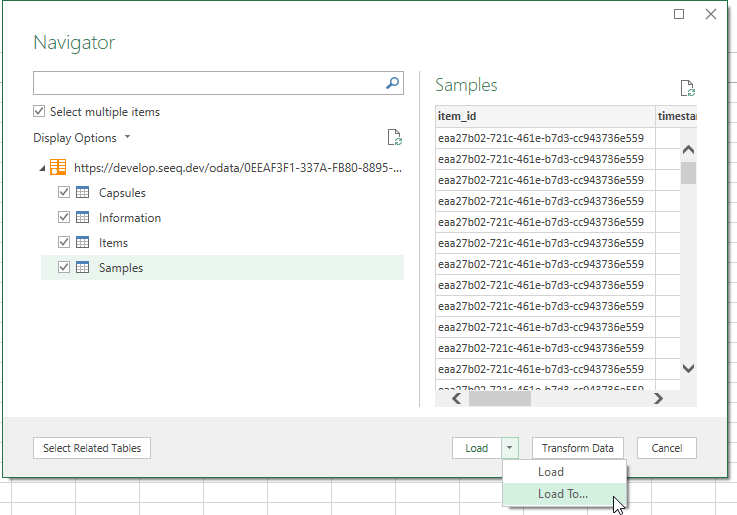
Step 2. Download the raw table data.
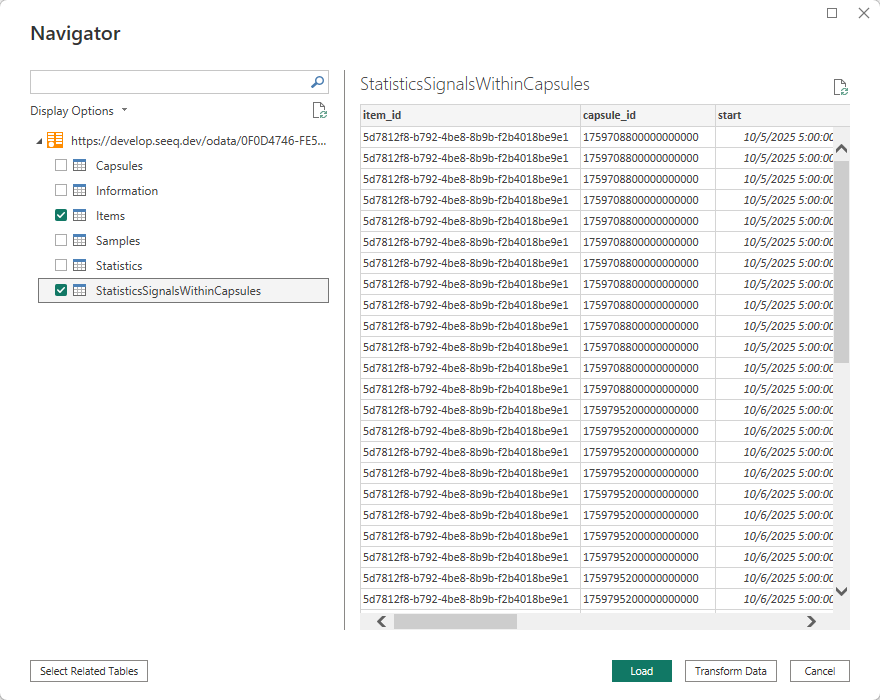
From the Navigator modal, check the “Select multiple items“ option. Select the desired tables. Then click “Load To.“
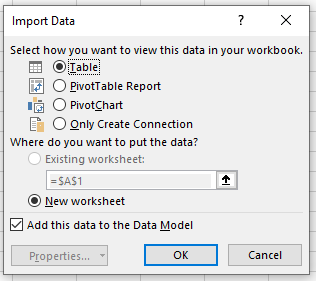
On the Import Data form, select “Table” and “New worksheet“ then clock OK. This will load each of the tables' raw data as their own sheet.
Step 3. Join the Items table to a data tables.
The Samples or Capsules table is not particularly human-readable in its default state. Excel can merge multiple tables to help with this.
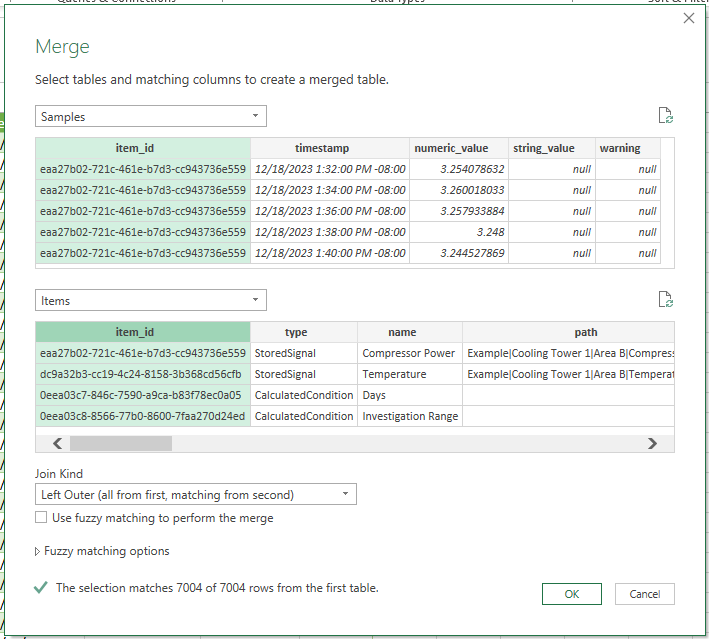
From the “Data” tab, choose the "Get Data" dropdown → “Combine Queries“ → “Merge.”
From the Merge window, select the desired data table for the first selection and the Items table for the second. Highlight the item_id columns in each. Ensure Left Outer join is selected. Then click OK.
From the Power Query Editor window, you can select which columns from the Items table to include. In this example, we will Expand the table to include the Name, Path, and Description. Click OK and the preview will be shown in the Power Query Editor.
Click the “Close and Load” button to load those results into a new worksheet.
Tip: Always join on item_id. Unlike column names, which may overlap or change, item_id is guaranteed unique across exports and ensures reliable joins.

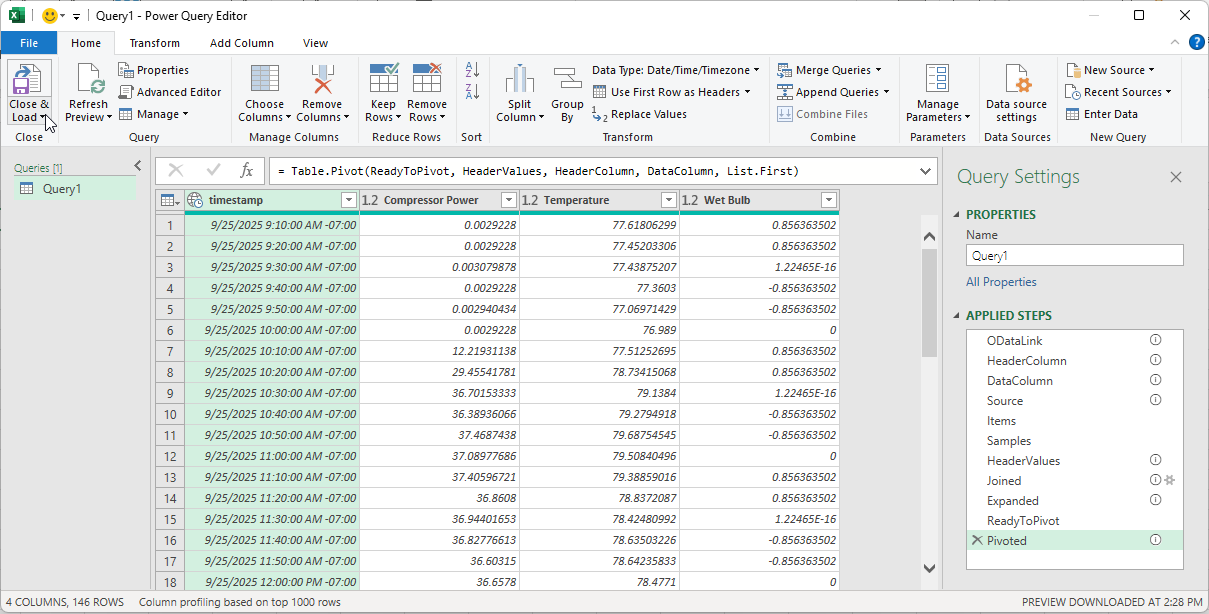
Recreating the Legacy Samples Table Format Using Power Query in Microsoft Excel
Modern exports return multiple tables. If your workflow expects a single “wide” table like the legacy service’s sample table, use the steps below.
Objective: Convert the modern Samples table “long format” to the “wide format” of the legacy exports so existing dashboards can use to the modern service without modifying business logic.
Step 1. Create a new blank query in Advanced mode
Open Microsoft Excel. Navigate to the “Data” tab, choose the “Get Data” dropdown → “From Other Sources“ → “Blank Query.”
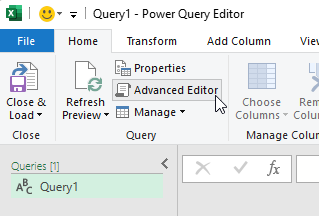
From the Power Query Editor modal, click “Advanced Editor.“
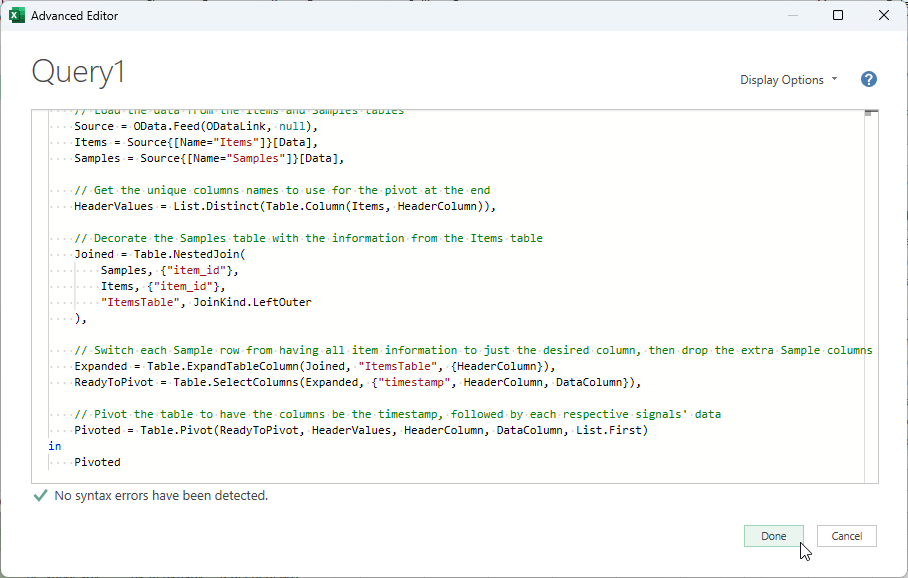
Step 2. Paste the below Power Query code into the editor.
Customize the first few inputs as needed.
Step 3. Click “Done” and verify preview.
Ensure no syntax or table errors are present.
If necessary, authenticate using an Access Key or Windows Auth as described above.
Step 4. Click the Close & Load button to load the data to the current sheet.
Migrate a visualization in Microsoft Power BI Desktop from a Legacy to Modern URL
Step 1. Edit a dashboard.
Launch Power BI Desktop and open a report with a visualization that’s using legacy export URLs.
In this example, we’ll be using the Samples Table, but the same concepts also apply to the Capsules Table.
Step 2. Add the modern tables to the schema.
Navigate to the "Get Data" dropdown → OData. Insert the export URL and click OK.
If necessary, authenticate using an Access Key or Windows Auth as described above.
Select the desired tables and click Load.
Step 3. Swap the old values for the new ones.
Remove the legacy fields from the visualization. Navigate into the modern tables' data columns and substitute the new values in their place. Power BI will automatically join the item properties with the data tables.
Reconfigure any calculations or aggregations as necessary.
Delete the legacy tables from the schema to keep the dashboards efficient.
Save the report and publish to the web.
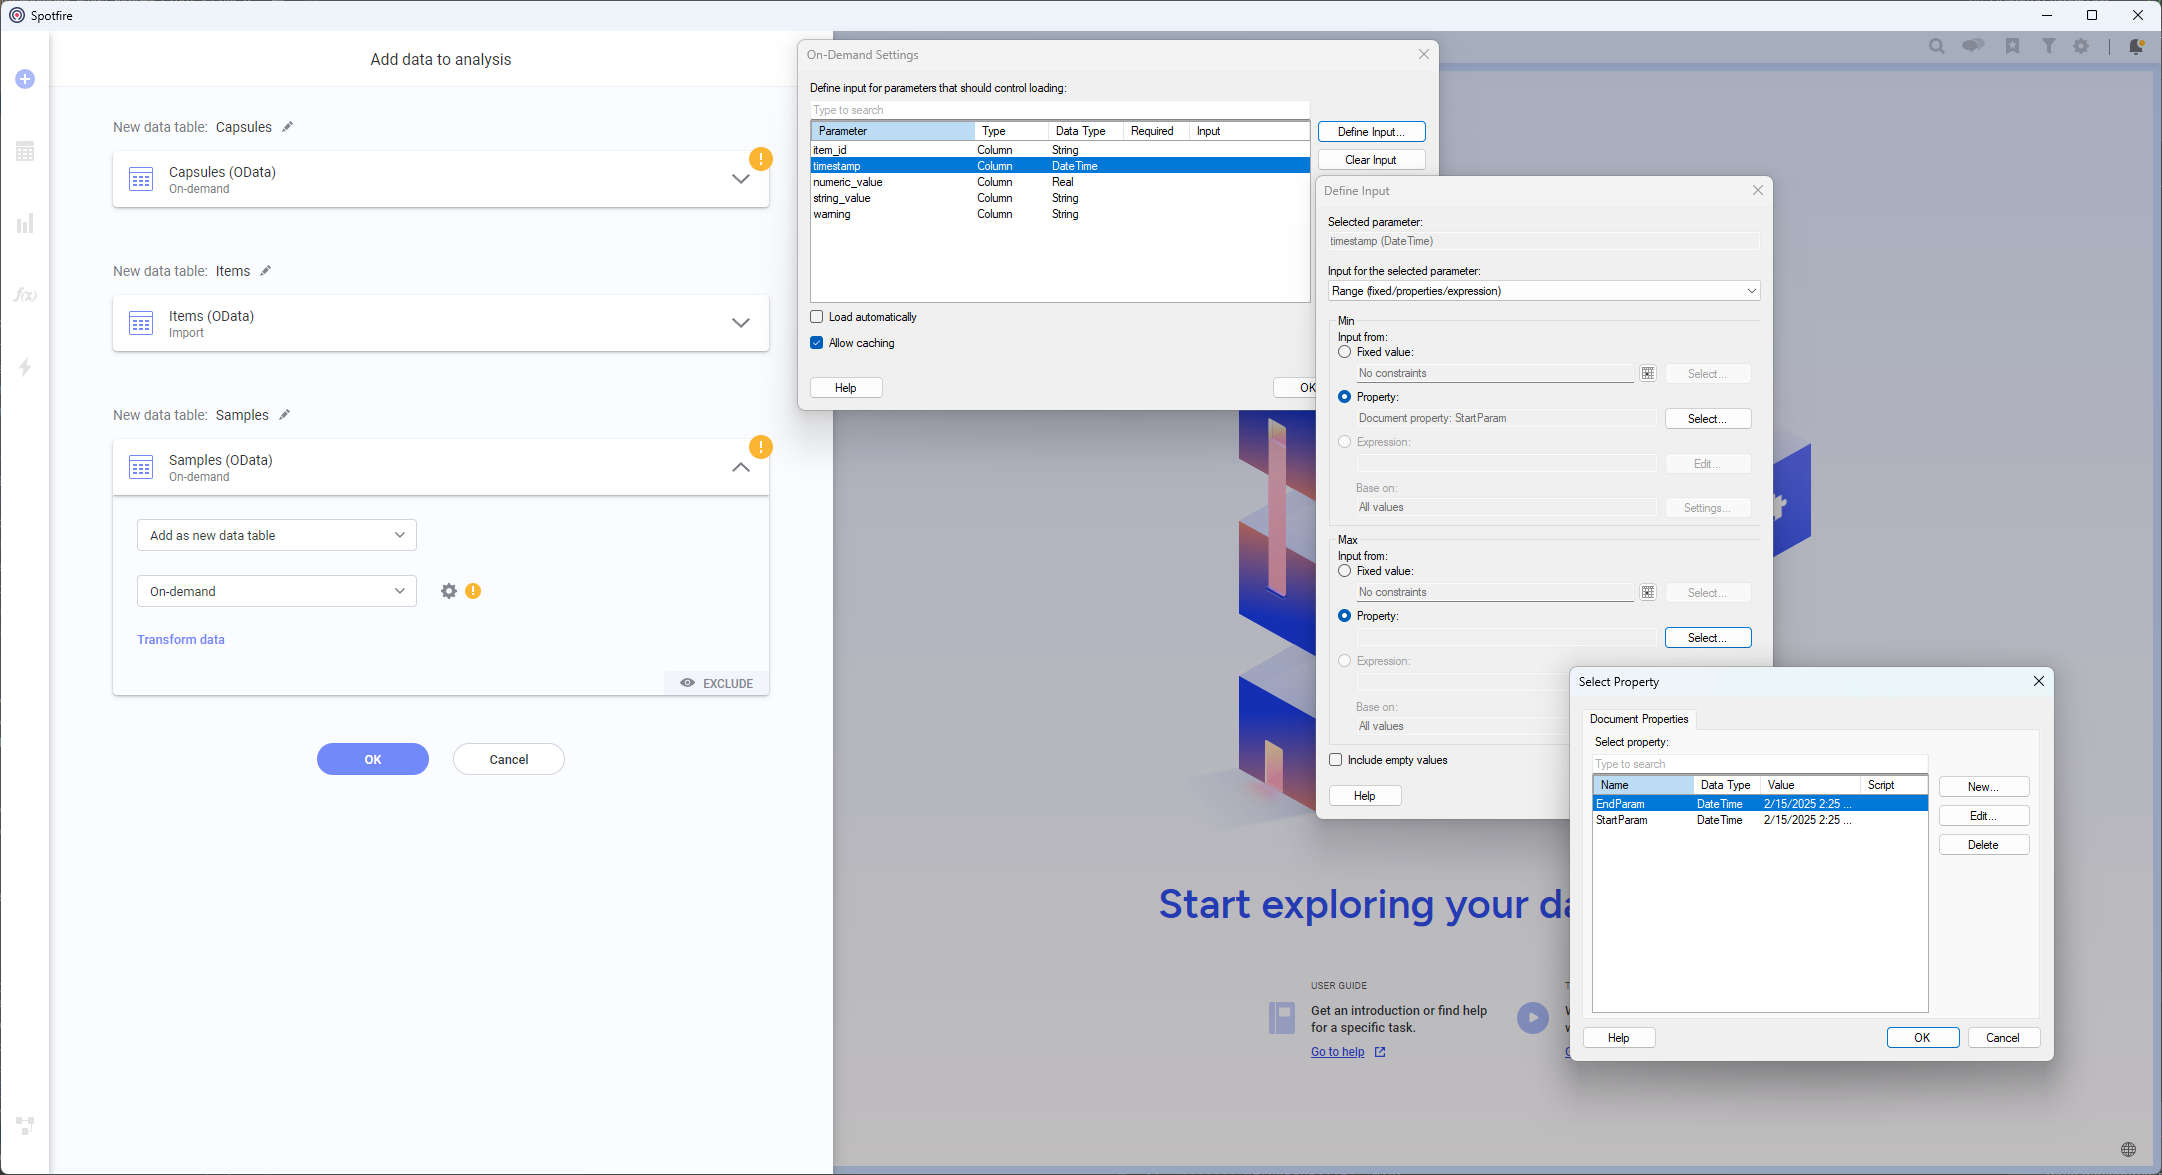
Use $filter to create a dashboard in Spotfire with On-Demand time ranges
Objective: Create a Spotfire dashboard that automatically updates to a new time range when interactive elements within that dashboard are modified.
Step 1. Launch Spotfire and set up an OData connection
Open TIBCO Spotfire. Navigate to “Add Data Table” → “Add” → “Connection to OData.” Insert your modern export URL and click OK.
If necessary, authenticate using an Access Key or Windows Auth.
Step 2. Connect to the tables and add On-Demand inputs
Add connections to the Items table and the Samples and/or Capsules tables as desired.
Configure the Samples/Capsules tables to use On-demand loading. Open the On-Demand Settings.
Select the timestamp (Samples Table) or start (Capsules Table) parameter, click Define a new input.
Use a Range input where the Min and Max come from a Property. For each Min and Max, open the Select Property input and then make a New Property – one DateTime that we’ll call
StartParamand oneEndParam.
Migration Checklist: Legacy OData → Modern OData
Use this checklist to ensure your exports and dashboards are successfully migrated before Legacy OData is removed after December 2025.
- Update the export URL
Replace legacy URLs:
https://site/odata.svc/MyExport_DataSet
with modern URLs:
https://site/odata/{id}.svc/Samples - Re-import the modern tables
Load the Items table and Samples or Capsules table as needed into Excel, Power BI, Spotfire, or other dashboarding application. - Join tables on
item_id
Merge Samples or Capsules with Items usingitem_idfor readable names, paths, and descriptions. - Recreate single-table format if needed
If your workflow expects the legacy Samples table “wide” format, apply the provided Power Query script to pivot the modern tables. - Rebuild visualizations or dashboards
Swap old fields for modern ones, confirm calculations, and remove legacy tables from your schema. - Verify authentication
Make sure you can log in using the modern OData URL before migrating your dashboards. If your site uses Single Sign-On (such as Azure AD or Okta), you must use an Access Key. If your site does not use SSO, you can connect with either your Seeq username and password or an Access Key. Windows Auth is also supported when enabled.